Project Setup Tutorials
Backlog setup tutorials
Your step-by-step to creating projects in Backlog
Learning new technology and processes can be a real hassle if you’re not provided with the resources to succeed. That’s why we put together a tutorial series to get you on the right track from the very beginning.
Get started creating, managing, and tracking your projects in Backlog with these simple-to-follow tutorials. Whether you’re a project manager, product manager, marketing manager, product developer, QA specialist, or almost anything in between, we probably have the tutorial you need. Each was created with numbered steps to help you set up your project. All you need to do is:
- Follow the steps set out numerically (i.e., setting up tasks, issues, creating issue types, etc.)
- Add details specific to your own project where indicated
- Track progress through to successful completion
- Click on the type of project you’re working on to get started!
Development
Bug Tracking
Quickly identify, track, and resolve every bug to perfect your product with our Backlog Setup Tutorial for Bug Tracking.
- Create a new Project in Backlog or go to one you’re currently working on that has bugs your team needs to start tracking. For our example, we’re using a project simply called “Bug Tracking”.Project Key: BGTRCK
- Enable all "Attributes and functionality."Note: Be sure to enable subtasking.
- Create issues for all of the bugs your team will be addressing and use the issue type “Bug” for each.
- For each issue, add in the following details:
- Description
- Severity
- Milestone
- Start & due dates
- Assign each bug to the appropriate team member.
- Use Backlog’s Gantt Chart view or Kanban-style Boards to track the progress of your assigned team member as the tasks move through the stages of completion.
- As everyone works, use @mentions to collaborate on tasks, gather feedback, and let others know when tasks are complete so that any dependent tasks can get started as soon as possible.
Roadmap
Plan out deadlines and priority levels for all of your team’s projects with our Backlog Setup Tutorial for Roadmaps.
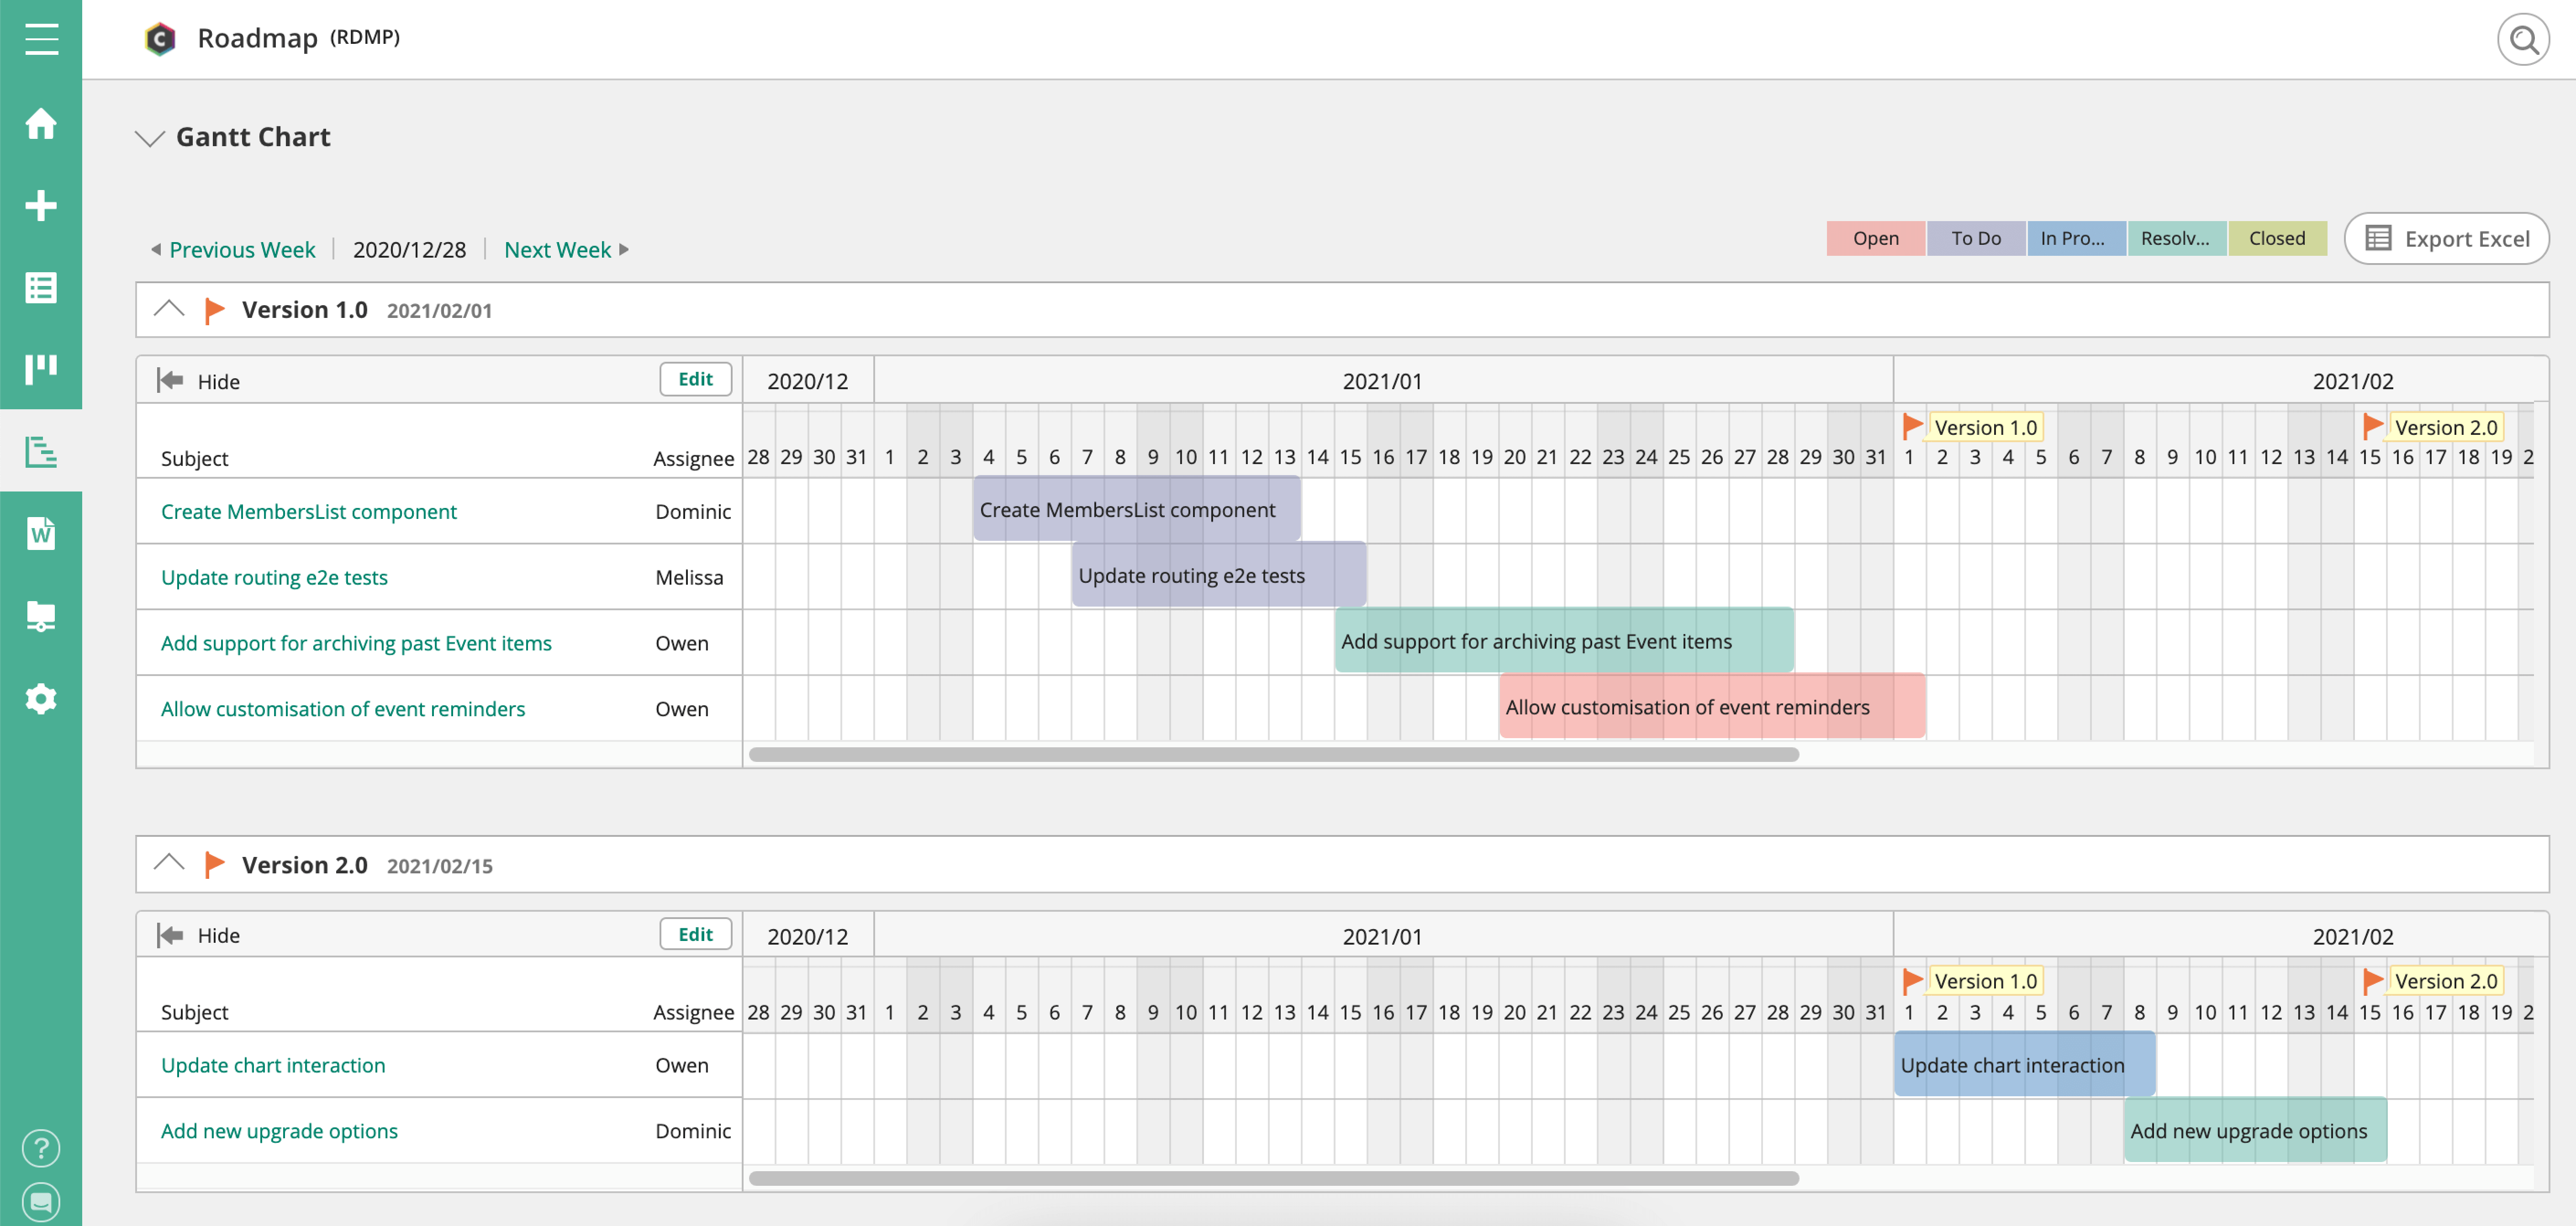
- Create a new project, and name it according to what you’re working on. For our demo, we’ll use “Roadmap.”Project Key: RDMP
- Enable all "Attributes and functionality."Note: Be sure to enable subtasking.
- Create Milestones under your project to denote the version of your release. We’re adding:
- Version 1.0
- Version 2.0
- Create all tasks for your roadmap. Use parent issues to denote larger goals and use child issues to break up the goals into individual tasks or jobs.
- For each task you add, include the following details:
- An assignee
- A start & due date
- A milestone
- Optional: A priority
- Use Backlog’s Gantt Chart view to view the Roadmap visually. Using this view, you can track progress by Milestone.
- As everyone works, use @mentions to collaborate on tasks, gather feedback, and let others know when tasks are complete so that any dependent tasks can get started as soon as possible.
Sprint Planning
Plan and track your development team’s next sprint with our Backlog Setup Tutorial for Sprint Planning
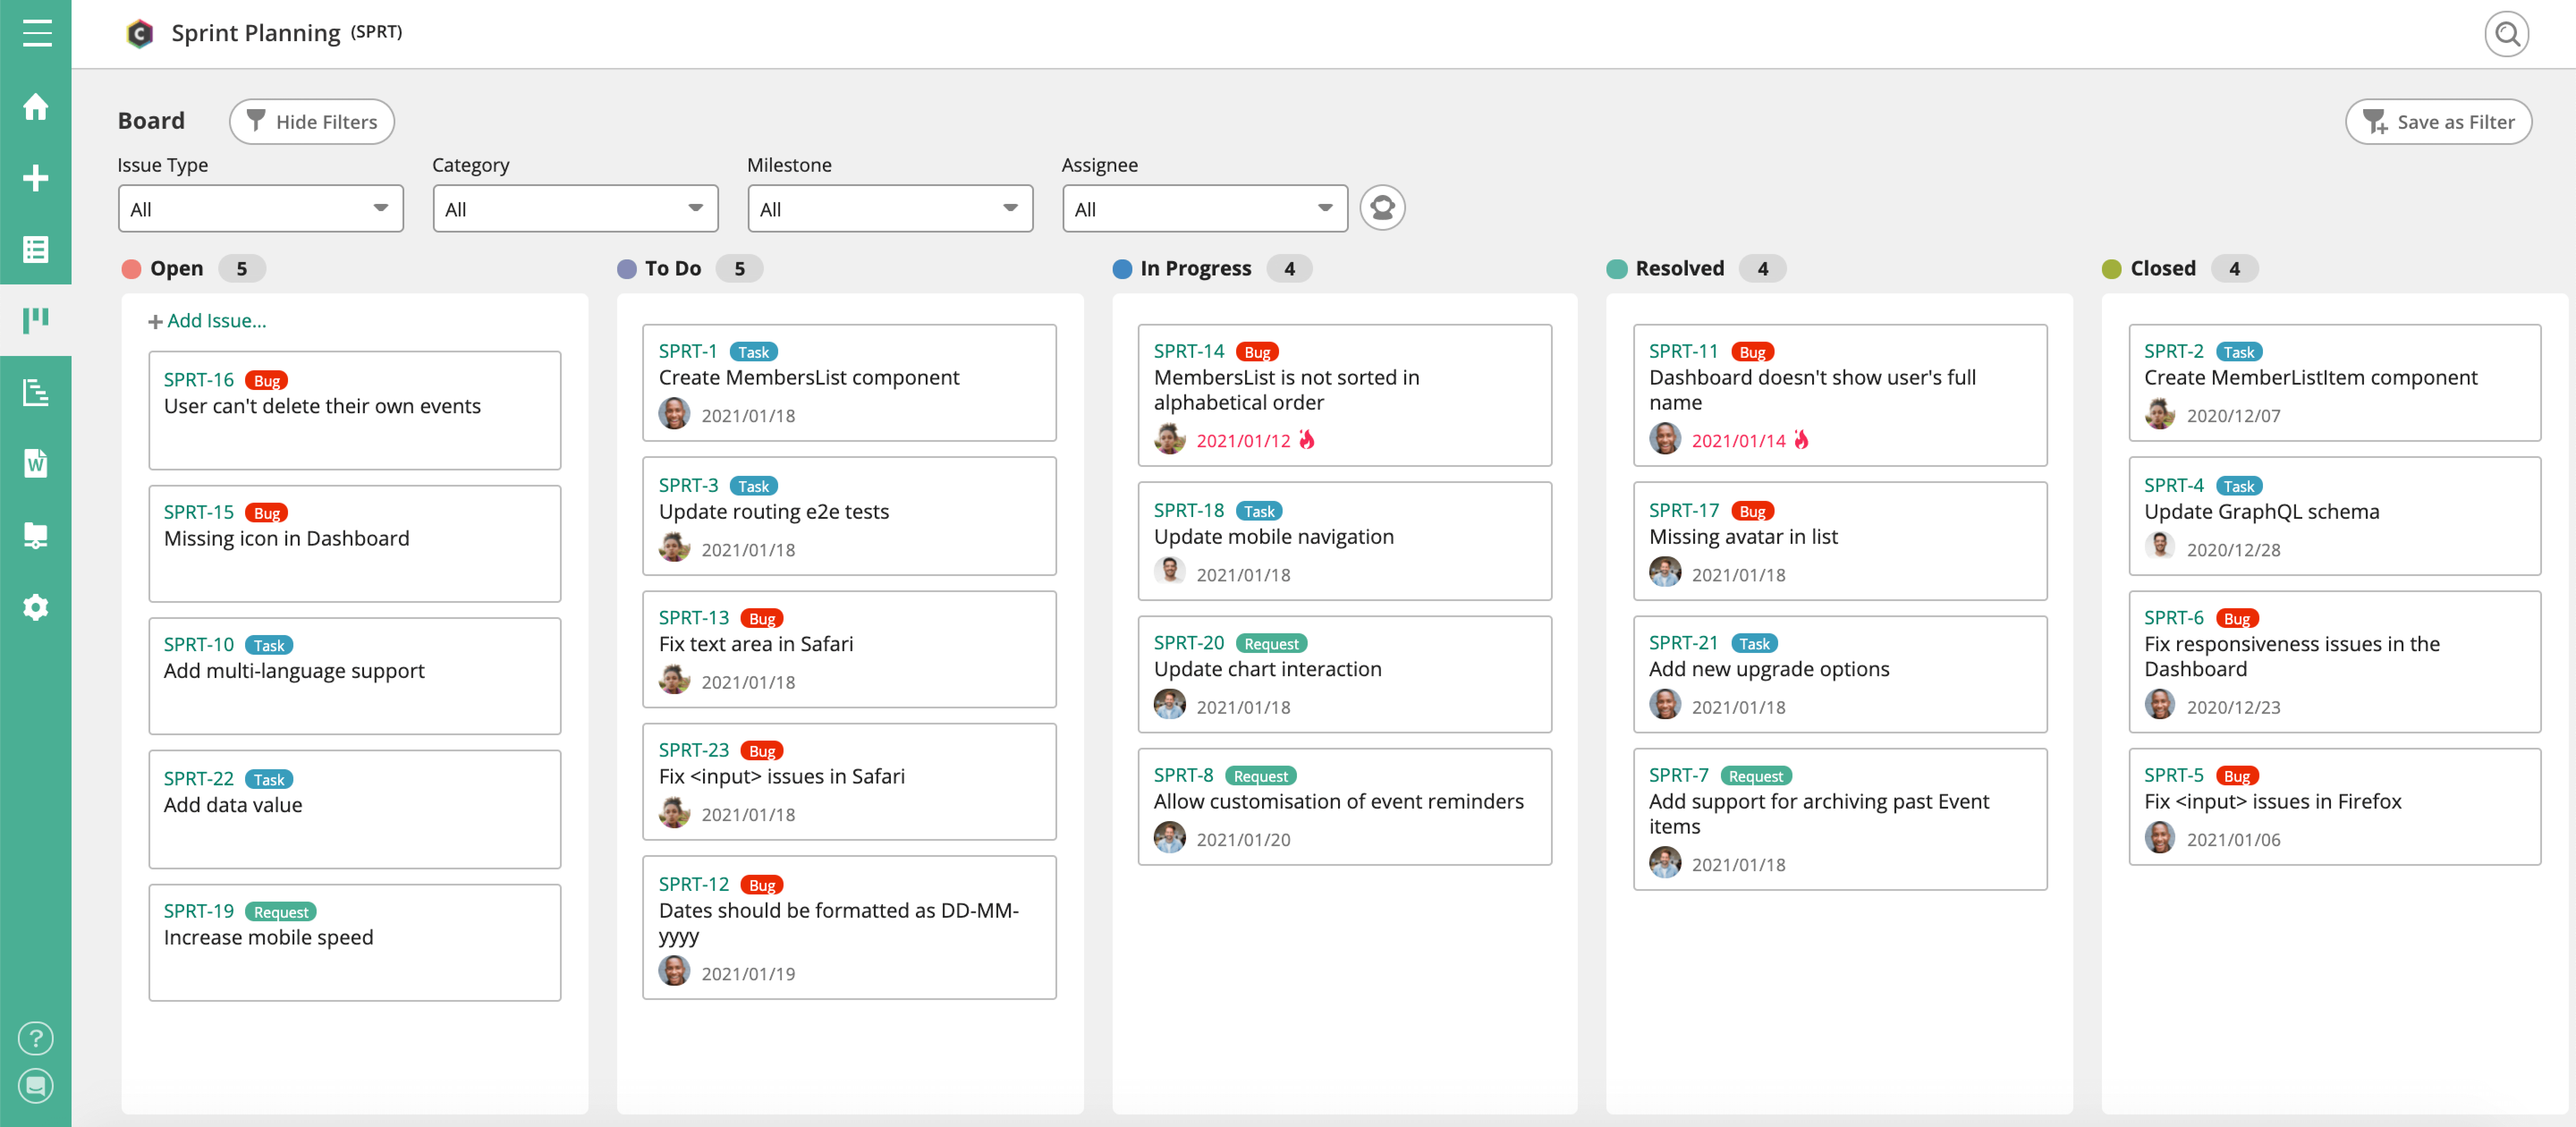
- Create a project called [Sprint] Planning, replacing “Sprint” with the name of your project.Project Key: SPNTPL
- Enable all "Attributes and functionality."Note: Be sure to enable subtasking.
- Create a custom status called “To Do” — in our example we’re using this status to denote which tasks will be added to the current sprint, but you can add other statuses that would be helpful to your team.
- Create issue types to reflect the types of tasks that will be involved. We’re adding “Request”, but you can add anything else you need.
- Create all tasks for your sprint. Use parent issues to denote larger goals and use child issues to break up the goals into individual tasks or jobs. You can prioritize tasks by due date or drag them into a specific order in your tasks list using the Kanban Board view.
- When it comes to starting your first sprint as a team, you will:
- Set the status for each task your team is taking on to "To Do"
- Assign each parent and child issue to a team member & add a due date
- Set the priority
For each subsequent sprint, you’ll repeat this process, moving tasks from To Do through Closed as your team completes the work. - As everyone works on the sprint, use @mentions to collaborate on tasks, gather feedback, and let others know when a task is complete so that any dependent tasks can get started as soon as possible.
Not using Backlog yet? No problem! Start a 30-day free trial — no credit card required — and you can start managing your sprint planning in Backlog today.
Quality assurance
Quality Assurance Management
Keep on top of QA testing to meet every deadline with our Backlog Setup Tutorial for Quality Assurance.
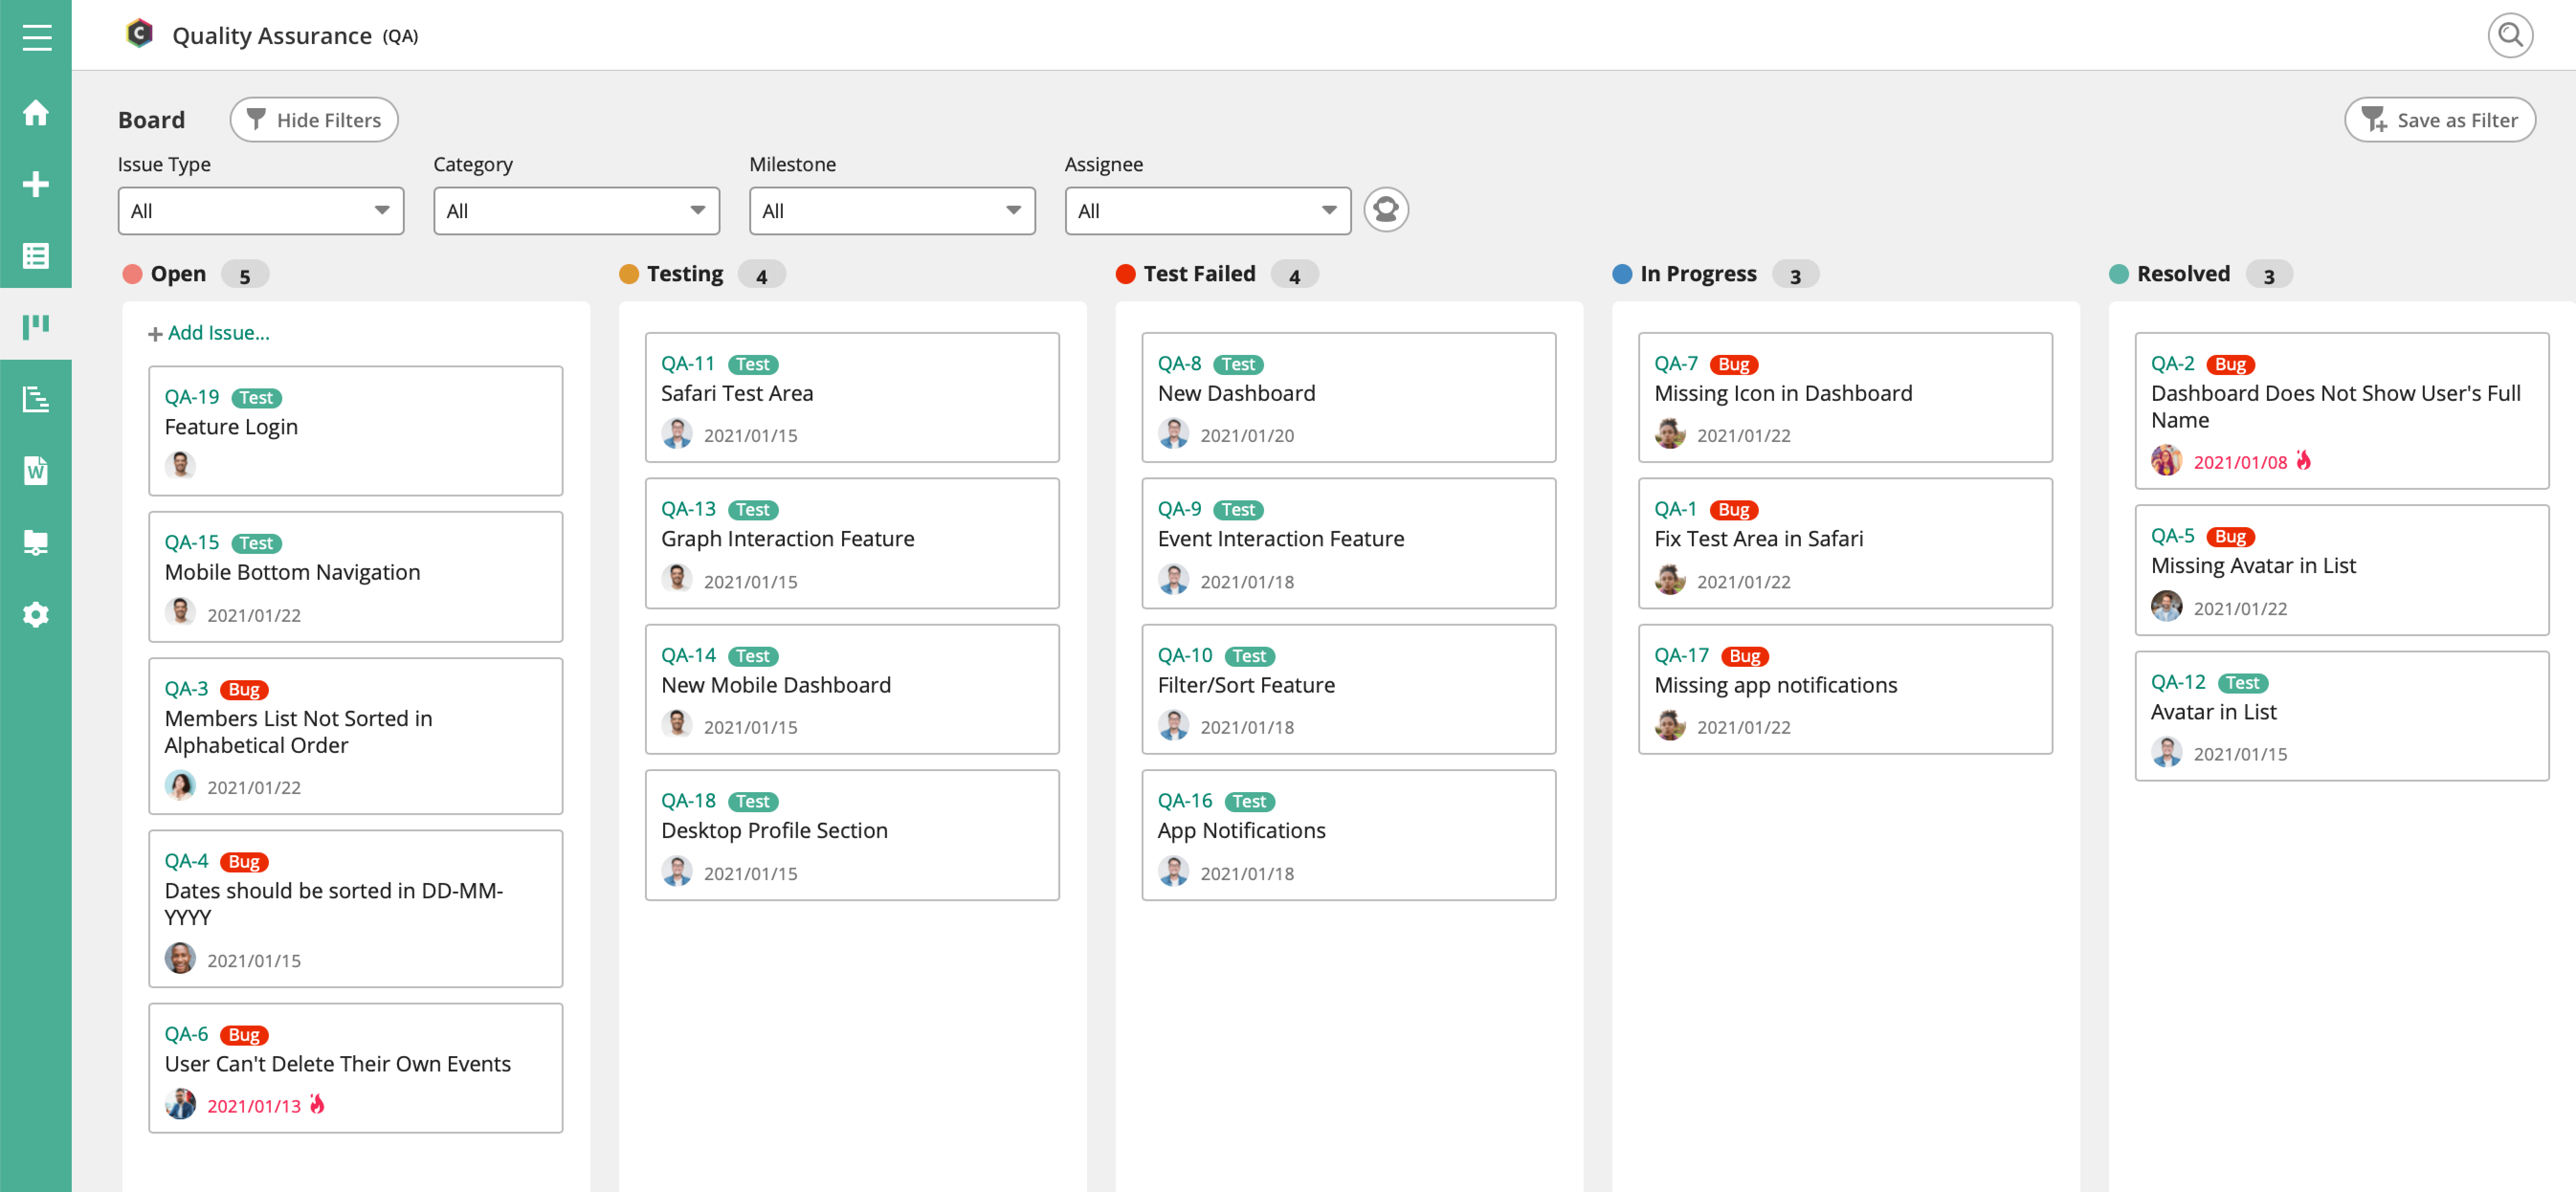
- Create a Project in Backlog for QA issues.Project Key: QA
- Enable all "Attributes and functionality."Note: Be sure to enable subtasking.
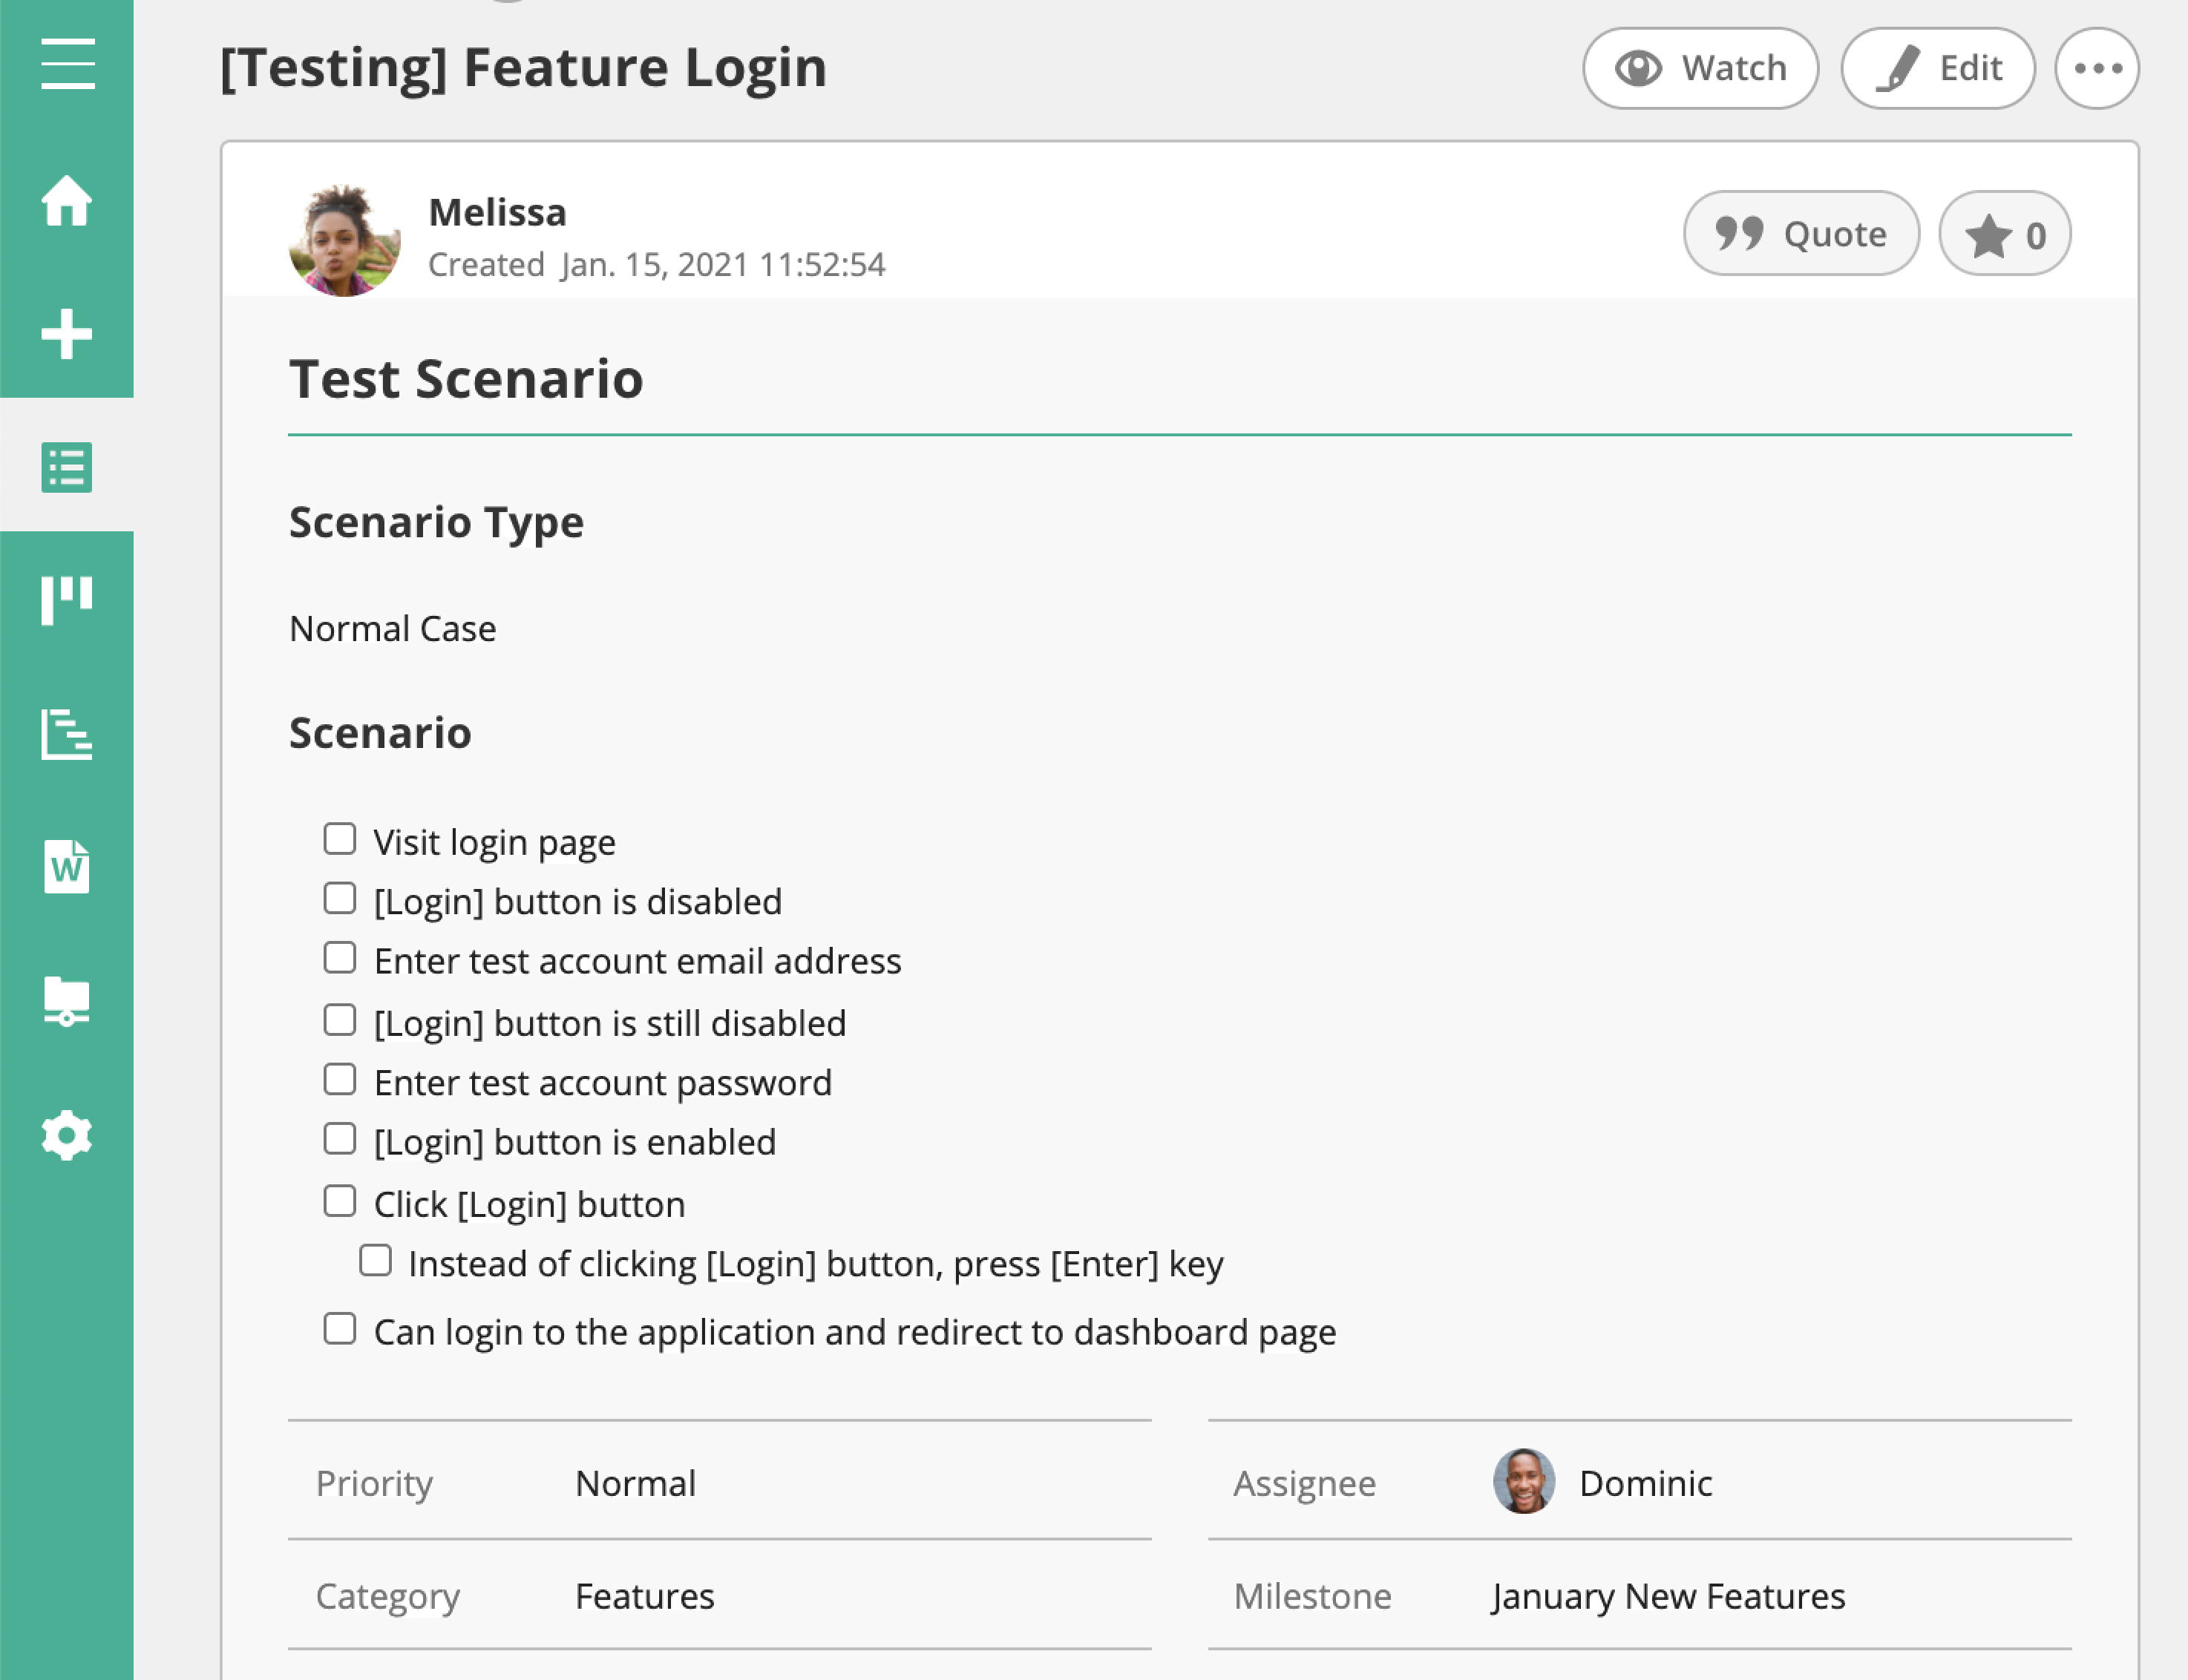
- Under "Issue Type," add a new type called “Testing.”You will use this issue type for all parent tasks.
- Under “Issue Status,” add two new statuses called “Testing” and “Test Failed.” Team members will change the status to “Test Failed” to indicate a bug.Feel free to add any other statuses your team will need, for example, a test scenario might look like:
- Visit login page
- [Login] button is disabled
- Enter test account email address
- [Login] button is still disabled
- Enter the test account password
- [Login] button is enabled
- Click [Login] button
- Instead of clicking [Login] button, press enter key
- Can log in to the application and redirect to the dashboard page
- Create an issue template for the new Testing issue type and include all of the testing parameters your team will require. For our example, we’re adding the following template outline:
- Test account
- Test address
- Test browser
- Normal case / Error case
- Create all tasks for Testing within your QA project. Make sure to:
- Assign each task to a team member
- Add a start date and due date for each issue
- Set the priority
- During testing, add a “Bug” subtask for every bug found under the “Test” parent task. There you can track the bug as it is worked on and resolved.
- Optional: Create a wiki for things your team may need to reference, like common issues and quick fixes.
- Using @mentions, you can collaborate on tasks, gather feedback, and let others know when tasks are complete so that any dependent tasks can get started as soon as possible.
Not using Backlog yet? No problem! Start a 30-day free trial — no credit card required — and you can start managing your sprint planning in Backlog today.
Product Management
Growth Experiments
Create and track growth experiments to successfully add new features to your product with our Backlog Setup Tutorial for Growth Experiments.
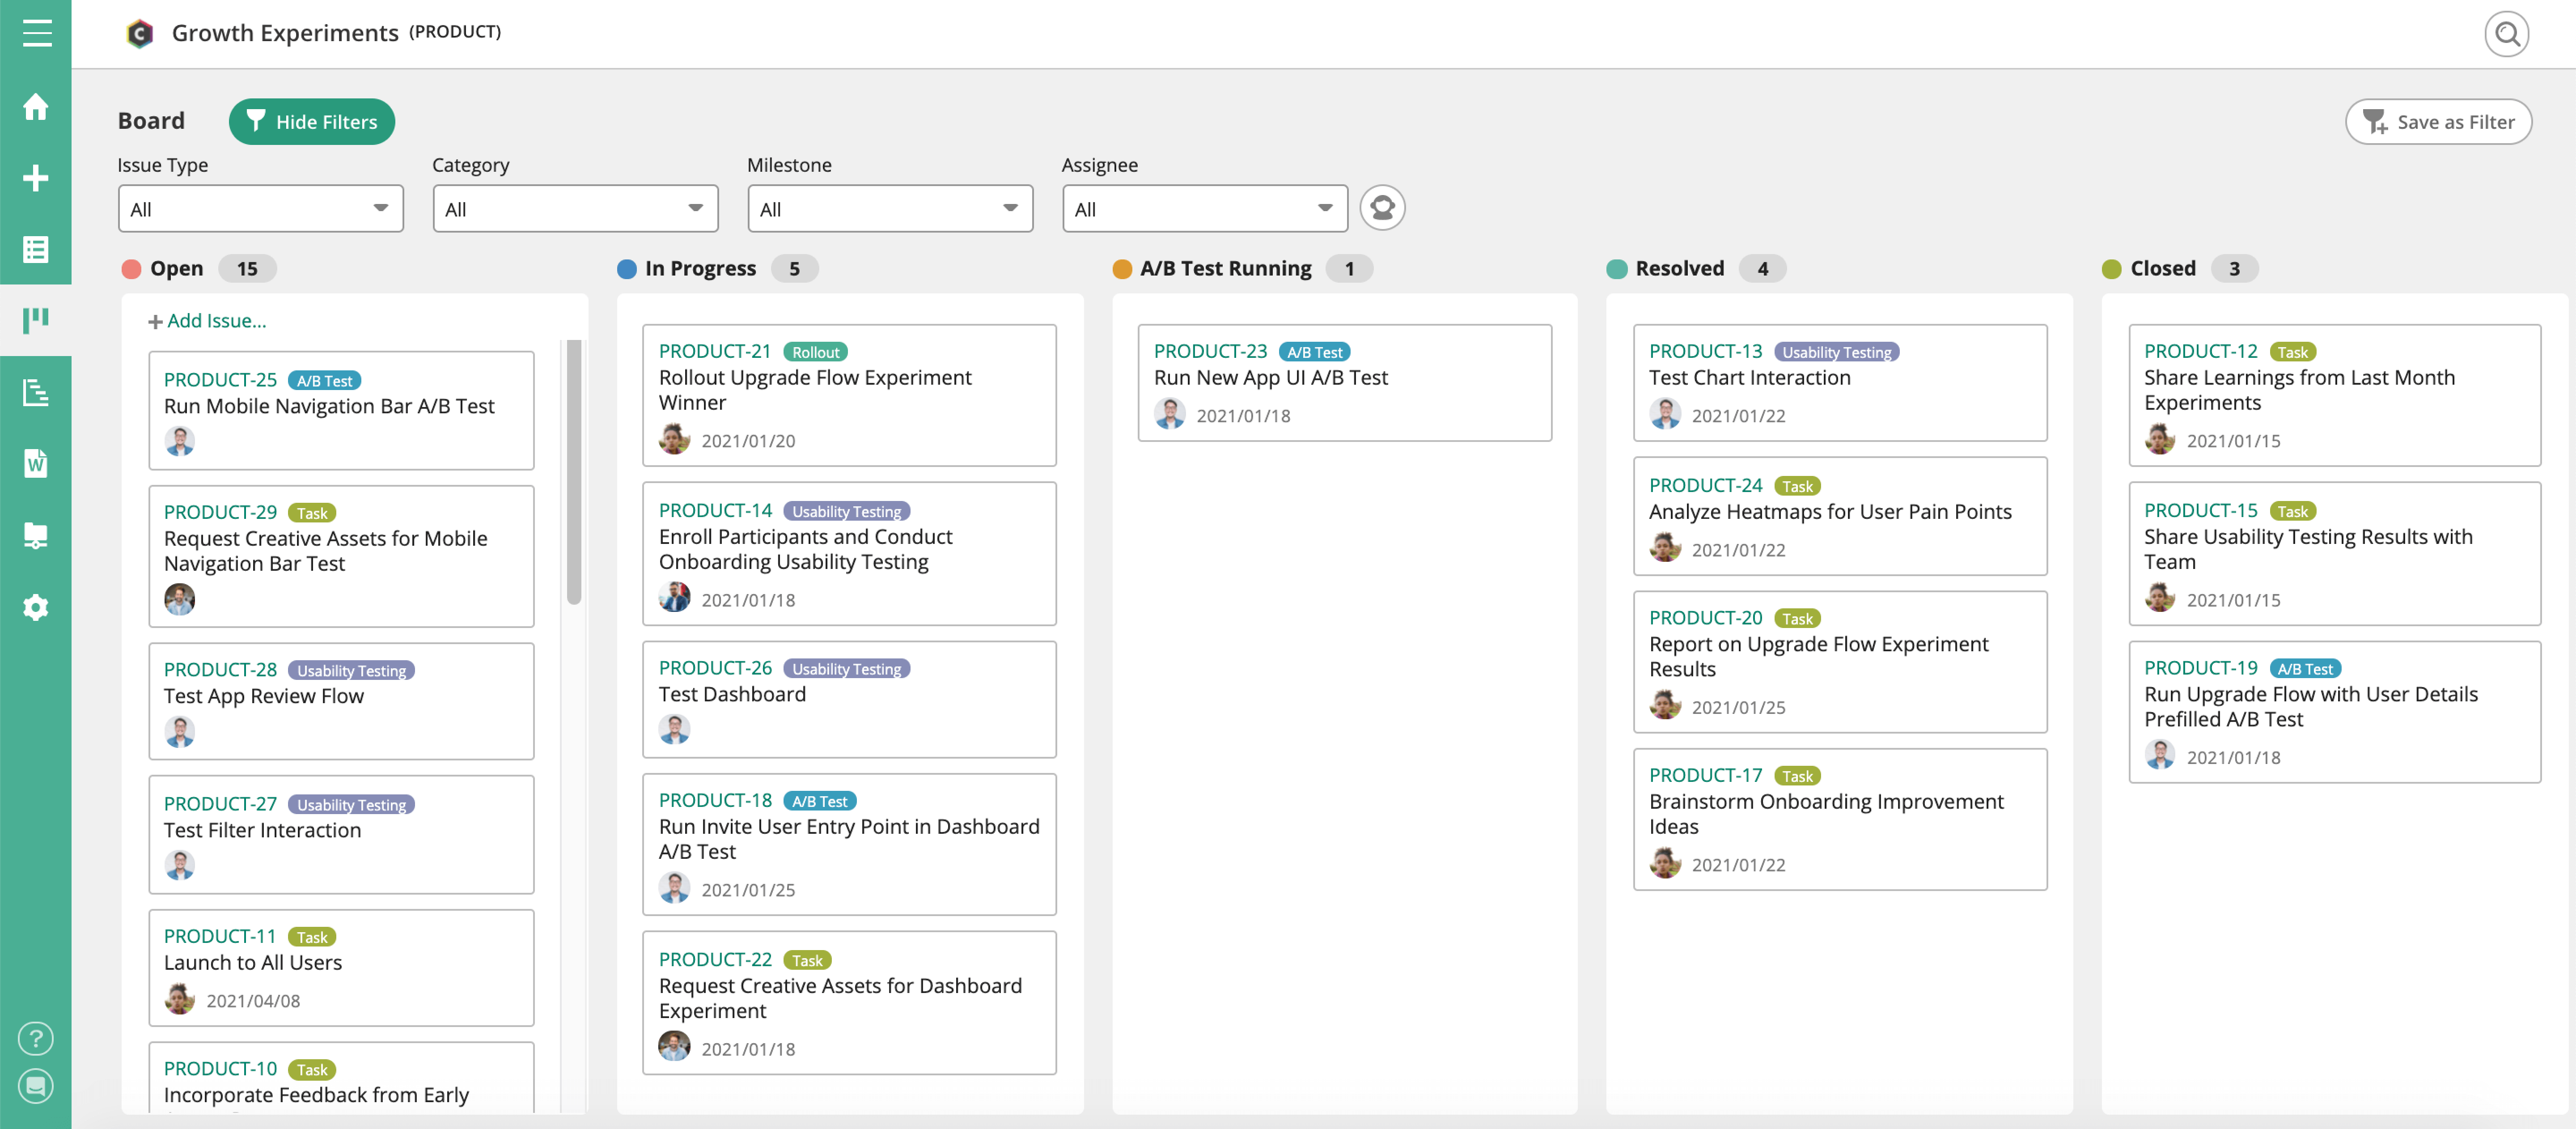
- Create a Project in Backlog called Growth Experiments.Project Key: GRWEXP
- Enable all "Attributes and functionality."Note: Be sure to enable subtasking.
- Enable all "Attributes and functionality."Note: Be sure to enable subtasking.
- Under “Status,” add a new type called “A/B Test Running” for tasks that are currently undergoing A/B testing. (You will not necessarily use it for all tasks.)
- Under “Issue,” create any additional issue types that will help your project. For our example, we’re adding “A/B Test,” “Usability Test,” and “Rollout.”
- Add in all of your tasks. Use parent issues to denote larger goals and use child issues to break up the goals into individual tasks or jobs.
- Assign each task to the correct team member and add the following details to each:
- start date & due date
- the priority
- Optional: Create a wiki for things your team may need to reference, like user contact lists and procedures.
- Using @mentions, you can collaborate on tasks, gather feedback, and let others know when tasks are complete so that any dependent tasks can get started as soon as possible.
Product Launch
Organize product launches to visually track your product from kick-off to release with our Backlog Setup Tutorial.
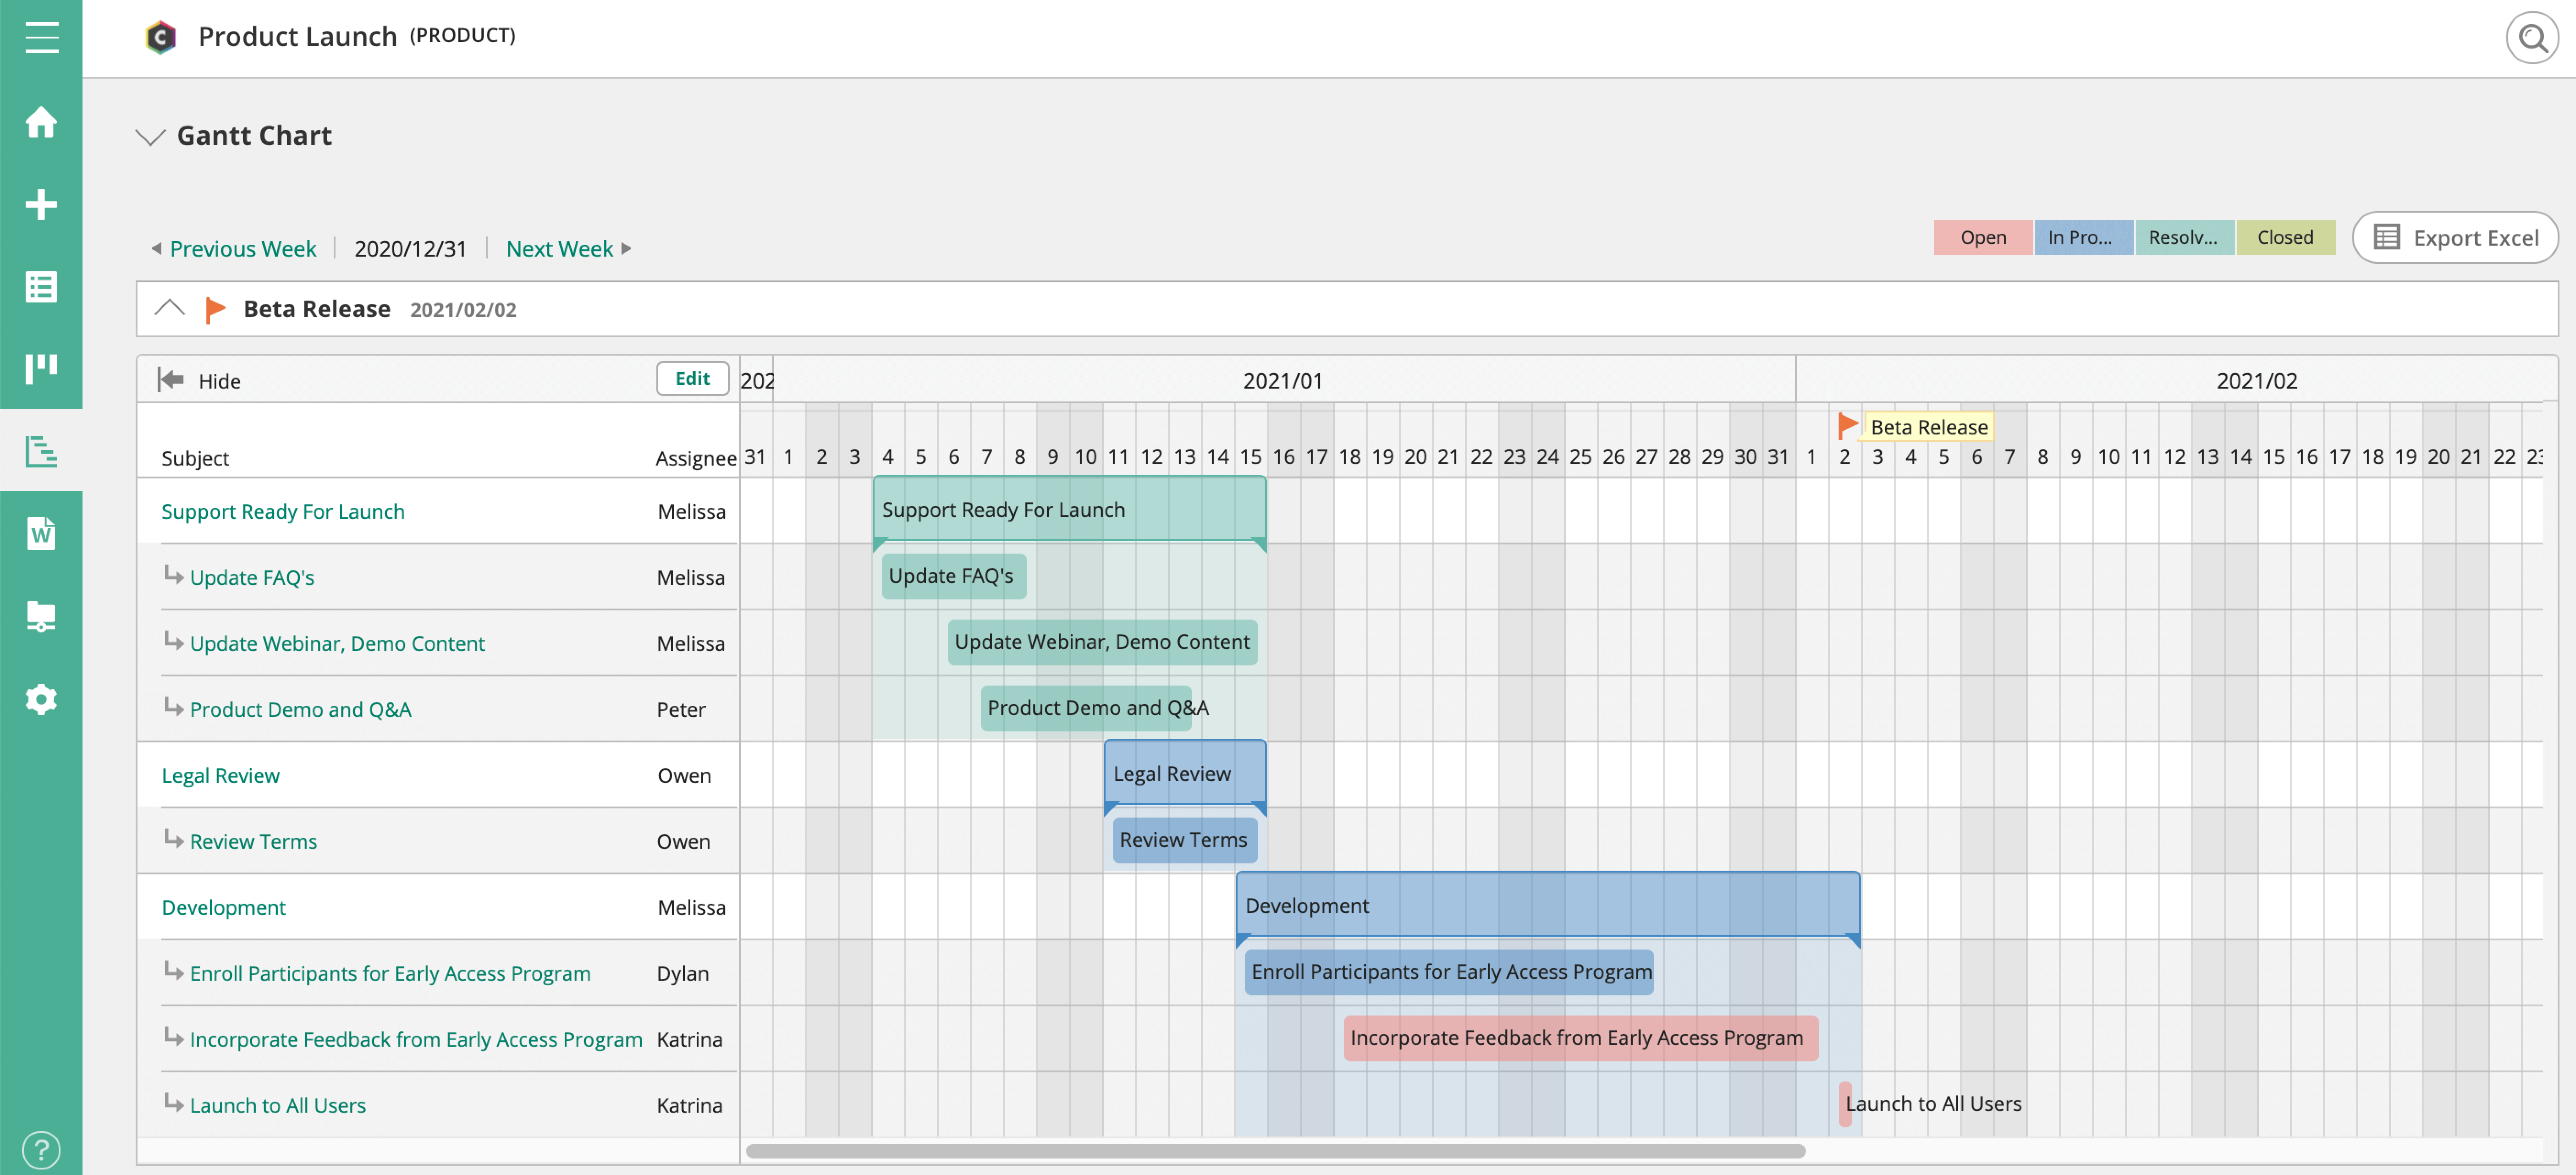
- Create a Project in Backlog called Product Launch.Project Key: PRDLNCH
- Enable all "Attributes and functionality."Note: Be sure to enable subtasking.
- Create categories for each type of work your team will be doing. For our example, we’re adding:
- Development
- Legal
- Support
- Add Milestones to your project to track your team’s progress. For this specific project, we’re adding ‘Beta Release’, but you can add others like:
- Internal release
- Launch to all users
- Mobile app iOS launch
- Create all tasks for your product. Use parent issues to denote larger goals and use child issues to break up the goals into individual tasks or jobs. For each task you add, include the following details:
- An assignee
- A start & due date
- A milestone
- Optional: A priority
- Use your project’s Gantt Chart to view your plan visually. Using this view, you can track progress by Milestone.
- As everyone works, use @mentions to collaborate on tasks, gather feedback, and let others know when tasks are complete so that any dependent tasks can get started as soon as possible.
Not using Backlog yet? No problem! Start a 30-day free trial — no credit card required — and you can start managing your sprint planning in Backlog today.
Marketing
Content Planning
Keep content production on track and hit your publication deadlines with our Backlog Setup Tutorial for Content Planning.
- Create a project called Content Planning.Project Key: CONPL
- Enable all "Attributes and functionality."Note: Be sure to enable subtasking.
- Under "Issue Type," add a new type called "New Content."You will use this issue type for all parent issues.
- Create a task template for the New Content issue type.Add in any standard information you'd like provided about content. Create your own, or follow our example with:
- Idea: (Briefly describe your idea.)
- Goals: (What are the goals of this content?)
- Assets: (What creative assets do you need?)
- Examples: (Provide content examples, if applicable.)
- Resources: (Do you require additional resources?)
- Under the Project Settings, create categories for each of your channels. For our example, we're adding:
- Blog
- Article
- Product Update
- Press Release
- Newsletter
- Case Study
- Create Milestones to track your content calendar by month.
- Milestone 1: January 2021
- Milestone 2: February 2021
- Milestone 3: March 2021
- etc.
- Add in all ideas as New Content parent issues. Be sure to:
- Fill out the task template
- Designate the channel using the appropriate Category
- Optional: Create a wiki for things your writers may need to reference regularly, like your Style Guide or Personas.
- In our example, we're using Milestones to represent months, so when it comes time to plan next month's content, you'll need to:
- Change the status for each task your team is taking on to "In progress"
- Add in the appropriate milestone (i.e., month)
- Create child issues for each workflow stage (e.g., write, edit, publish, promote) and any design assets needed (e.g., featured images, header images, GIFs, infographics, etc.)
- Assign each child issue to a team member & add a due date
- Optional: set the priority of each task
- Using @mentions, you can collaborate on tasks, gather feedback, and let others know when tasks are complete so that any dependent tasks can get started asap.
Marketing Campaign
Set your marketing campaigns into motion with our Backlog Setup Tutorial for Marketing Campaigns.
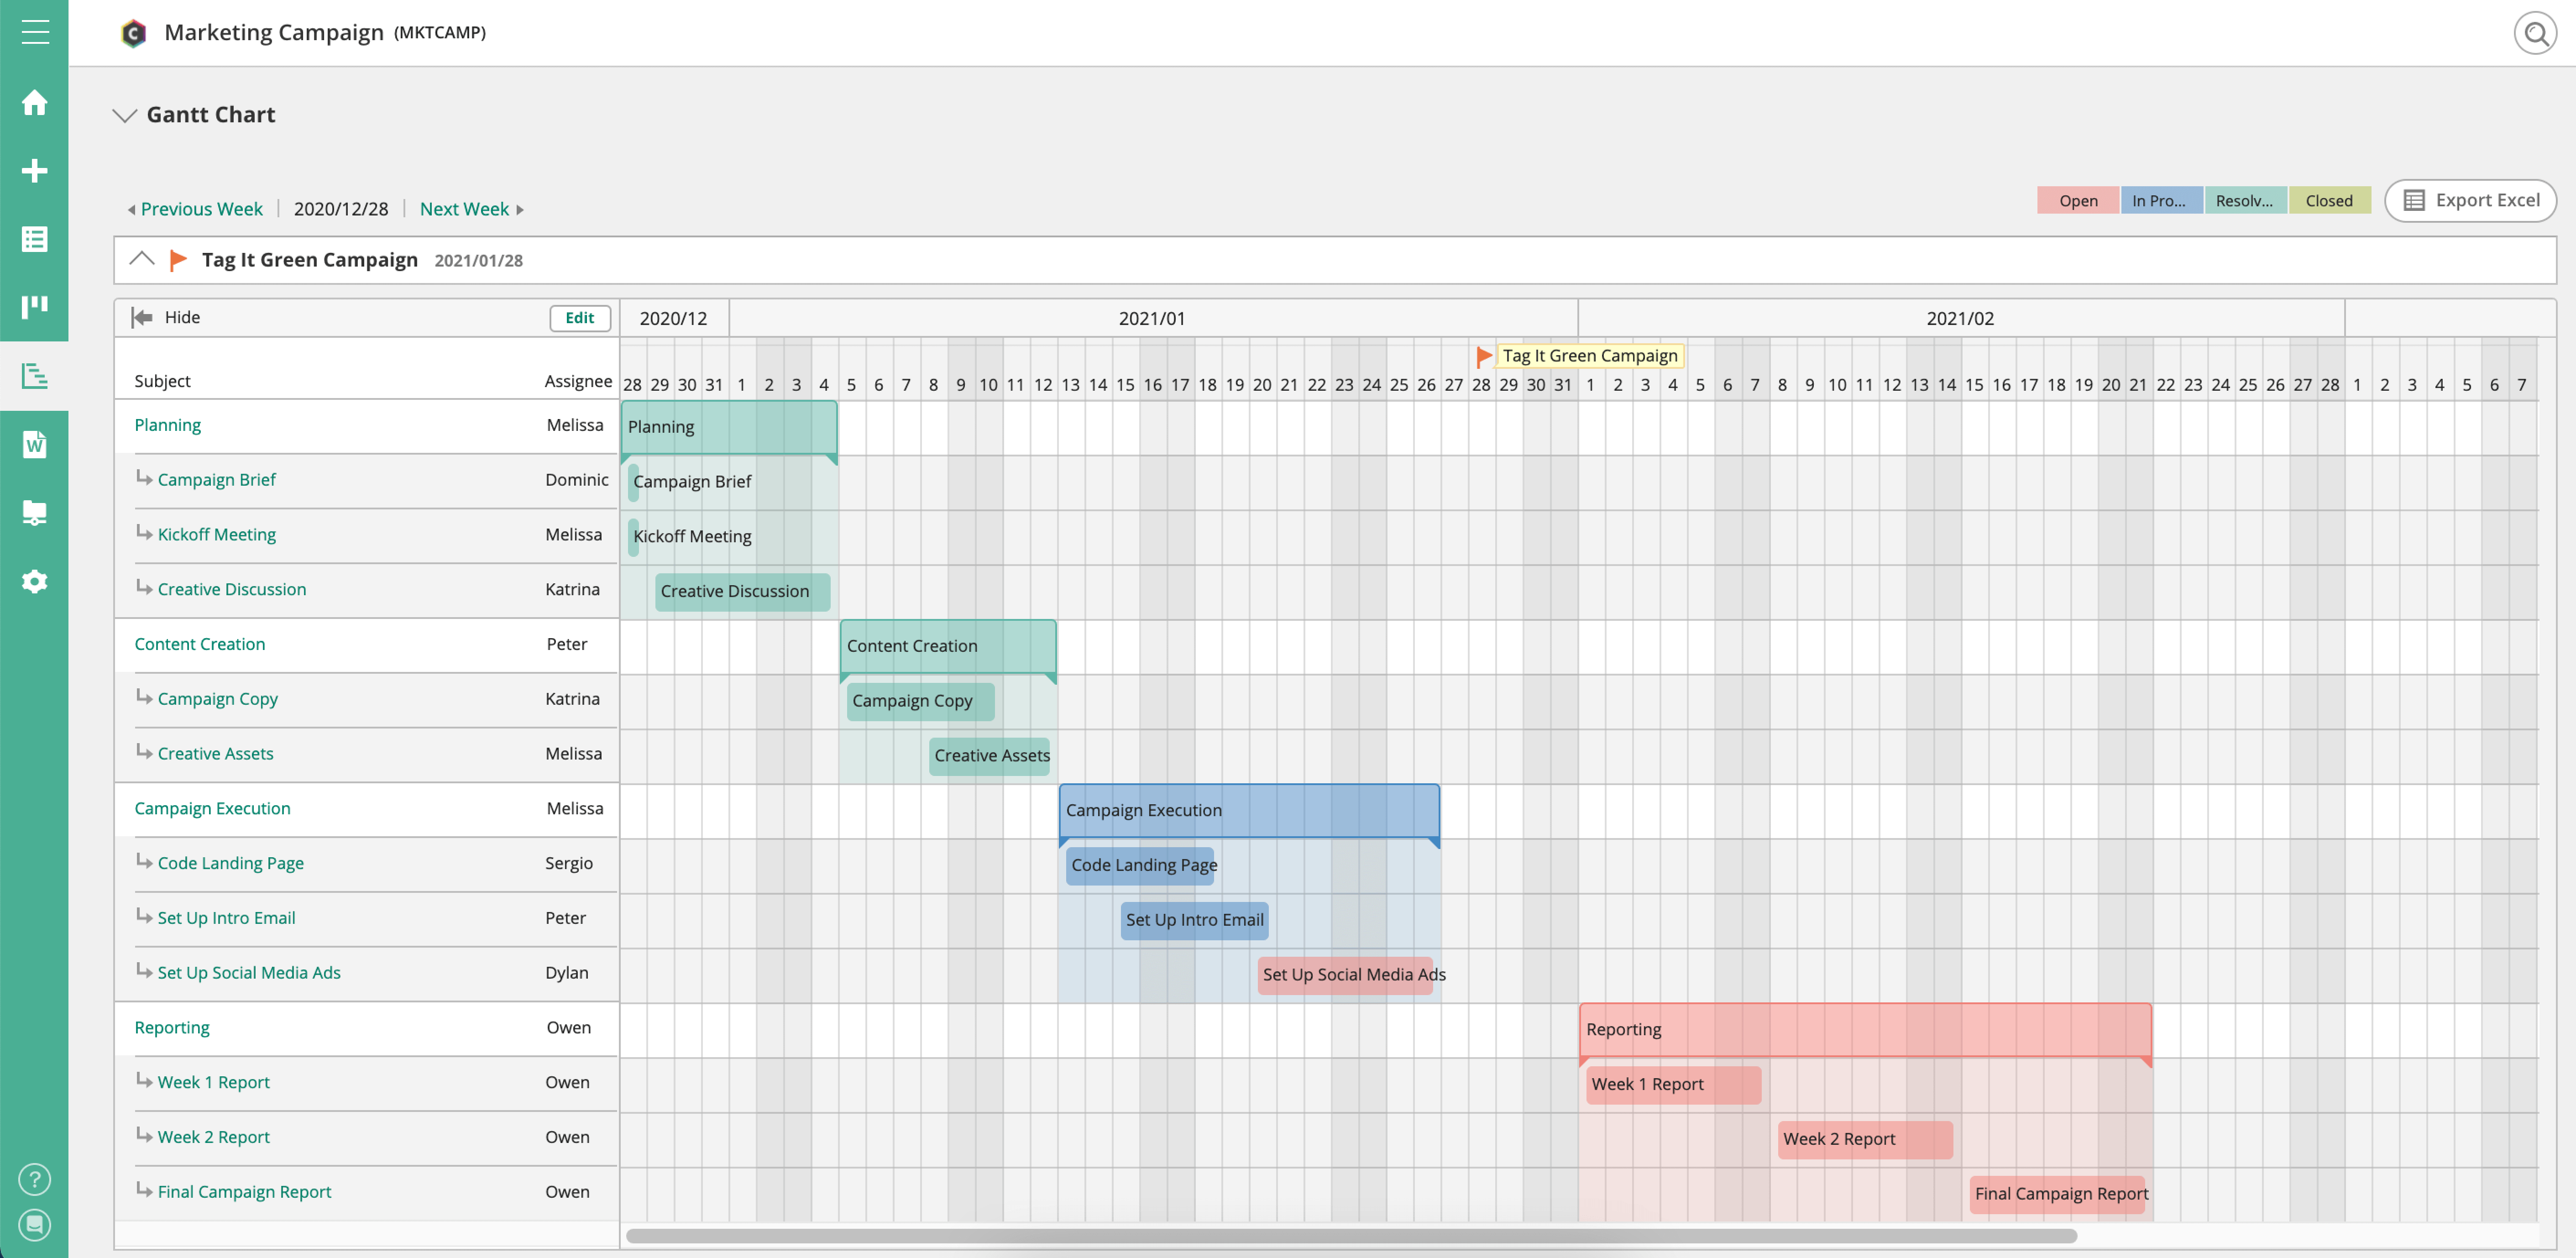
- Create a project called Marketing Campaign.Project Key: MKTCAMP
- Enable all "Attributes and functionality."Note: Be sure to enable subtasking.
- In the project settings, set up a category called "Brand Awareness" to group all your future brand awareness campaigns. You might consider adding other categories like:
- Seasonal Push
- Contest Marketing
- Customer Referral
- Email Marketing
- Set up a Milestone to go along with our example brand awareness campaign called "Tag It Green." This milestone will help you track all of the tasks and progress for this specific marketing campaign.
- Create the Planning task by adding a new issue. Set your category to "Brand Awareness" and the milestone to your campaign name.
- A parent issue conveniently groups all relevant planning child issues (i.e., subtasks) you create. Create the child issue "Campaign Brief" under the Planning parent issue. Fill in the task description with your campaign brief.Since you have already set the Milestone in your parent issue, your child issue should have your campaign name pre-populated under the milestone. To finish adding the task:
- Assign the task to the appropriate team member.
- Set a start and due date.
- Simply repeat this process to create the rest of your tasks!
Public Relations
Keep public relations on track and hit your publishing and contact deadlines with our Backlog Setup Tutorial for Public Relations.
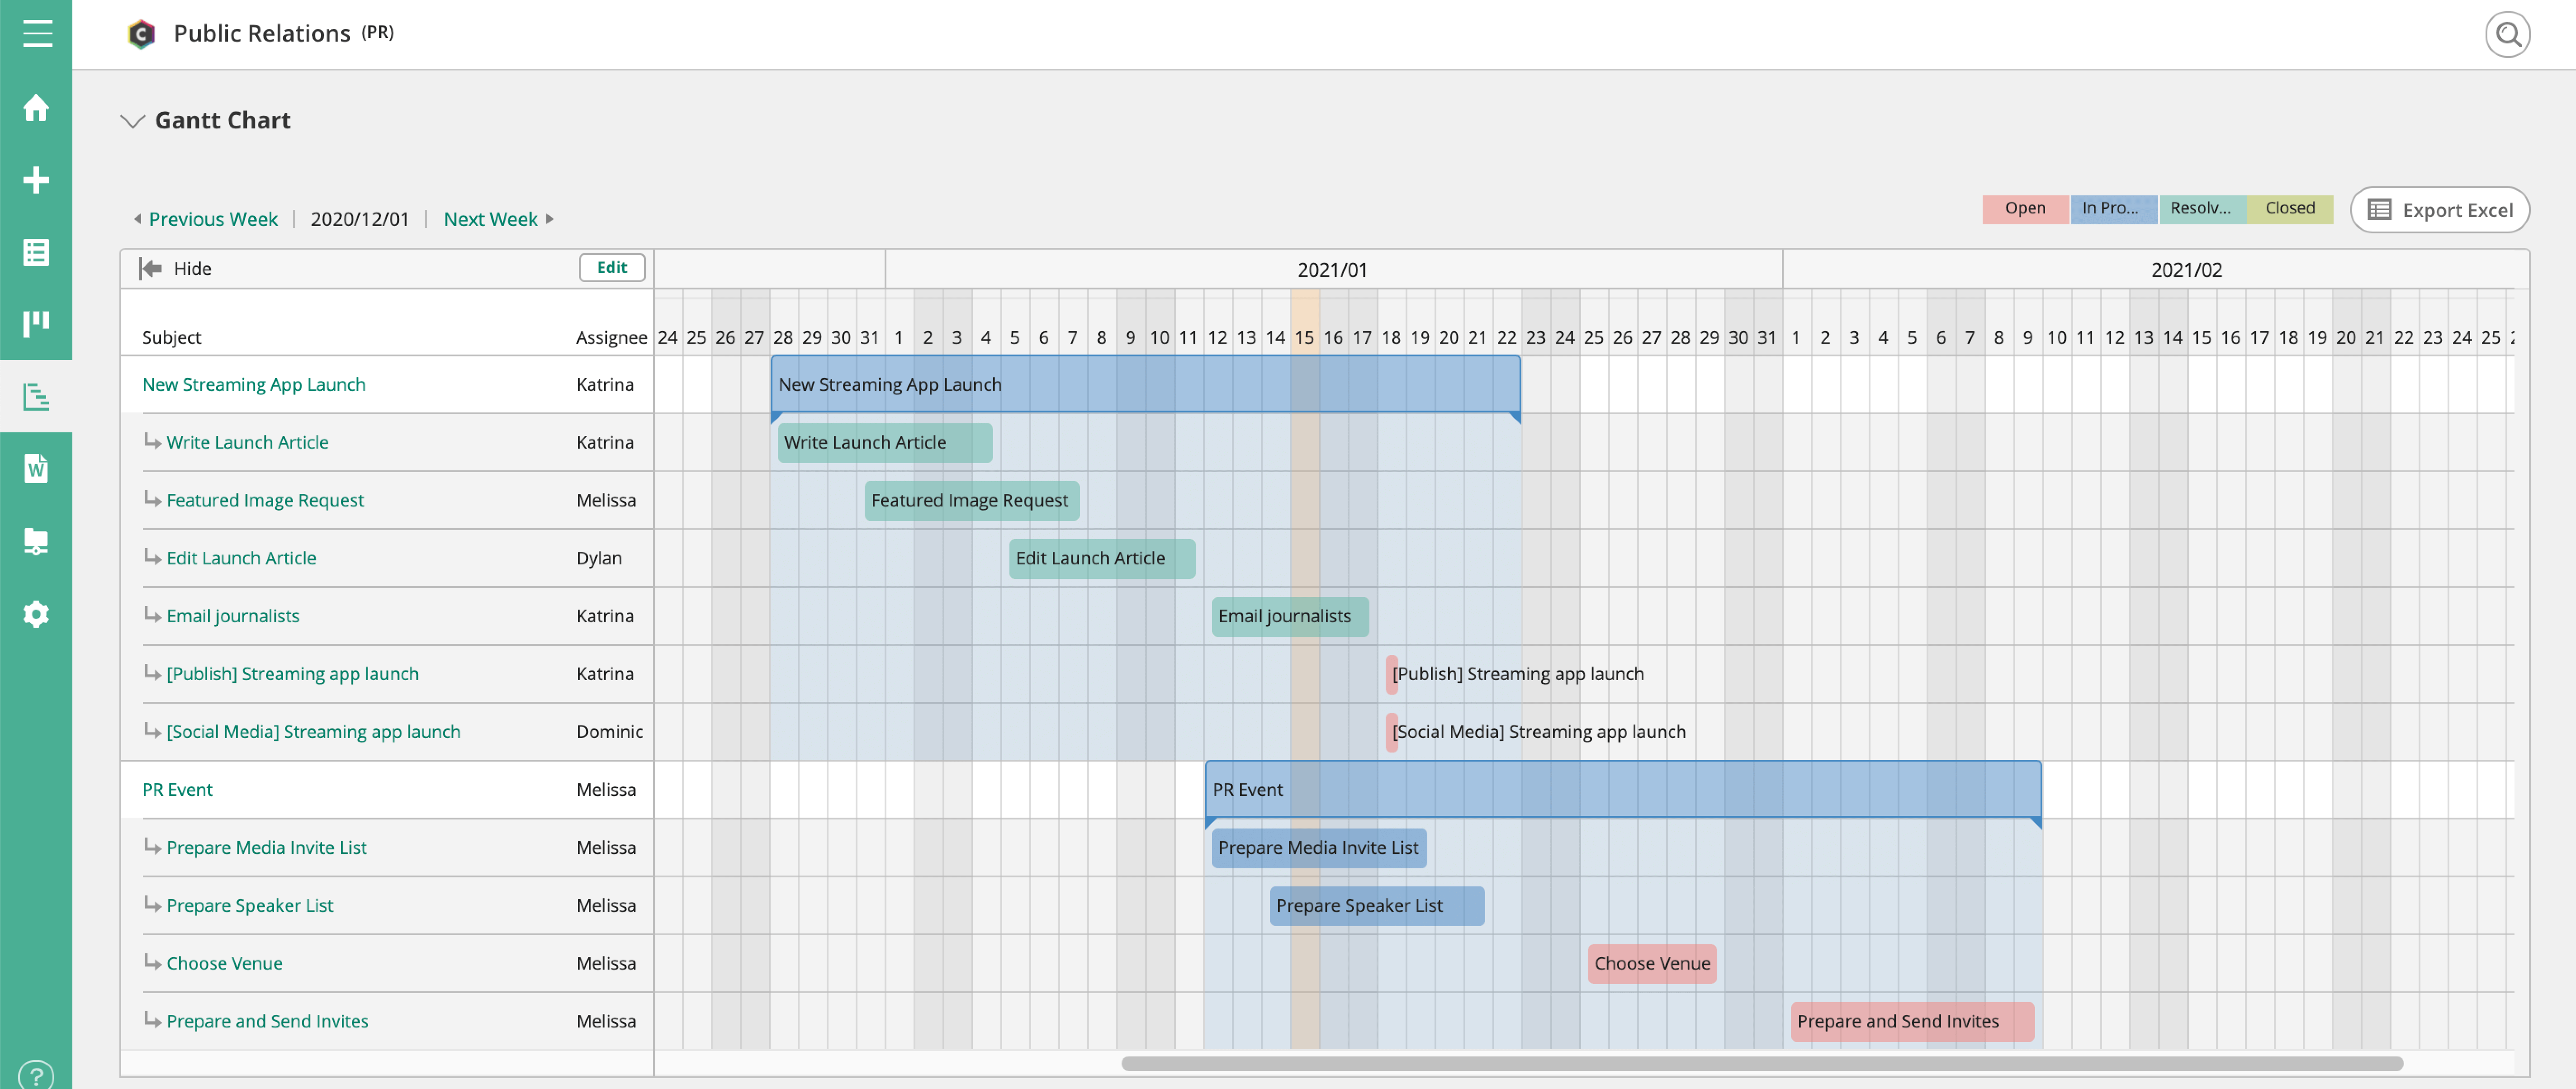
- Create a project called Public Relations.Project Key: PR
- Enable all "Attributes and functionality."Note: Be sure to enable subtasking.
- Create Categories to track the type of projects you’re promoting. In our example, we’ll add:
- Press Release
- Event
- Brochure
- Optional: Create a wiki for things your team may need to reference, like your list of journalistic contacts or influencers.
- Create the Planning task by adding a new issue. Set your category to "Brand Awareness" and the milestone to your campaign name.
- Add in your parent issues and child issues.In our example, each parent issue is a different company event or promotional news and each child issue is a stage of the associated workflow.These are the workflow stages we’re including in our example project:
- Write
- Edit
- Featured Image
- Publish
- Email Journalists
- Social Media
- Prepare
- Choose
- Promote
When it comes to the next event you want to promote, for example, you'll need to:- Create a new parent issue for the event
- Add in the appropriate category (i.e., Event)
- Create child issues for each workflow stage (e.g., prepare, choose, promote)
- Assign each child issue to a team member & add a due date
- Optional: set the priority
- Using @mentions, you can collaborate on tasks, gather feedback, and let others know when your tasks are complete so that any dependent tasks can get started as soon as possible.
Not using Backlog yet? No problem! Start a 30-day free trial — no credit card required — and you can start managing your sprint planning in Backlog today.
Did you know?
- With Kanban-style Boards, you can easily move tasks through your workflow with a simple drag and drop.
- With the Issues list view, you can view and filter issues by status, assignee, due date, and more.
- Or use Gantt view to quickly see how your due dates may be affecting other work and adjust accordingly.
Want to know more about Kanban? Check out our Kanban guide