We’ve said it before, and we’ll say it again: a picture is worth a thousand words, which is why diagrams are so convenient. They’re a neat way to display complex information in an easily digestible format.
Websites and user journeys can be complex, which is where user flow diagrams come in handy. They’re an invaluable tool in the website designer’s arsenal. As the name implies, user flow diagrams can help you see how a user makes their way (or ‘flows’) through your website or app.
The user flow could encompass the steps they take to perform a certain action, or it could involve the items a typical user clicks on. The more you know, the better you can make the experience, and in turn, the happier your visitors will be.
Let’s take a closer look at what exactly a user flow diagram is. We’ll also run through some tips to help you create your own, so you can hit the ground running.
What is a user flow diagram?
Alright! So, we’ve already partially answered this question: it’s a diagram that shows the user’s journey. But there’s more to it than just that.
A user flow diagram can show the way someone uses a website or app in a general sense, or it can track a route someone takes to accomplish a specific task. The way a shopper makes their way to the checkout on an e-commerce website is one example. From a business perspective, ensuring your customers can make it to the checkout without getting frustrated and leaving is good sense. A click away is a lost customer.
User flow diagrams can map these steps, helping UX and UI designers link the user’s needs, actions, and consequences with functionality. They can then use the information to influence web or app designs or make improvements to existing systems.
You can’t help your users if you don’t know what they need, and this is what user flows do. They help you spot the dead ends, the awkward journeys, and the blind corners that trip up your users.
What’s the difference between user flow and user journey?
User flow focuses on how the user interacts with your app or site.
User journey refers to all the touchpoints involved in the choice to use your product. A user journey begins long before people land on your site or app and continues long after. It includes everything from word-of-mouth recommendations, product comparisons, and online ads to delivery and customer service.
Why should you make a user flow diagram?
User flow diagrams are there to help UX and UI designers improve how users navigate the website or app. Here’s what they should help you accomplish:
- Map out the user flow
- Ensure the process contains all the right steps
- Get early feedback from users and stakeholders, and use this to inform your design while it’s low-fidelity (and therefore cheaper)
- Make decisions early on, before you’ve spent too much time on the design
Here’s the bottom line: if you invest time in creating a page flow diagram earlier on, it’ll save you headaches later. It’ll also lead to happy users who enjoy spending time on your site or app.
What does a user flow diagram look like?
A user flow diagram is a flowchart with a very specific purpose. Here are some user flow examples.

A user flow diagram for a web-based eSports application, by Andy Davies.

A visual sitemap, by Maru.
It also depends on what stage of design you’re at. If have a finished wireframe, you can use it to create a wireframe flowchart or wireflows. These pair wireframe conventions with flowchart shapes, as you’ll see in the example below.

A webflow diagram for an app, by Darmawan R. Dipo.
Pro tip: When creating a user flow diagram, use standard flowchart symbols for clarity. You’ll find the most popular symbols in the table below.

How to make a user flow diagram
1. Define your needs and your customer needs
First, you need to understand your business goal and the problem your user wants to solve.
Your goal will be easier to work out. You want users to buy something, subscribe, share, or click. If you’re not sure, refer back to your company and project objectives to help inform your choice. You then need to match up your business goals with user objectives. What do they want?
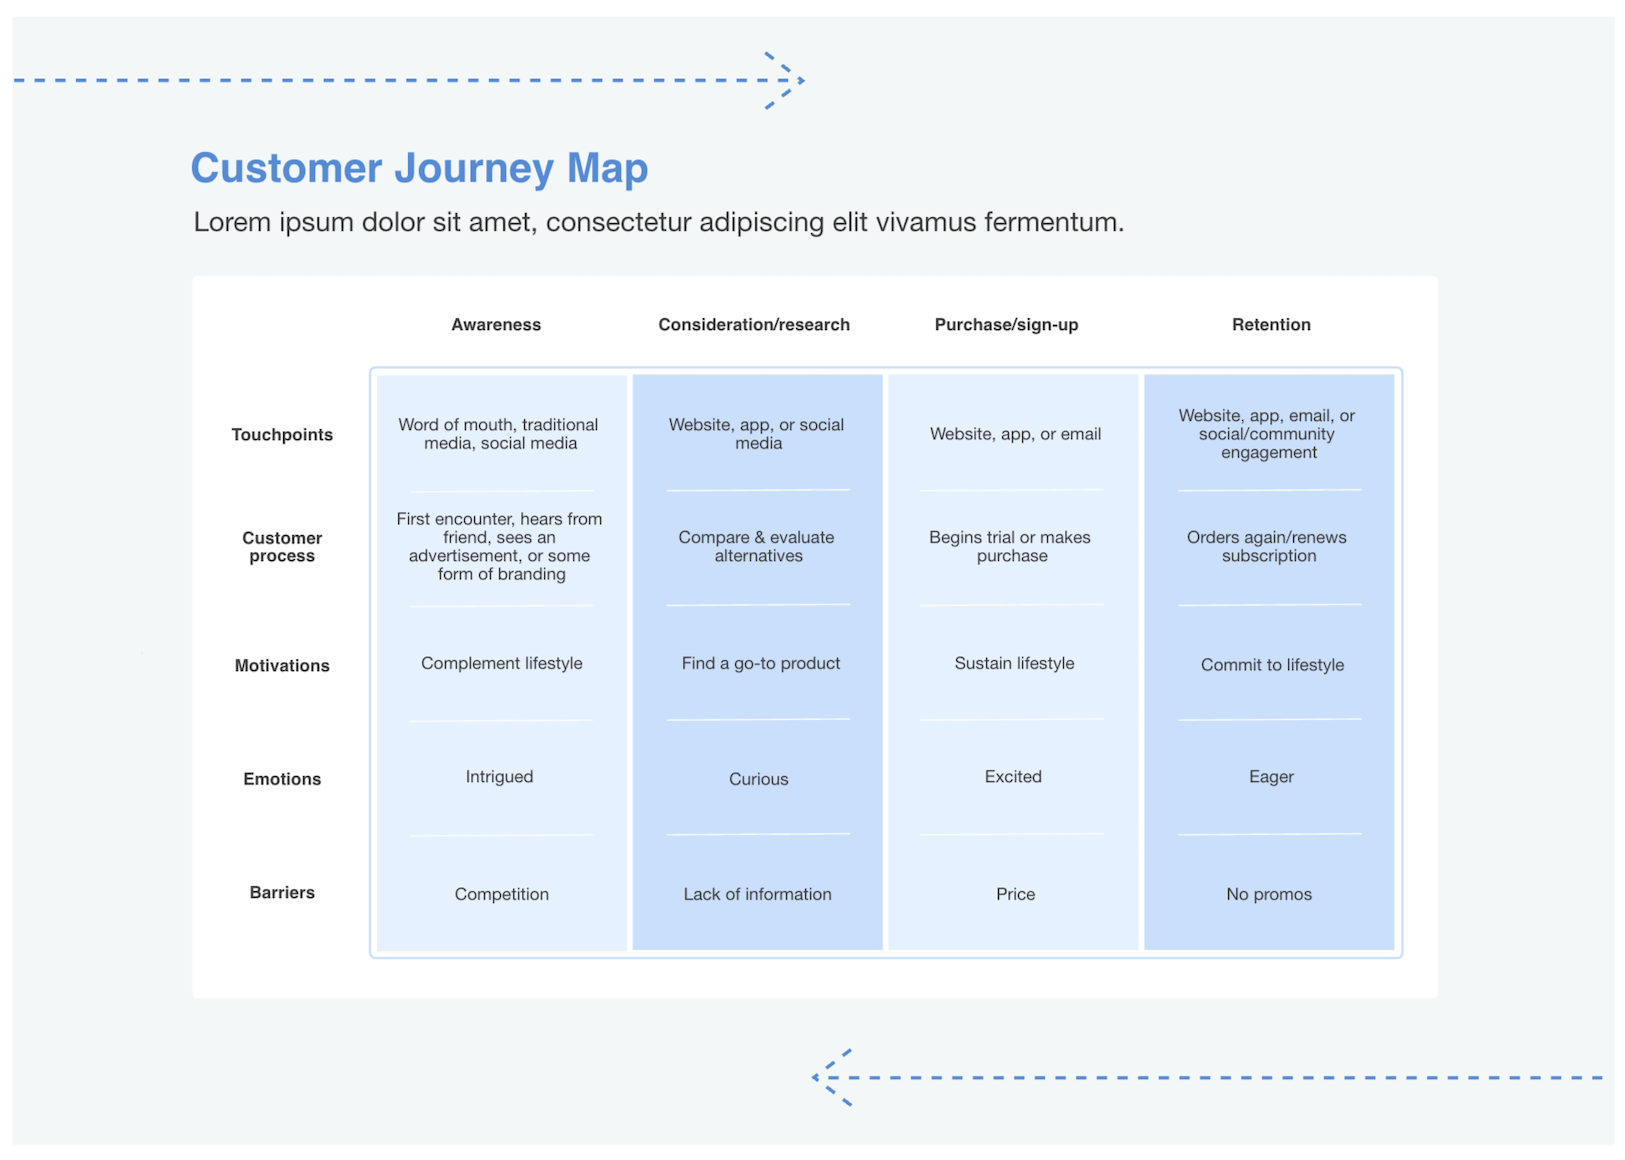
A customer journey map can help you define the thought processes driving user behavior. This handy diagram can match your customer’s mood to each stage of the journey as well as the most crucial touchpoints. Evaluating the mindset of a typical user will help you refine your messaging so that customers are as receptive to it as possible.
You can also delve into the hierarchy of effects models, which are theories that define how a customer responds to certain prompts and moves through a series of common steps when deciding on a purchase or subscription.
2. Consider how users will find you
If your website or app is already up and running, you still want to improve it. One way to do that is through Google Analytics.
Analytics tools offer valuable insights into visitor behavior, including how they found you (social media, email, PPC, organic search, etc.). Google Analytics provides a breakdown with percentages showing you which channels are most popular and where you need to improve your targeting.
Each of these channels should be at the very beginning of your data flow diagram.
3. Find out what users want
If someone visits your site and can’t find what they want, they’ll click away and look elsewhere. So, you need to give them the information they want, fast. Put yourself in their shoes and, at every stage, ask yourself what they want to accomplish.
If you’re working on an already-live site or app, you can do this yourself and seek out real users for their opinions. Sometimes, when you work on something, it’s difficult to see it from an outsider’s perspective, so this kind of feedback can be invaluable.
Pro tip: success doesn’t have to involve a sale. Subscribing to a newsletter or allowing push notifications is just as valuable and could likely lead to a sale later on.
4. Map out your user flow
Once you know what your users want to do, it’s time to create your user flow diagram. Firstly, identify website or app entry points — the places where users make initial contact with your product or brand. Secondly, connect entry points to each corresponding landing page. Depending on the customer segment and the entry point a user comes from, you may have multiple landing pages.
On your diagram, each landing page should have a call-to-action that determines the next phase of the page flow. Think about the user goal each page should satisfy and the actions a target user will take next. Some sections of the user flow will have a single sequence, while others will branch off to represent multiple options in the user path.
Remember that the flow may change over time as your website or product offering develops, so you should make sure the diagram is easily editable.
Pro tip: use flowchart shapes to make your diagram universally understandable (with no need for keys or explanation).
5. Share and gather feedback
The more feedback you get, the better. Other perspectives give you a deeper understanding of how different people will interact with your site or app. This is also good from a collaborative point of view. Clients and stakeholders will appreciate an early sneak preview, which gives them a chance to comment and minimizes the risk of nasty surprises later on.
6. Share feedback with the designers
Give the user flow information to the designers making the website or app, so they can create with purpose. It’s a good idea to bring a lead designer into client meetings. You can also give clients access to your diagramming software and give them permission to leave comments directly on the designer’s work. This shortens the gap between those creating the website and those using it while making the whole process smoother and more collaborative.
Best practice for user flow diagrams
- Stick to the user perspective: avoid adding back-end processes in your diagram, as there are other models better suited for that purpose. A page flow diagram is only meant to map out what the user sees during the customer journey to help you simplify the conversion process. Adding excessive detail at this stage is more of a hindrance than a benefit.
- Limit the scope: don’t include more steps than are necessary for users to complete the specific task. While it’s okay to use more than one entry point or landing page, you should primarily do this when the process is otherwise the same. Too many connectors make for a cluttered diagram, so keep it simple.
- Restrict the directional flow: try to make your map flow in one direction so that viewers can easily follow the user’s path. Since the goal of design is to make website functions simple, your diagram should also depict the user flow in the most streamlined manner.
- Use digital diagramming tools: pen and paper are fine, but diagramming software that lets you drag, drop, edit, and share at the click of a button is much more convenient. And when it’s time to update the user flow diagram, the process will be quick and straightforward.
This post was originally published on September 9, 2020, and updated most recently on March 11, 2022.
About Author

Georgina Guthrie
Guest authorGeorgina is a displaced Brit currently working in France as a freelance copywriter. Before moving to sunnier climates, she worked as a B2B agency writer in Bristol, England, which is also where she was born. In her spare time, she enjoys old films and cooking (badly).