Launching your first sprint shouldn’t feel like herding cats. With Backlog, you can move from “we should sprint” to “we’re shipping” in a matter of minutes — even when multiple teams are involved.
This step‑by‑step guide walks you through setting up a shared product backlog, planning and kicking off Sprint 1, and running the day‑to‑day with clarity.
Before you start: what we mean by “Sprint” in Backlog
Backlog is a flexible collaboration platform used across industries, but it really shines for software teams thanks to projects, issues, Git/Subversion repos, milestones, and documents that keeps decisions close to the work.
Scrum teams typically work in one‑ or two‑week iterations (sprints) to deliver small, valuable increments. We won’t attempt a full Scrum glossary here — just enough to get your first sprint created and running smoothly across multiple teams.

Quick note: There’s no single “correct” way to do Scrum in Backlog. What you’ll see below is a practical pattern that scales well when several squads are aiming at the same goal. Treat it as a starting point and adapt as you learn.
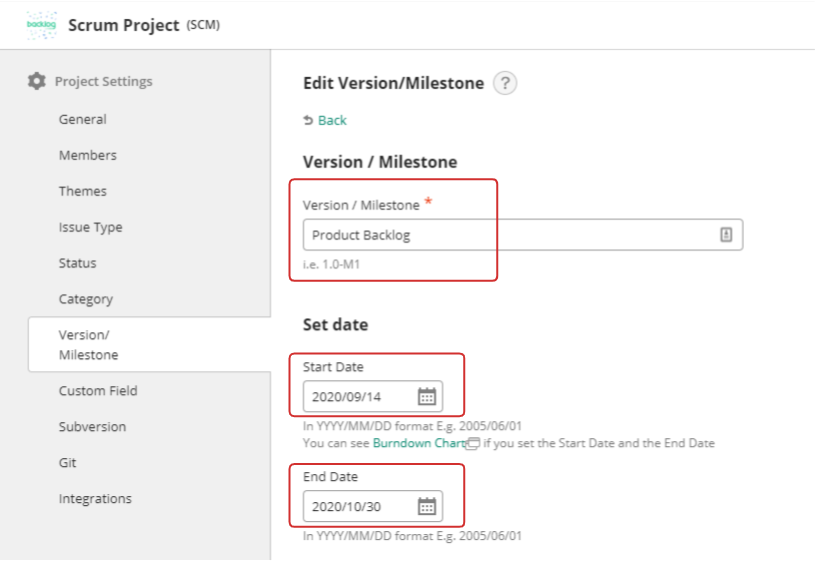
Step 1: Create a “Product Backlog” milestone and capture user stories
Think of a milestone as a time‑boxed bucket for issues you intend to complete within a window. To keep the big picture tidy, create a milestone called Product Backlog with a generous date range (e.g., this quarter). This doesn’t make the backlog time‑bound — it simply gives you a stable filter you can use throughout planning.
Now populate it:
- Add user stories/issues. Create issues for each user story or backlog item. You can stick with the default Task type or create a custom User Story type if you prefer clearer labeling.
- Assign to Product Backlog. Set the milestone on every newly added story to Product Backlog so they’re all collected in one place.
- Standardize inputs. If you’re on the Standard plan or above, use Issue Templates so every story includes definition of done, acceptance criteria, and any cross‑team dependencies your squads must know up front.
Pro tip: When multiple teams are feeding the same product backlog, add a consistent label or custom field for the team/squad (e.g., “Payments,” “Mobile,” “Platform”). You’ll use this for filtering later.
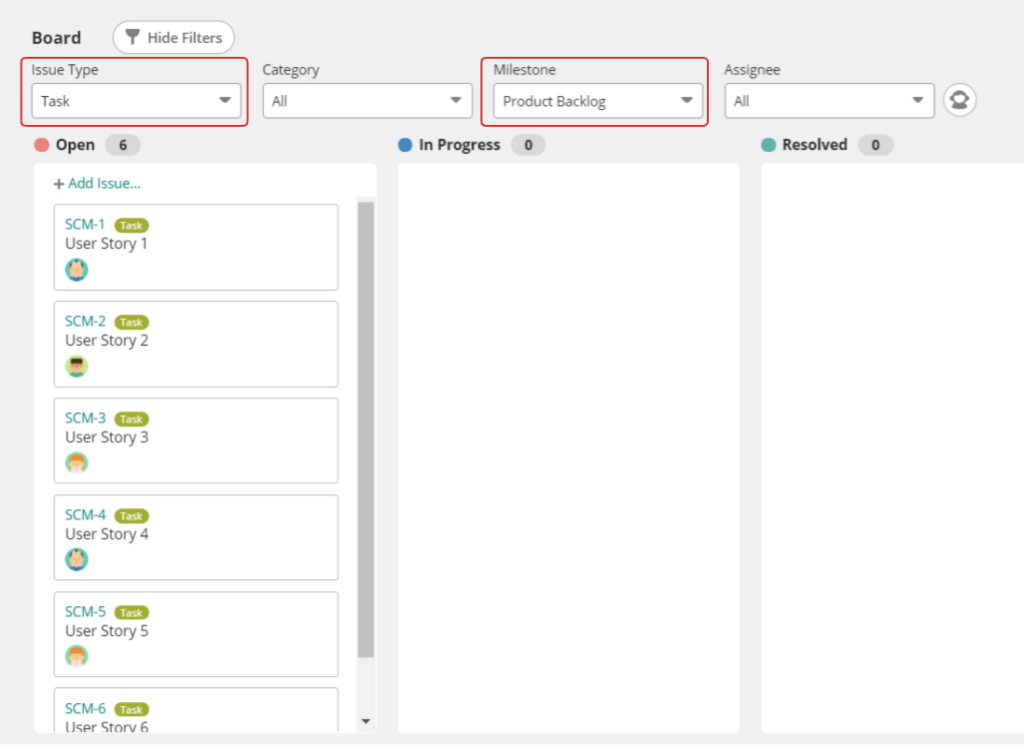
Step 2: Prioritize collaboratively using the Board (not just priority flags)
Backlog provides three built‑in priority levels (Low/Normal/High). When you’re aligning several teams, that’s rarely granular enough. Use the Board to create a hands‑on ordering session:
- Drag to reorder stories within the column so the most important work sits at the top. This live order is visible to everyone looking at the Board.
- Keep the Product Backlog milestone filter on while you reorder so you’re prioritizing the whole backlog, not just a subset.
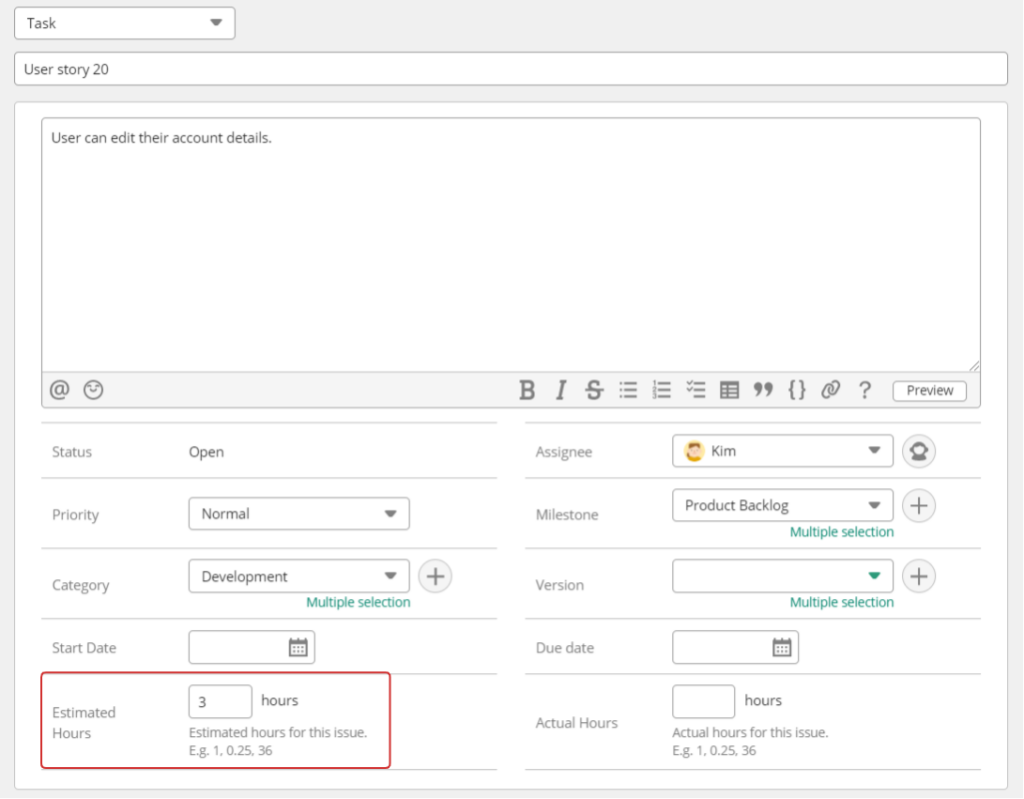
- If you estimate in story points, enter a numeric value in Estimated Hours (e.g., “3” for a 3‑point story). This fuels your burndown charts later without forcing you to commit to specific hours up front.
Why this works across teams: The Board gives you one place where product and engineering leads can negotiate trade‑offs in real time. If Platform needs to land an API before Mobile can ship, you’ll see and sequence it here.
Important: Drag‑ordering changes the Board’s order but does not change the Issues list or Gantt ordering. Treat the Board as the single source of truth for priority.
Step 3: Carve out Sprint 1 as its own milestone
Pick your sprint length (many teams start with two weeks) and create a new milestone: Sprint 1, with concrete start and end dates.
Then select the top‑priority stories (from Step 2) that comfortably fit the sprint and assign them to both milestones: Product Backlog and Sprint 1. Backlog allows multiple milestone assignments per issue, which is perfect for this pattern.
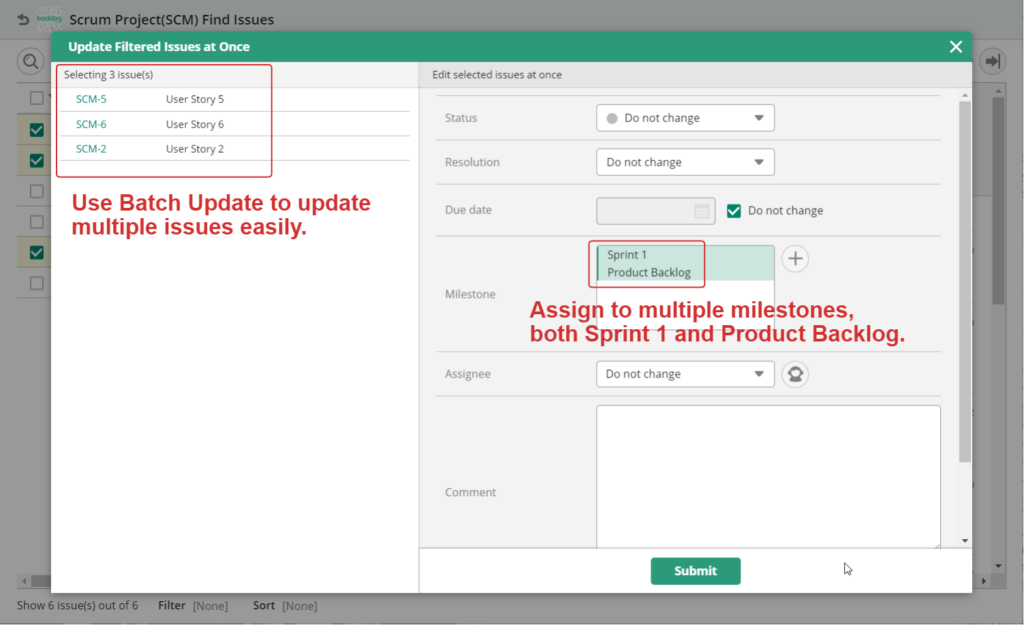
- Use the batch update in the Issues list to set the Sprint 1 milestone en masse.
- Double‑check the assignee on each story so every item has a clear owner.
- If multiple teams are in play, confirm each squad’s capacity before finalizing scope. A quick gut‑check: compare the sum of story points for each squad with their recent velocity or best initial guess.
Result: Stories selected for Sprint 1 have two milestones; everything else remains only in the Product Backlog. This gives you two powerful views at once: the sprint slice and the long‑range backlog.
Step 4: Sanity‑check the plan with Gantt and Burndown charts
With Sprint 1 defined, take five minutes to stress‑test the plan:
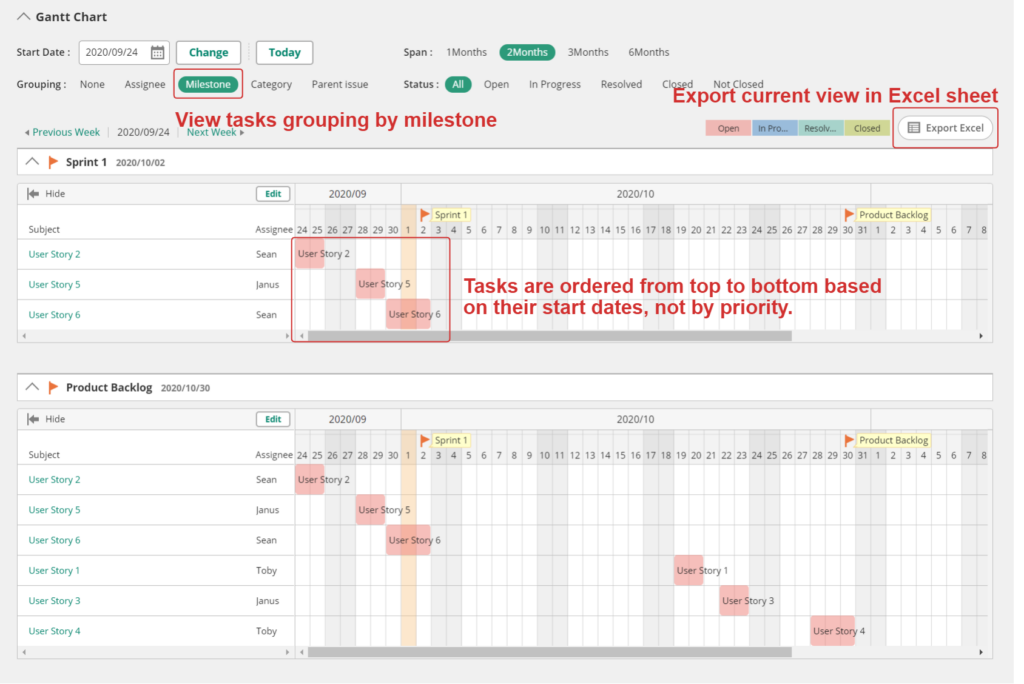
- Gantt chart: Switch to a Gantt view and group by assignee (or team label) to spot overloaded developers and sequence risks. If Story B depends on Story A, make sure their dates reflect that order. Rebalance work so no one is carrying more than they can finish in the sprint.
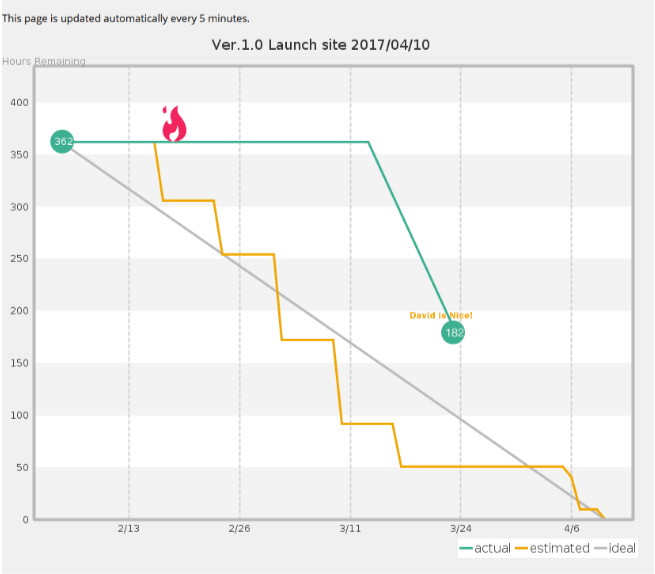
- Burndown charts: Backlog automatically shows burndown for the current milestones (today must be on or after the milestone start date to see the chart). The Product Backlog chart tracks total remaining points across the big bucket; the Sprint 1 chart shows your iteration’s path to zero.
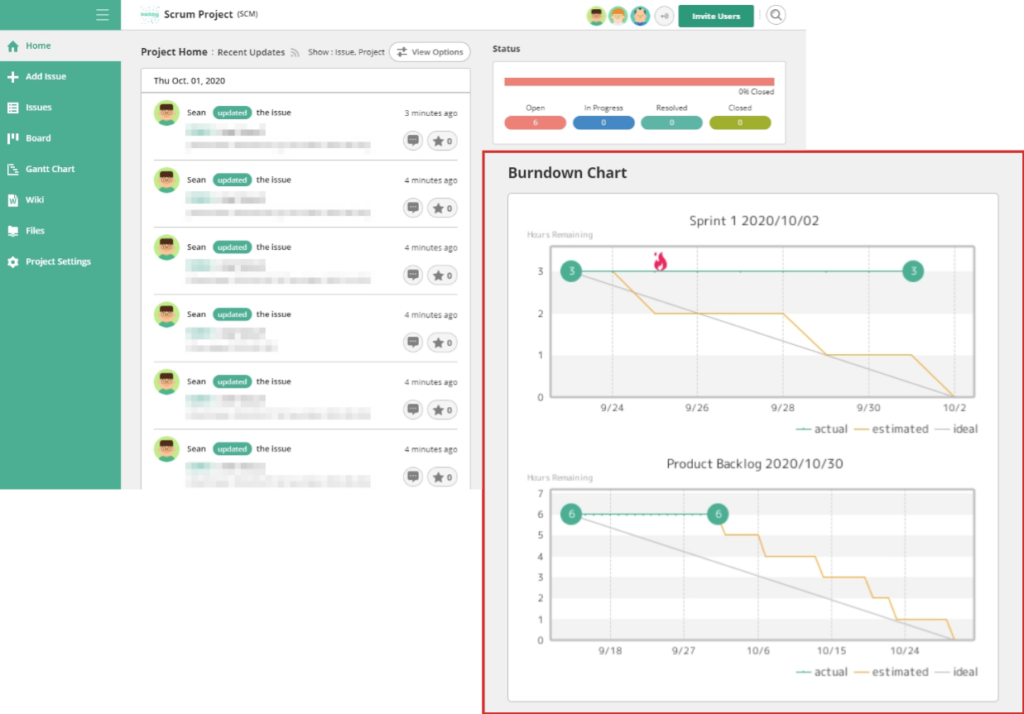
If the burndown looks steep (i.e., too much scope), trim stories now. It’s far cheaper to reduce scope before day one than to scramble on day nine.
Step 5: Kick off the sprint and standardize status flow
On day one, run a short kickoff to confirm what “done” means, how you’ll collaborate, and when standups happen. Then, put the following simple conventions in place:
- Statuses: Backlog ships with Open → In Progress → Resolved → Closed. If you need more nuance, add custom statuses like In Review or Testing — especially helpful when multiple teams hand work back and forth.
- Board filters: Create saved board filters for Sprint 1 and for each team so every squad can focus on their slice without losing the whole‑sprint picture.
- Branch/PR links: If you’re using Backlog’s Git/Subversion repos, link issues to branches, commits, and PRs via the issue key in commit messages. This gives PMs and other teams immediate visibility into progress without asking devs for status pings.
Pro tip: Encourage small PRs tied to single issues. This keeps your “In Review” column flowing and helps other teams unblock faster.
Step 6: Run daily standups from the Board
Keep standups lightweight and visual:
- Filter the Board to Sprint 1.
- Walk the columns right‑to‑left (Closed → In Review/Testing → In Progress → Open) to prioritize finishing and unblocking over starting new work.
- Call out blocked cards and assign a clear next action (pairing, escalation, scope tweak).
- When teams are remote, screen‑share the Board so everyone sees the same source of truth.
Because the Board updates in real time, you won’t need a separate spreadsheet or status doc.
As issues move to Resolved or Closed, your burndown chart will drop accordingly and show whether you’re on track.
Step 7: Collaborate through linked code and pull requests
Whether you’re pairing up on a bug fix or coordinating a larger feature across multiple repos, good collaboration means tying your code back to the story it supports.
Backlog helps you keep tasks and code tightly linked by connecting issues to your Git or Subversion repositories.
Here’s how it works:
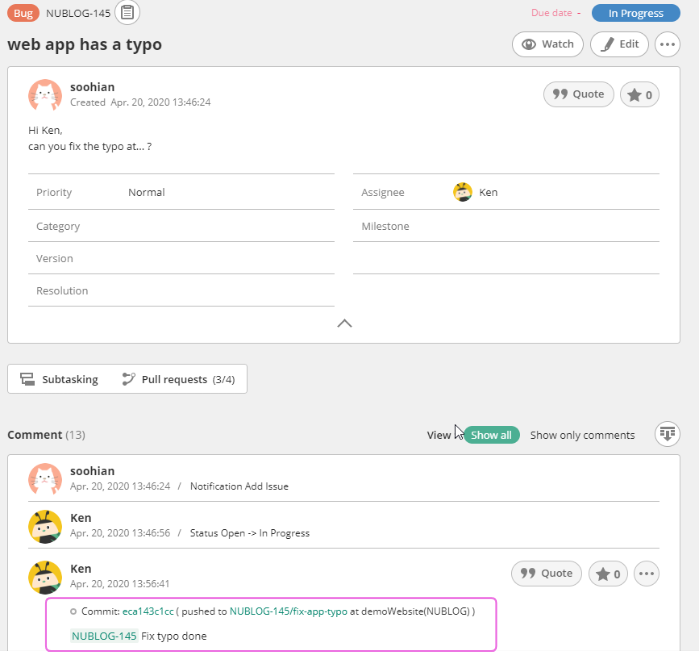
- Developers include the issue key (e.g. PRJ-102) in their commit messages or pull request titles.
- Backlog automatically links the commit or PR to that issue.
- This gives product managers and teammates instant visibility into what code was changed, when, and why — without needing a dev-to-dev sync.
You’ll see commit links and pull request summaries directly on the issue page, so there’s no confusion about which stories are “done done.”
Pro tip: Encourage devs to work in feature branches and open pull requests early. That way, reviewers can follow progress and leave feedback before a wall of code hits them the day before sprint review.
If you’re managing multiple squads or shared repos, consider setting naming conventions for branches (feature/mobile-login) and pull requests ([PRJ-106] Implement login flow on mobile) to keep everything traceable.
By linking work to code, you give every team — not just engineers — the context they need to ship confidently.
Step 8: Keep documentation and decisions close to the work with Wiki
After standups, sprint reviews, or ad‑hoc syncs, capture outcomes in the project Wiki. Good candidates include:
- Sprint 1 goals and non‑goals
- Architecture notes or API contracts agreed between Platform and Mobile
- Risk logs and mitigations
- Retrospective notes and action items.
Link relevant documents from issues so that future readers can easily reconstruct why a choice was made without having to dig through chat history.

Step 9: Track progress and adapt during the sprint
Two lightweight habits help multi‑team sprints stay aligned:
- Watch the flame: If progress lags behind the ideal burndown, Backlog highlights it with a visual alert. Don’t ignore it — either de‑scope a low‑value story, swarm to finish a high‑value one, or extend the timeline if the sprint uncovered legitimate complexity.
- Review Gantt by assignee mid‑sprint. If one engineer gets stuck on a gnarly story, consider reassigning a lighter issue or pairing to keep momentum.
Pro tip: Resist the urge to “hide” delays by stuffing more status categories into the workflow. A clear, honest Board plus a live burndown is the fastest way to make good decisions.
Step 10: Demo, close, and reflect
On the final day:
- Sprint review/demo: Show the increment to stakeholders. Because issues are linked to commits and PRs, you can trace exactly what changed for each story.
- Close remaining work: Anything not done moves back to Product Backlog and will be reconsidered next sprint. Don’t quietly carry it over without a conversation; this is your chance to re‑prioritize.
- Retrospective: Capture what helped you align across teams and what created friction. Log action items in the Wiki and turn the top 1–2 into issues for the next sprint (e.g., “Create shared API mock server”).
Step 11: Report and share outcomes quickly
Backlog makes it easy to export what happened so leaders across teams stay in the loop:
- Gantt export (Excel): Useful for a one‑page view of what was planned versus what finished.
- Issues export (CSV/Excel/print): Grab fields like subject, status, assignee, start/end dates, and story points to feed internal dashboards or share with stakeholders who don’t live in Backlog.
Pro tip: Keep exports light and repeatable. A single Issues export filtered to Sprint 1 with columns for Issue Key, Title, Assignee, Status, and Points is often enough.
Putting it all together (multi‑team checklist)
- One shared Product Backlog milestone that every story belongs to.
- Drag‑ordered Board as the canonical priority list — visible to everyone.
- Sprint 1 milestone assigned to the committed top slice, using batch update.
- Story points in Estimated Hours for fast, comparable burndown.
- Gantt grouped by assignee/team to balance load and spot dependencies.
- Statuses tailored to your handoffs (e.g., Testing/Review).
- Daily standups on the Board, right‑to‑left flow to prioritize finishing.
- Wiki pages linked from issues for decisions and learnings.
- Issues ↔ commits/PRs linked via issue keys for instant traceability.
- Burndown + flame icon watched daily; scope adjusted when needed.
- Exports for quick stakeholder updates.
Frequently asked “first sprint” questions
How many points should we commit to in Sprint 1 if we don’t have velocity yet?
Use capacity as your guardrail. Sum up each developer’s realistic focus time for the sprint (accounting for meetings and support) and choose a point total that feels comfortably achievable. It’s better to under‑commit and finish early than miss and start your multi‑team cadence with a carry‑over.
Do we need separate sprints per team?
If teams are tightly coupled on a common goal, a single shared sprint with team filters works well. If they operate independently, separate sprint milestones can reduce noise — just keep a shared Product Backlog for cross‑team prioritization.
Should we estimate in hours or points?
For planning across multiple teams, relative estimates (story points) are usually more robust. Enter the numeric point values in Estimated Hours to power Backlog’s charts without implying fixed hours.
Get started with your first Sprint
Your first sprint in Backlog doesn’t have to be perfect — just visible, aligned, and shippable. Use milestones to frame the work, the Board to agree on what matters most, Gantt to balance capacity and dependencies, and burndown to learn whether your plan is realistic. Keep decisions in the Wiki, link code to issues, and run lightweight reviews and retros to improve every two weeks. And that’s it!
Start small, adjust as you go, and let Backlog’s shared views keep multiple teams moving in the same direction — fast. Ready to give it a try?
About Author

Georgina Guthrie
Guest authorGeorgina is a displaced Brit currently working in France as a freelance copywriter. Before moving to sunnier climates, she worked as a B2B agency writer in Bristol, England, which is also where she was born. In her spare time, she enjoys old films and cooking (badly).


