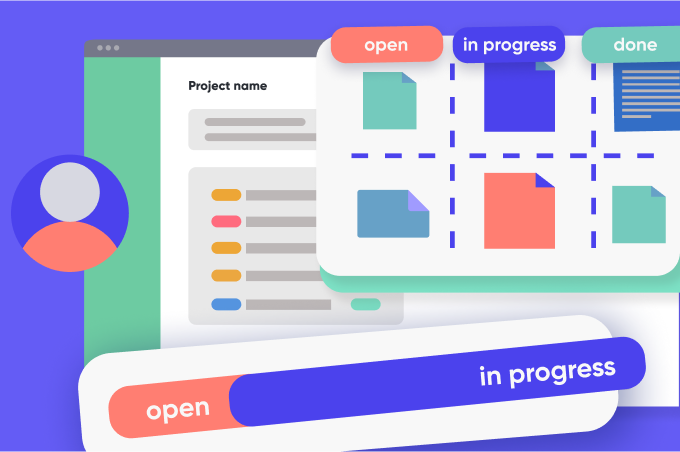
A solid issue-tracking system is paramount to success if you want to keep your project team on-task and on deadline. Issue tracking helps teams collaborate, prioritize, and resolve issues efficiently, ensuring no details get lost.
Backlog is a comprehensive project management solution that integrates robust issue tracking with version control, collaboration tools, and other advanced features.
Let’s explore how you can leverage Backlog to track your issues and manage your projects effectively.
Understanding issue tracking
Issue tracking is the process of identifying, recording, and managing any problems, tasks, or requirements that occur during a project. Issue tracking and task management systems are essential to the success of any project because they enable teams to collaborate, prioritize, and resolve issues efficiently.
Without issue tracking, project teams may suffer from:
- Lack of visibility and oversight: Without a clear and transparent way to track issues, it’s challenging to maintain visibility into the project’s status, pending tasks, and potential roadblocks. This can lead to miscommunication, missed deadlines, and a general sense of disorganization.
- Inefficient communication among team members: When issues are scattered across various channels or mediums, teams struggle to maintain a coherent dialogue, share updates, and keep everyone on the same page.
- Difficulty with prioritization and record keeping: Without a systematic approach to issue tracking, prioritizing tasks, allocating resources appropriately, and keeping stakeholders informed becomes unnecessarily complicated.
However, with a robust issue tracking system like Backlog, teams can overcome these challenges. A centralized platform for issue tracking increases transparency, facilitates communication, and helps you prioritize tasks based on their importance and impact.
Ultimately, effective issue tracking is a critical component of successful project management. It ensures that teams deliver high-quality results within the specified timeframes and budgets.
Introduction to Backlog issue tracking software
Backlog is a comprehensive project management platform that offers a powerful suite of issue tracking tools with a user-friendly interface that streamlines workflows and fosters seamless team collaboration. It also supports workflow automation to further enhance productivity and is also a powerful bug tracking software.
At the core of Backlog’s issue tracking lies its highly customizable issue management system. With Backlog, you can tailor every aspect of your project’s issues to align with your team’s unique processes and project requirements.
From custom issue statuses and types to specialized categories and custom input fields, Backlog empowers teams to create a tailored issue-tracking experience that perfectly fits their needs.
Ensuring team members remain informed and up-to-date is crucial for effective issue tracking. Backlog keeps your whole team in the loop with both in-app and email notifications.
Complex issues often require the team to divide and conquer by breaking tasks down into smaller, more manageable subtasks. Backlog’s subtasking feature allows you to do just that, assigning portions of an issue to multiple team members for efficient collaboration and parallel execution.
In short, Backlog helps you streamline your team’s workflows, enhance collaboration, and deliver high-quality projects more efficiently.
Setting up your project in Backlog
Backlog consolidates your entire project workflow into one centralized platform where you can manage each project-related task from conception to completion.
To get started, you first need to create a new project workspace.
From the main dashboard, select the New Project button and enter a distinctive project name and key.
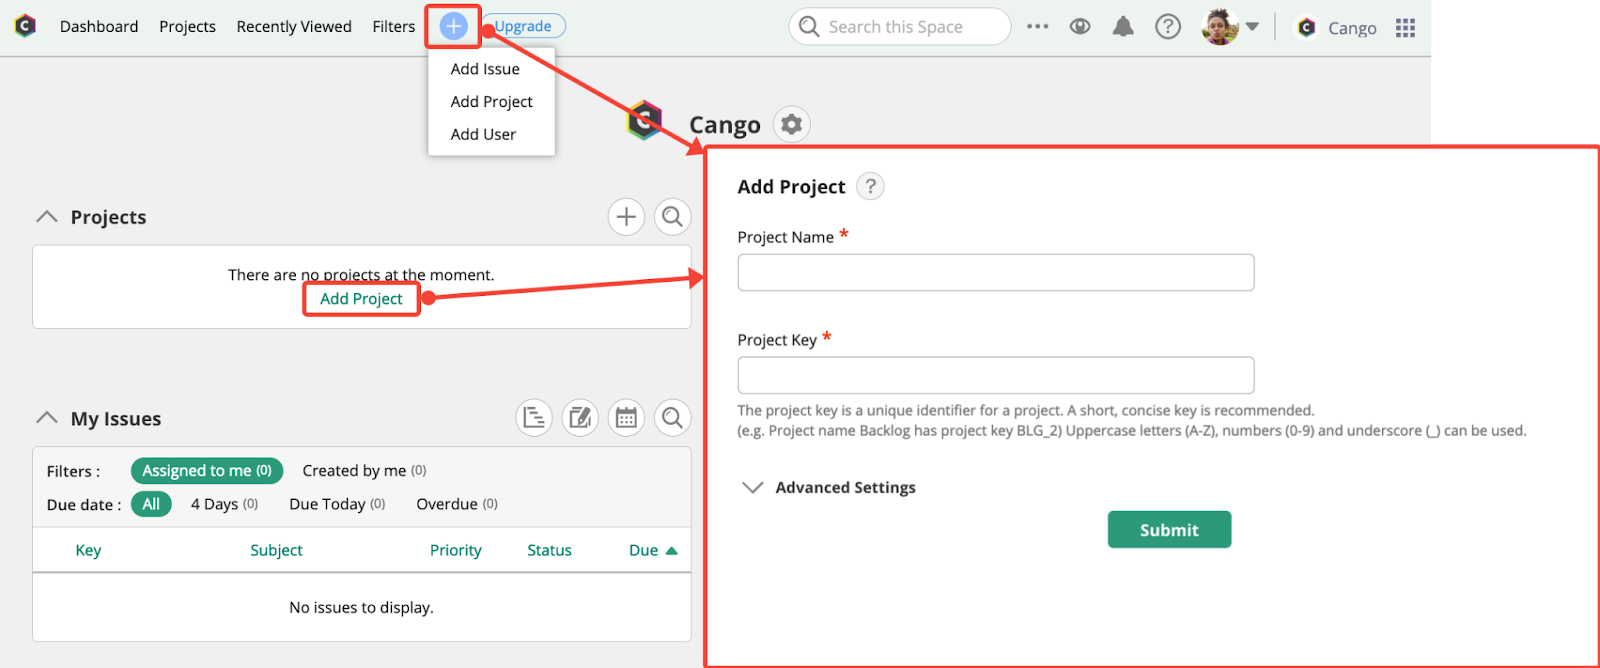
Next, customize your project using the Project Settings menu.

For example, you might want to enable:
- Gantt and Burndown charts for advanced project analytics
- Subtasking for more detailed task management and issue tracking
- Git or Subversion for integrated version control
By bringing all these key components into one centralized project hub, teams can coordinate and execute work more efficiently, with full visibility across the entire flow.
Now that your project has been created, the next step is to set up issue tracking.
Creating and categorizing issues
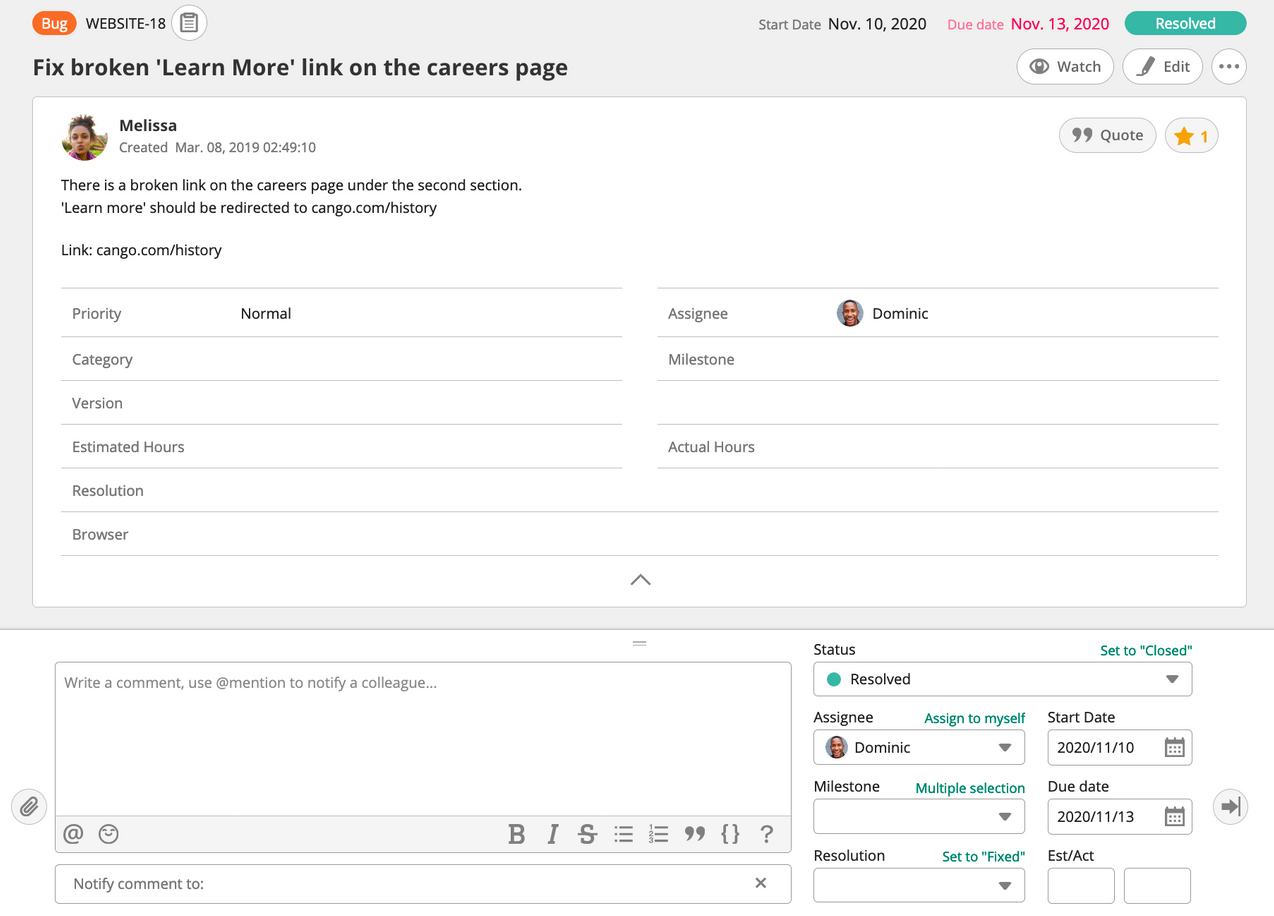
In Backlog, each issue gets its own dedicated page containing all the relevant details, attachments, and a collaboration stream for the team.
Creating a new issue is simple. Just follow these steps:
- Click the + icon in the global navigation menu to open the “New Issue” dialog.
- Enter a clear title summarizing what the issue is about.
- In the description field, provide thorough details like requirements, goals, constraints, and any other context the assignee will need.
If the work is particularly complex, break it down into sub-tasks by adding subtasks, i.e., child issues. This creates a checklist-style structure within the parent issue for granular assignments and progress tracking.

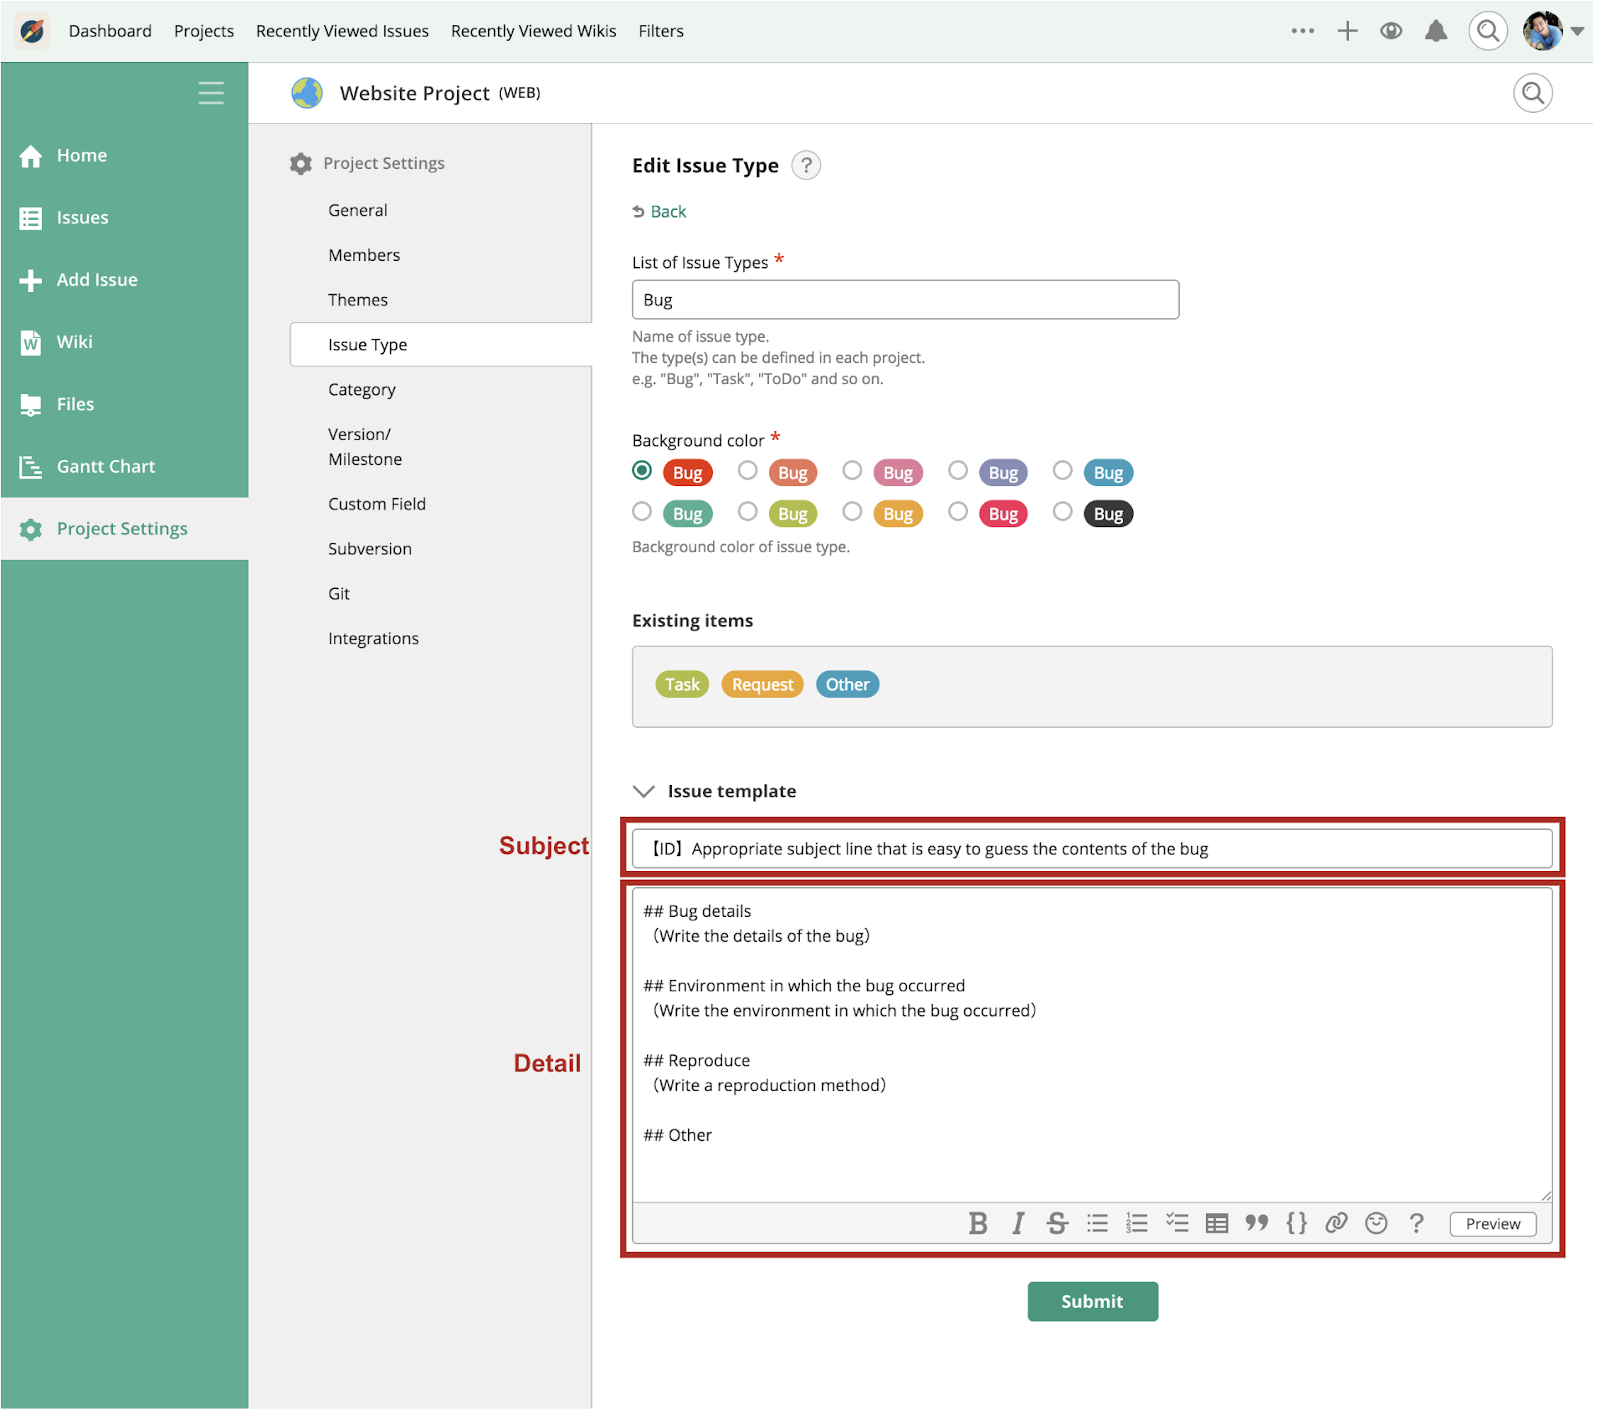
With the core issue defined, Backlog provides powerful categorization capabilities essential for effective bug tracking.
For example, custom issue types allow to label and sort issues by work type—for example, feature development, bug fixes, or documentation—and establish templates for more detailed and streamlined issue creation.
And with Backlog’s categories feature, you can logically group and sort issues however makes sense for your team – by product, workstream, client, etc.
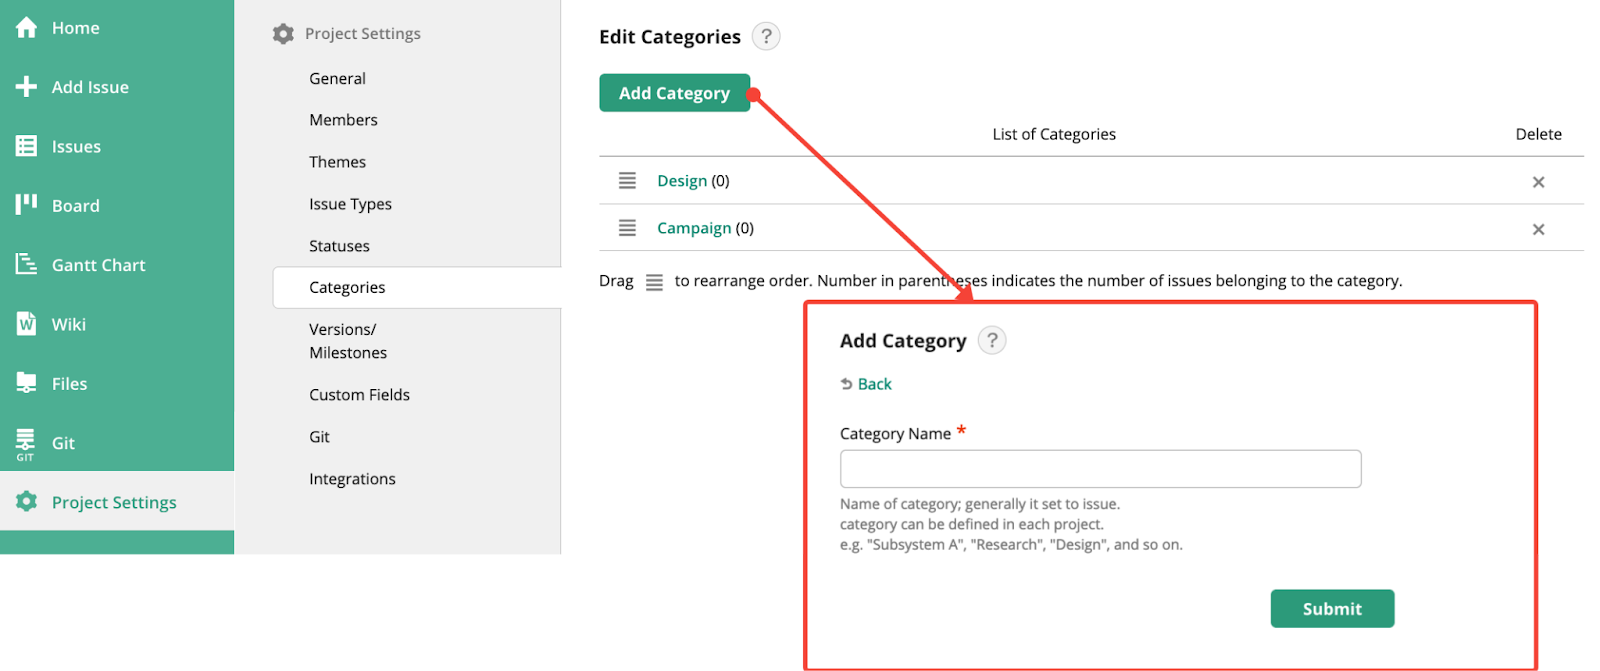
The more thought you put into configuring issue types, fields, and categorizations upfront, the more efficient your team can be.
Overall, Backlog’s structured approach to issues provides the building blocks for streamlined project execution from end-to-end. With issues properly defined, categorized and easily accessible, the path is cleared for high-velocity delivery. These key features make Backlog an invaluable tool for project management and bug tracking.
Assigning roles and responsibilities
In addition to managing and assigning individual tasks, Backlog also allows you to manage your project team.
You can add users to Backlog in two ways:
First, you can grant them access to the tool by adding them to your Organization.
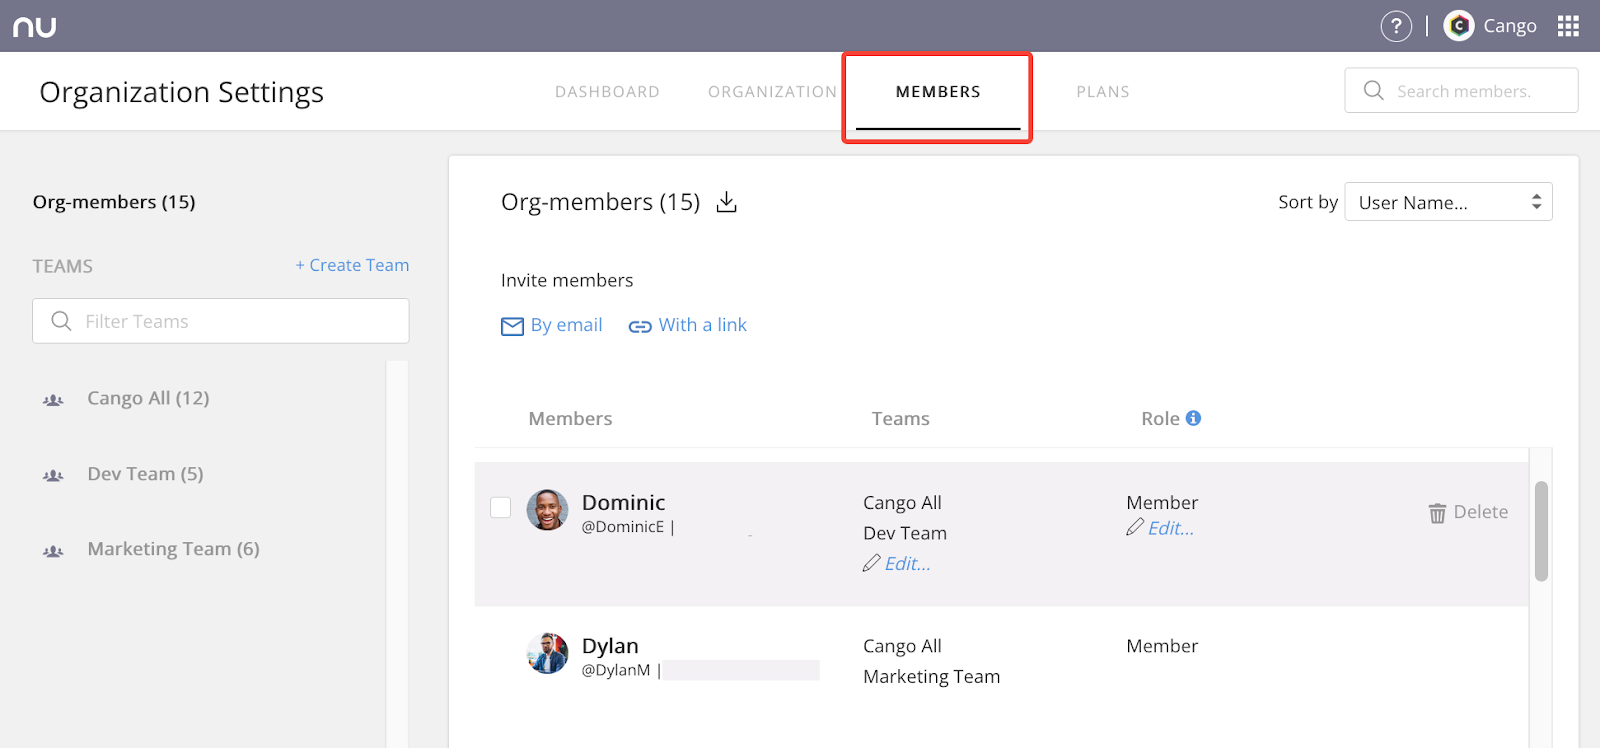
This is ideal for users who will work on multiple projects or for organizations that want to secure their projects by using Managed Accounts through Nulab Pass (more on that later).
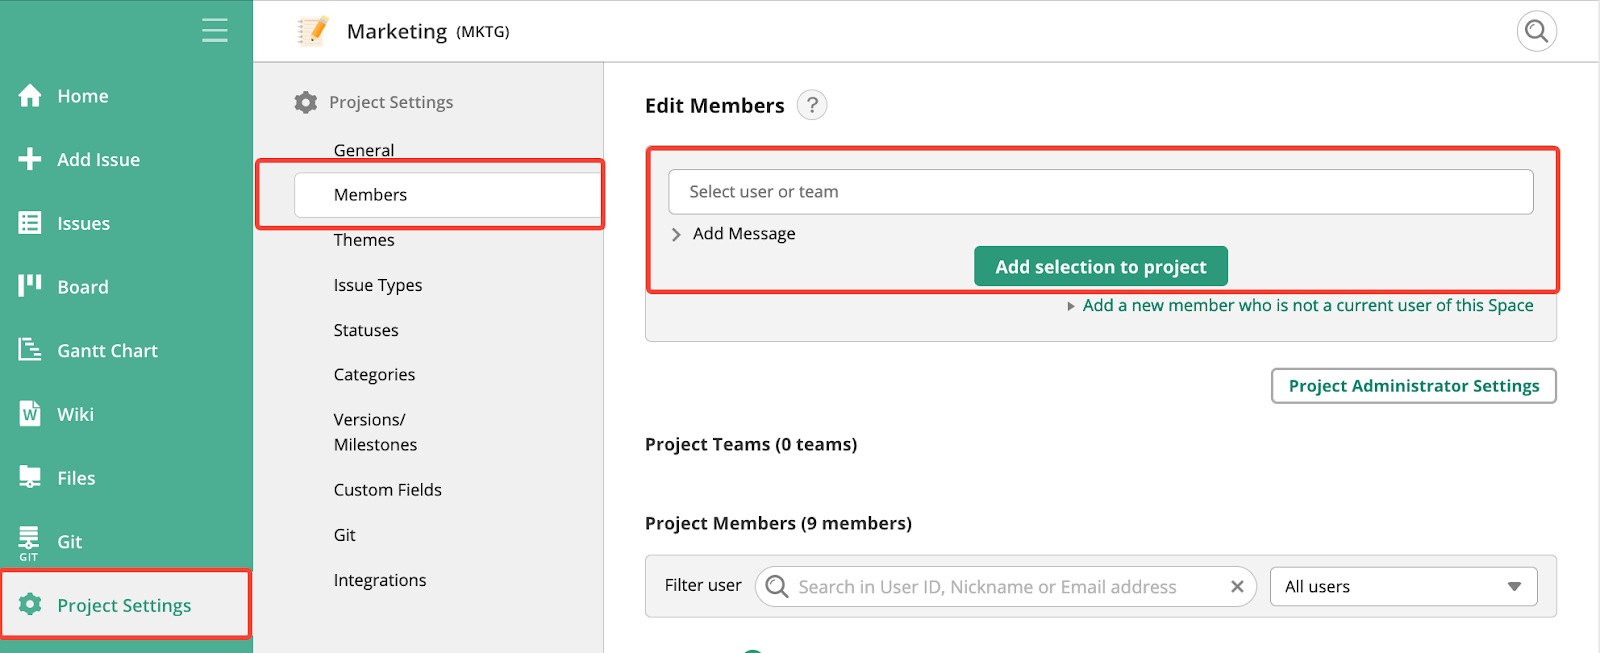
You may also add users to individual projects, regardless of whether you’ve granted them Organization-level access in Nulab. To do this, once you’ve created your project, go to Project Settings > Members.
When adding your team members, stakeholders, and guests, you will also need to assign their user roles. This determines their level of access.
At the highest level are Plan Administrators, who have complete control over the entire organization’s settings, billing, and user management. This role is typically reserved for operational leaders overseeing multiple departments.
Next are Administrators, who can still make organization-wide changes like adding/removing users and creating new teams or projects, but have a slightly more limited scope focused on a specific division or initiative.
For individual projects, there’s the Project Administrator role. These users have full administrative privileges for the project(s) they are assigned to. Project Administrators can customize workflows, manage project members, and essentially own that project’s settings and dynamics.
The most common role is Member. Members can create issues, join project teams, view reports, and execute all the core project work, but they can’t make administrative changes.
Finally, there is a Guest role for stakeholders who need visibility into a project but don’t require editing capabilities. Guests can view issues, comments, and files and browse the project wiki but cannot directly make changes themselves.
When configuring Backlog, consider the level of access each person should have based on their role and involvement.
Here are some suggested guidelines:
- Assign the Plan Administrator role sparingly, for example, limiting this role to senior operational leaders.
- Department heads, portfolio managers, and other supervisors responsible for multiple teams may be best suited as Administrators.
- Make project managers, scrum masters, and any primary decision makers for a given project the Project Administrators.
- Keep individual contributors like developers, designers, writers, etc., as Members for their respective projects.
- Any external clients, stakeholders, or anyone needing visibility can be added as a Guest.
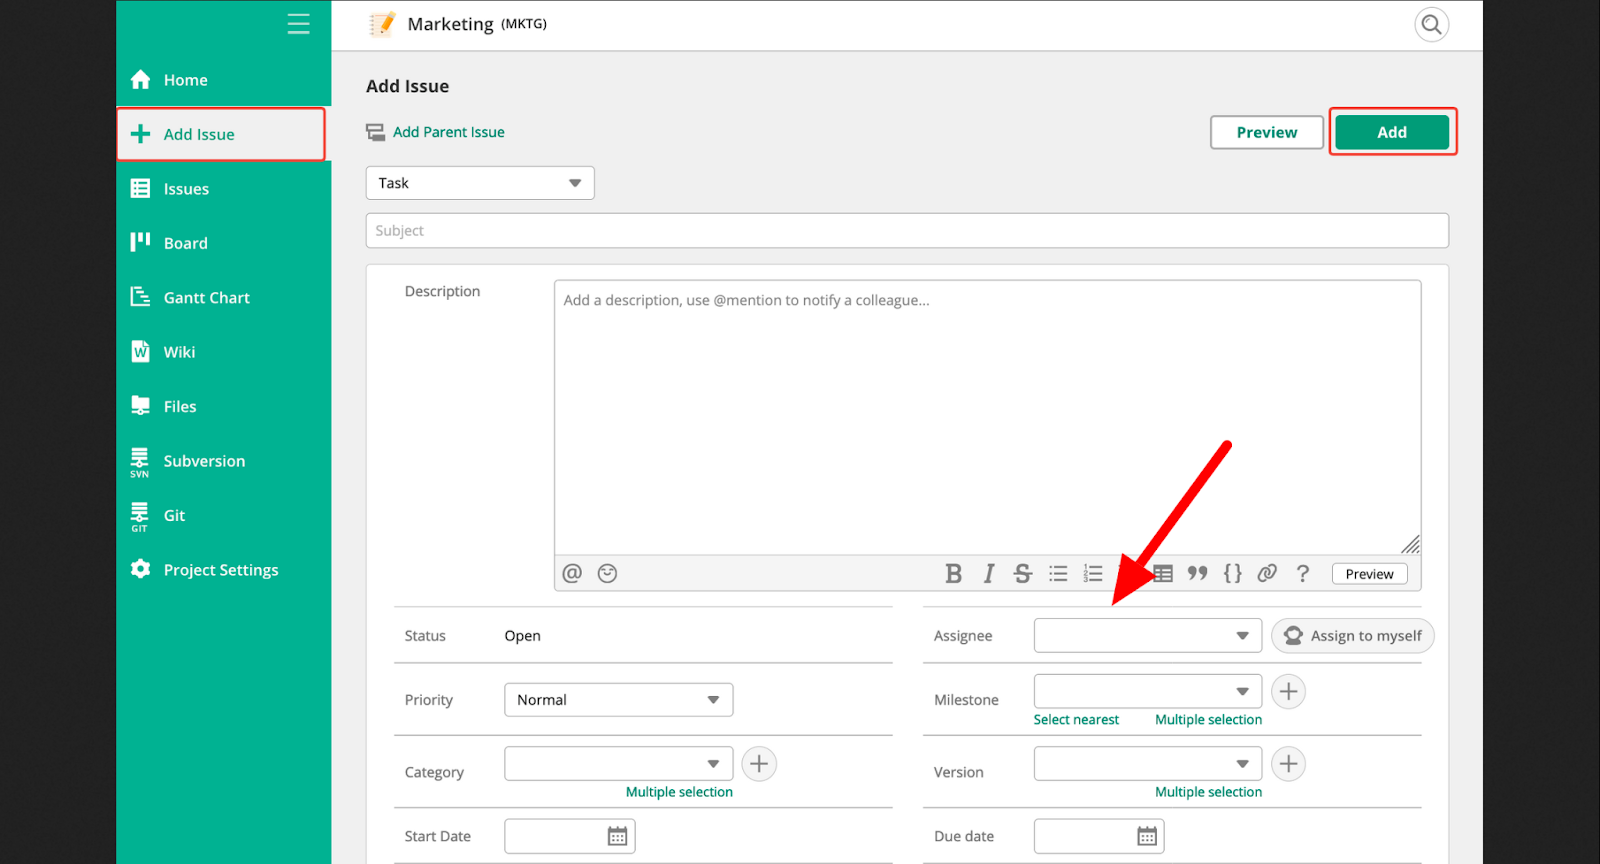
Start delegating issues once everyone has access to the tool and the project. Each issue can be assigned to one person at a time. If you must share responsibilities across multiple team members, consider breaking the issue into subtasks first.
Assigning issues and subtasks is simple. While you’re creating or editing a task, use the Assignee dropdown to select the person you want to delegate it to.
Once created, you can review issue assignments and manage the team’s workload in a few different ways.
First, use the Issues page to see all issues laid out in a simple chart and sort or filter by the assignee if needed.

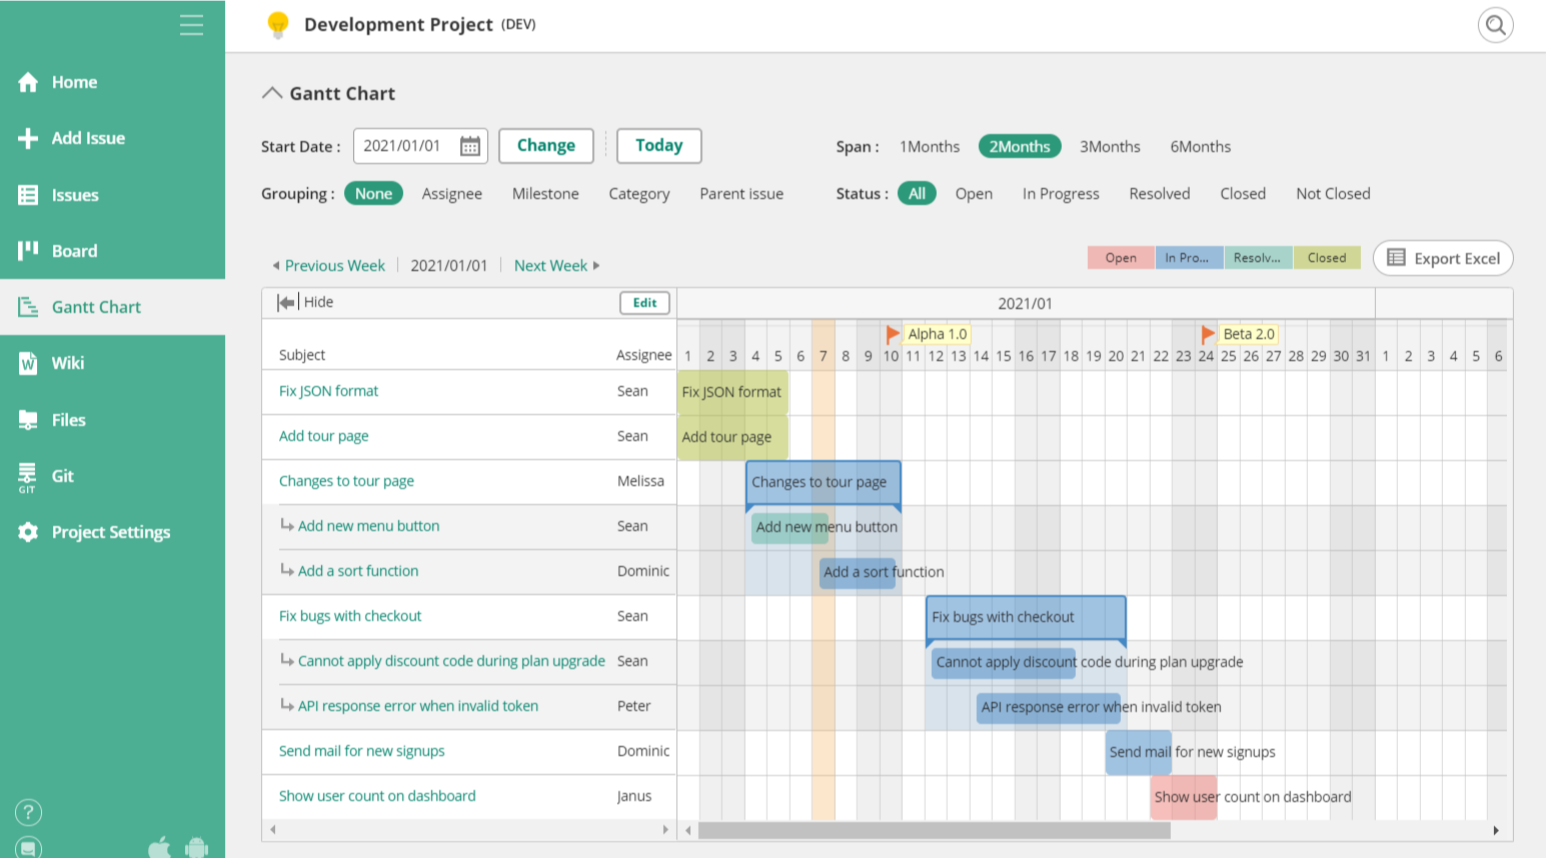
Or, manage your team’s assigned deadlines using Backlog’s built-in Gantt chart, which lays out your project’s tasks and dependencies along a timeline.
By aligning roles to responsibilities, Backlog keeps everyone focused on their work. Those tasked to monitor progress can easily do so, while those driving execution can focus on getting things done.
Configuring notifications and permissions
Keeping everyone in the loop is key for projects to run smoothly. Backlog’s notification system makes sure team members stay up-to-date on the issues that matter. Notifications are automatically sent to the person an issue is assigned to, anyone mentioned on the issue, and those who have opted to watch the issue.
The watch feature acts like a subscription and bookmark in one, allowing you to track issues that are important to you. When you watch an issue, you’ll:
- Be able to quickly find and access the issue details
- Get notified anytime the issue is updated or changed
- View progress from your watchlist
To start watching an issue, go to the issue page and click the watch button. To stop watching, just click it again. You can access the issues you watch and their updates by clicking the icon in the main navigation menu.
In addition to in-app notifications, users can also receive email updates. To opt into this feature or manage your email settings, click on your profile icon in the top navigation, then go to Personal Settings > Email Settings.
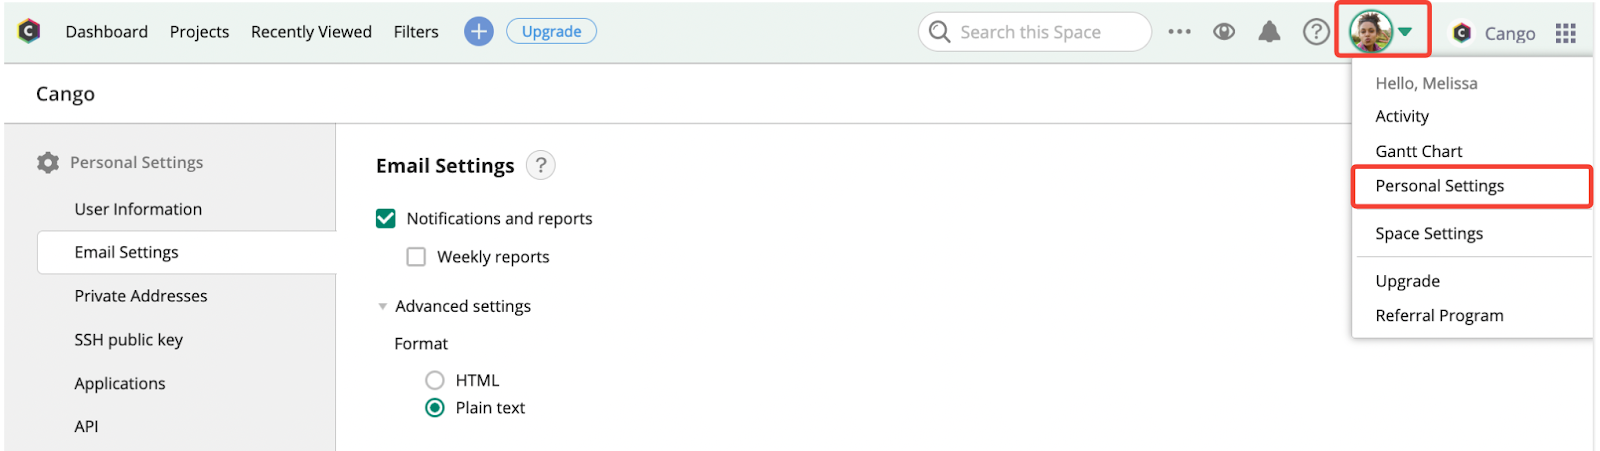
The email settings allow you to customize what types of notifications you receive. For example, you might choose for Backlog only to email you when you’re directly mentioned on an issue.
You can even set email preferences for each individual project you’re working on. Here’s how:
- Under Project Preferences, select Specify by Activity or Project.
- Find and add the projects you want to customize.
- Choose what issue updates you want to be emailed for each project.
Any projects not customized here will follow the default settings under General Email Notifications.
Finally, to push your notifications to your preferred communication app, simply set up the Slack, Microsoft Teams, or Google Chat integrations.
By adjusting your notification and email settings, you control how much or how little you’re updated on issue activity—keeping you informed without getting overwhelmed.
Best practices for using Backlog’s issue tracking
Implementing a robust issue tracking system like Backlog is a great start, but following best practices is essential in helping you truly maximize the benefits.
Here are some tips for effective issue management:
- Regularly updating issue statuses: Make it a habit to regularly check off completed tasks, advance issue stages, and close out resolved items.
- Using labels and filters: Categorize issues by type, priority, assigned owner—or any other taxonomy that makes sense. This saves time and reduces noise.
- Integrating with version control: Manage your version control with Backlog’s Git or SVN integrations to get a comprehensive view of the entire project lifecycle. Issues can be linked directly to code commits, branches, pull requests, and more for full accountability.
- Consistent review and triage: Hold regular triage sessions, allowing teams to discuss roadblocks, prioritize them, and agree on the next steps as a unit.
With these strategies, you can elevate your team’s use of Backlog’s issue tracker. Rather than just tracking tasks, you’ll be able to accurately forecast timelines, coordinate resources, and deliver successful projects more efficiently.
Advanced features and integrations
Backlog also comes with a range of advanced features and integrations you can use to improve your issue tracking processes even further. Below, we’ve summarized some of the best of these.
Creating custom fields for specific tracking needs
While Backlog’s default Issues pages are detailed, they may not always cover everything. If your project has unique tracking needs—for example, numerical data, instructions, KPIs, or links to external resources—you can create custom fields to house them.
Backlog offers five types of custom fields:
- Simple text fields
- Sentence fields for longer text that occupies multiple lines
- Numeric fields
- Lists—including single or multi-select options
- Dates
Create new custom fields by going to Project Settings > Custom Fields. Then, click Add Custom Field to create it and associate it with specific issue types.
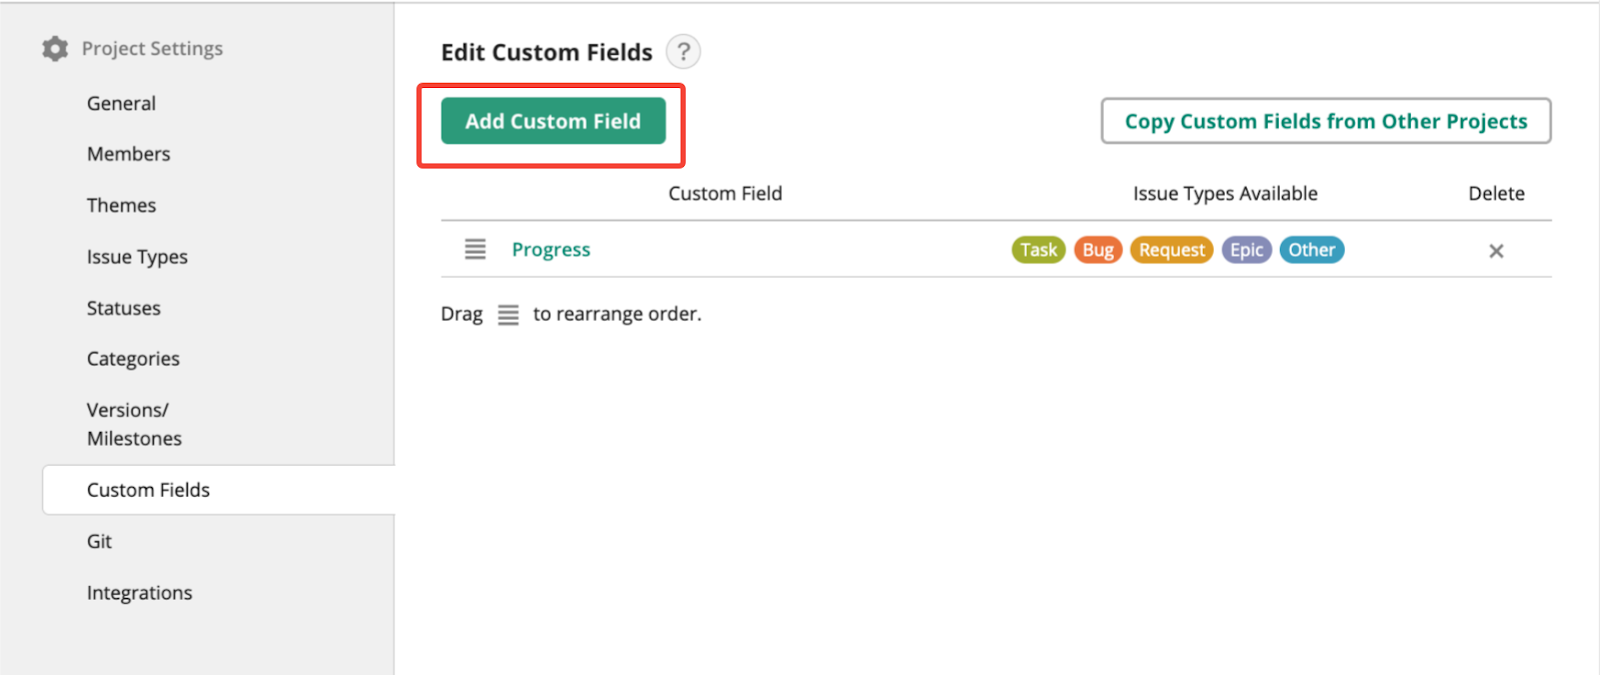
If you’ve already created a new field on another project, simply select Copy Custom Fields from Other Projects to import it.
Now, each issue your team creates will include all the details the team needs to start working and track their tasks more effectively.
Integrating with other tools
Backlog offers several integrations that can improve your project’s security and productivity.
Two such integrations—Nulab Pass and Cacoo—don’t require any additional setup beyond adding the tools and granting your team access.
Nulab Pass is Nulab’s security management solution.
With it, you can:
- Create managed accounts for your team, granting you more control over who can access your tools and project data
- Improve security by eliminating the need for individual user passwords
- Regularly audit your security logs, ensuring nobody has access to your organization’s tools that should not
Learn more about Nulab Pass and try it for yourself.
Cacoo is a user-friendly design platform that enables you to create engaging, easy-to-understand charts and diagrams for any project.
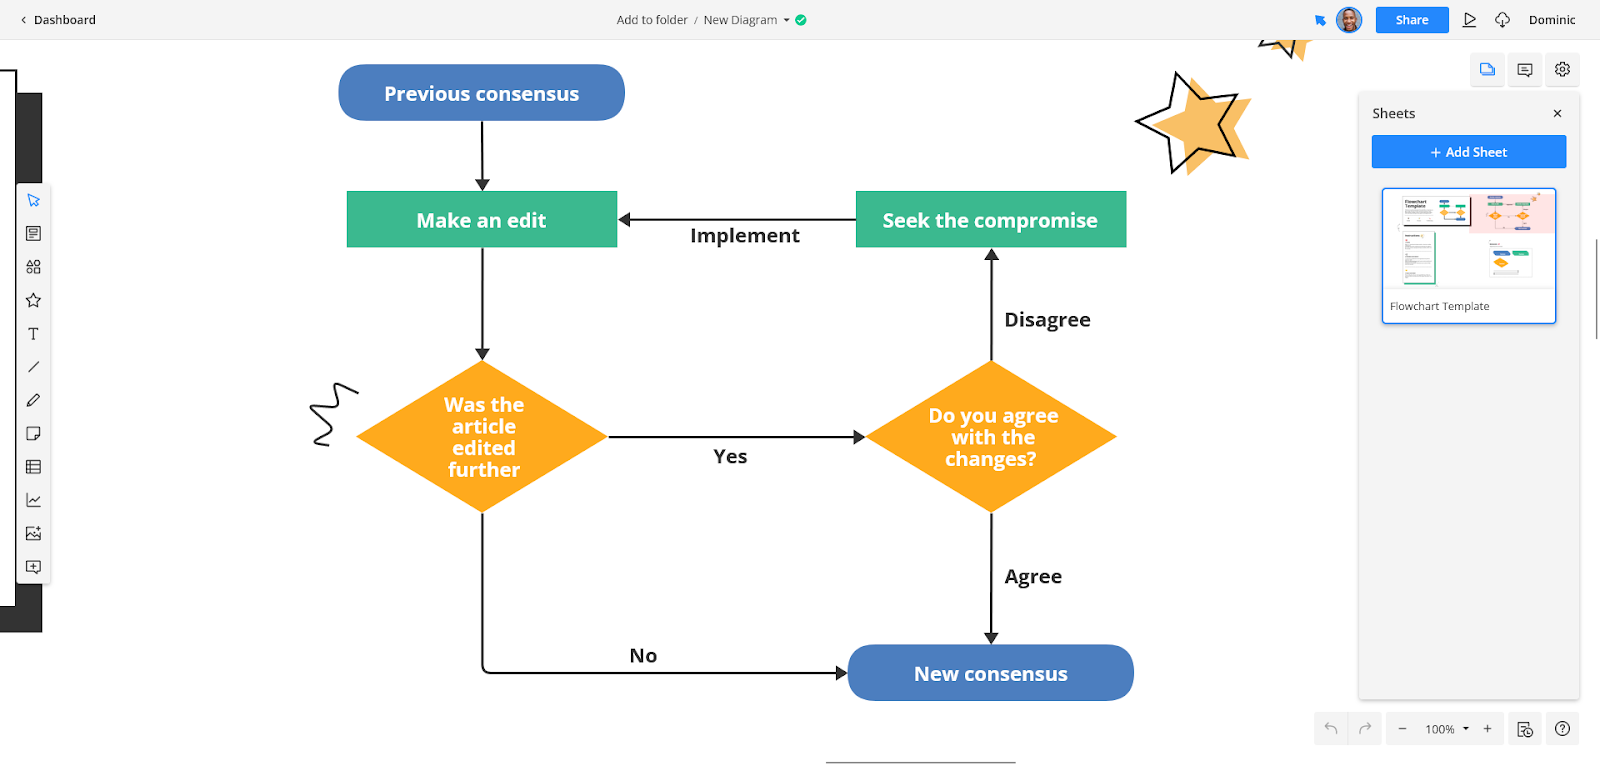
Its user-friendly, drag-and-drop interface makes it easy to create effective designs, even if you’ve never used a design tool before. Its free template library includes hundreds of pre-designed charts, graphs, and visual assets. And its dynamic charts enable you to visualize any reporting data in a snap—all you have to do is upload a spreadsheet.
Best of all, any design you create in Cacoo is instantly shareable to Backlog. Just copy and paste a link to your image into an issue comment, and it will automatically appear for the whole team to see. Use it to illustrate processes, workflows, important data, and more—anything that can help your team understand their tasks and execute them effectively.
Finally, integrate your issue tracking with Backlog into the rest of your team’s daily workflow.
For example, Backlog’s Slack, Microsoft Teams, and Google Chat integrations allow you to create, update, and track issues directly from your team’s favorite messaging app—meaning you don’t need to stop the conversation to keep your issue tracking up-to-date.
Find these and other integrations in Backlog’s third-party integration library.
Getting started with Backlog
Launching a new project management tool may seem intimidating—especially if your team is already used to something else. But Nulab offers plenty of education and support to make the transition seamless.
For example, you can learn about almost anything—from overcoming everyday project management challenges to creative ways to use Backlog—over in Nulab Learn. For instance, you could read up on using Backlog to streamline your client management or explore a deep dive into the Agile methodology.
For product-specific support, check out the Nulab Help Center. Its Backlog Support library includes articles on every Backlog feature. For example, read up on setting up your first project, or find a step-by-step guide to watching an issue.
Implement Backlog’s issue tracking and project management solutions to unlock your team’s full potential. Experience the power of streamlined workflows, enhanced collaboration, and efficient issue resolution. Try it for free today!
About Author

Backlog Staff
Guest authorBacklog is the all-in-one project management software by Nulab. Combining task management, version control, and bug tracking, Backlog delivers the features teams need to create great projects in one simple tool.