
Let’s take a moment to talk about something that isn’t strictly to do with code but is still a crucial part of your web development arsenal: mockups.
Think of mockups as being like the conceptual building blocks of your creation. They’re a vital part of the website/app development process, nestled in between the wireframing and prototyping stages.
But what is a mockup? Where does it fit into the wider product development process? And what do you do with one once you’ve created it? We have the answers.
What is a mockup?
In its simplest form, a mockup is a full-sized model of a design or a device used for product presentations or demonstrations. Mockups are used in everything from branding exercises and social media layouts, to packaging, products, and print.
In the realm of web development, mockups take on a more specific, arguably more exciting role. They’re not just static, lifeless pictures. They are interactive, visual representations of your future website or application. They’re the bridge between barebones wireframes and high-fidelity prototypes.
When you’re working with mockups, you’re dealing with a mid to high-fidelity visualization of your design, usually showcasing the layout structure, the color schemes, typography, images, and the overall navigation interface of the website or app. And yet, while mockups are more detailed and functional than wireframes, they’re not fully interactive like a prototype. They give you the look, but not the full experience. Think of it like a 3D model of a car: it might look and feel like the real deal, but you can’t drive it — yet.
Why mockups?
They’re more than just pretty pictures. They are essential for communication, testing, visualization, and design approval. Let’s unpack these.
Communication and buy-in
Mockups are your design’s universal translator. They turn the technical details of your design into something visually tangible, enabling a more constructive conversation with non-technical stakeholders. With a mockup, clients, marketing teams, or even your dad can understand what you’re planning to build without having to decode CSS or HTML.
Because they’re easy to understand, they’re a great tool for getting stakeholders on board, helping customers make a purchasing decision, boosting lead generation efforts, and generally engaging your audience.
Testing
A mockup is your website’s test dummy. It allows you to play around with design elements, like color combos, typographies, and UI elements, in a safe environment where errors are welcome and there’s zero risk of breakage. Want to see if a red call-to-action button works better than a blue one? This is your playground.
Visualization
Mockups provide a crystal-clear visual representation of how different elements of a website or app will look in relation to each other during those all-important early stages. Does that header look too big? Is the text readable against the background color? Your mockup will show you.
Design approval
Before you wade into the deep waters of coding, you need sign off on your design. A mockup provides a realistic, easy-to-understand model that stakeholders can review. This early feedback can save precious development time by spotting potential issues before they become coded reality.
Documentation
Last but definitely not least, mockups serve as documentation for your design process. They’re your design diary, chronicling your journey from initial concept to final design. This can be incredibly useful for future projects, allowing you to avoid past mistakes and replicate successful elements.
What’s the difference between a mockup and a wireframe?
Understanding the difference between a mockup and a wireframe is crucial.
Wireframes
Think of a wireframe as the blueprint or skeleton of your website. It’s a low-fidelity, basic layout and structure of the website’s pages and content. Wireframes are typically created at the beginning of the design process to establish the basic size and placement of page elements, site features, and navigation details.
In a wireframe, design elements are represented by placeholders and boxes, which stand in for the more detailed components of the final design. The focus here is on functionality, behavior, and priority of content, rather than color, typography, and imagery.
Mockups
Unlike wireframes, mockups provide the visual richness of the website or app, giving stakeholders a solid idea of the final product’s aesthetics. But while they look like the final product, they’re not actually usable. Clicking that button won’t do anything, no matter what.
What’s the difference between a mockup and a prototype?
A prototype is an interactive model of the final product. It looks like the final product and behaves like it too. You can click buttons, toggle menus, and generally play around with the design just as you would with the finished website or app.
Mockups are static, high-fidelity designs that show how the product will look, while prototypes are interactive, allowing users to experience how the product will work.
Where do mockups fit in the web design process?
Your first instinct might be to dive straight into coding, but let’s hold that thought. Web design is a marathon, not a sprint, and strategic steps in the right direction can make a world of difference.
A website’s design journey typically follows these stages:
Requirement Gathering > Wireframing > Mockups > Prototyping > Development > Testing.
Mockups make their grand entrance right after wireframing and before prototyping. Let’s break it down:
1. Requirement gathering
This is where you identify what the website needs to do. This could be anything from simply showcasing a portfolio to providing an intricate eCommerce platform. Here, you’re defining the site’s purpose, target audience, functionality, and content.
2. Wireframing
Once the requirements are clear it’s time to create the skeleton of your website, a.k.a. the wireframe. This is a rough, low-fidelity blueprint that outlines the basic structure and layout of your website. It’s like the sketch an artist makes before starting a painting.
3. Mockups
Here’s where mockups make their star appearance. They add flesh to your wireframe’s bones, offering a visual representation of how the final product will look, but without interactivity. The mockup will include color schemes, typography, buttons, and images – basically, the aesthetics of the site. Consider this your artist now adding color to that sketch.
4. Prototyping
After the mockup comes the prototype, which is a higher-fidelity representation that includes interactivity. It’s a working model of your site where you can click on buttons, open menus, and navigate as if it were the final site. It’s like an interactive, 3D version of your artist’s painting.
5. Development
After the design gets the green light, it’s time to code it into reality.
6. Testing
Post-development, the website undergoes various tests to ensure it’s running smoothly and bug-free before being launched.
A step-by-step guide to creating a mockup
Stage 1: Understanding the project’s scope
Before you even think about opening your mockup tool of choice, you need to have a deep understanding of the project’s scope. Here’s what to consider:
- Purpose: What is the website or app supposed to do? Whether it’s an eCommerce site, a blog, a portfolio, or a complex web application, you need to know its raison d’etre.
- Target audience: Who’s using your creation? Knowing your target audience will influence your design choices significantly. For example, a website targeting 18 to 25 year olds might have a different design approach from one aimed at senior citizens.
- Content: What kind of content will the website or app feature? Are there going to be images, videos, long-form text, or user-generated content? Knowing this will guide your decisions.
- Functionality: How will users interact with your website or app? What features and functionalities will it have? This could include things like contact forms, user profiles, shopping carts, and so on.
- Brand guidelines: If the website or app is for a specific brand, you need to consider the brand’s guidelines. This will dictate your choice of colors, typography, and overall vibe.
- Competitor analysis: Reviewing competitor websites or apps can offer important insights. Identify what they do well and where they fall short to leverage their strengths and avoid their weaknesses in your design.
Stage 2: Creating a wireframe
Now it’s time to lay the groundwork for your mockup with a wireframe. Let’s break down the process:
- Define the information hierarchy: Start by outlining what content is most important and should be most prominent on the page. This hierarchy will guide the layout, helping ensure key information is easily accessible to users.
- Layout design: Begin sketching out the basic layout of your pages, ideally via a diagramming tool (Cacoo has handy wireframe templates you can use). This includes placing headers, text blocks, images, and other components in the positions they will occupy in the final design. Keep user experience in mind and try to create a natural flow that guides users through the site.
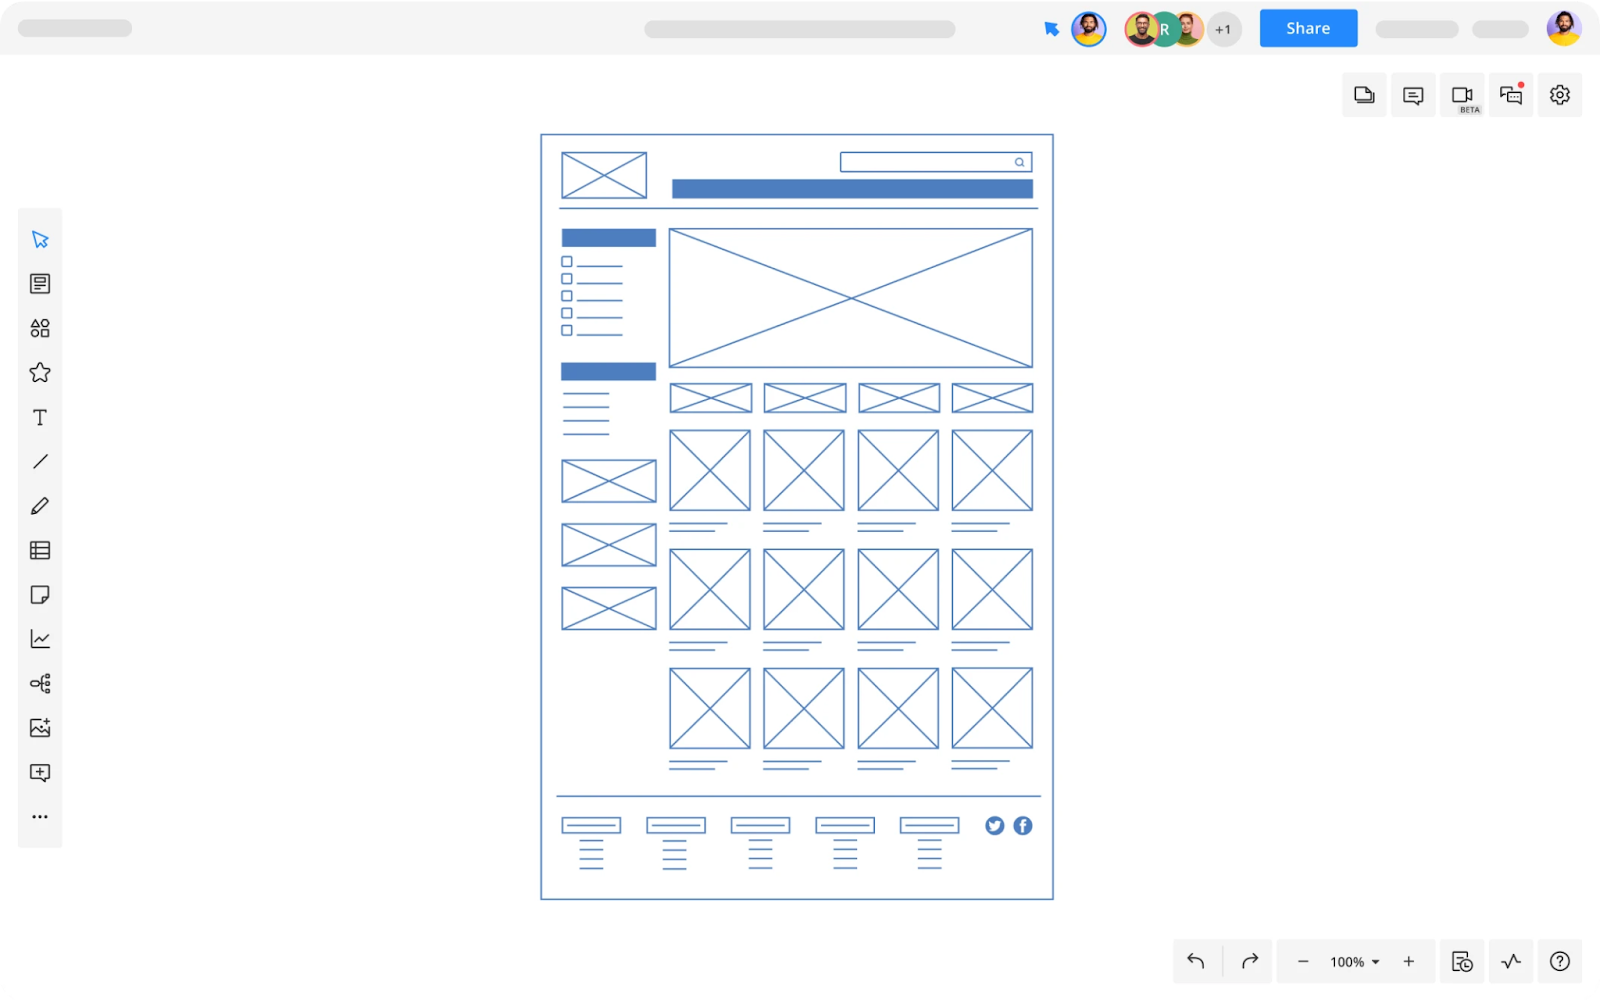
A low-fidelity wireframe created in Cacoo
- Navigation structure: Decide how users will move around your website or app. Will there be a navigation bar at the top? A menu that slides out from the side? Hamburger menus, anyone? Consider what makes the most sense for your users and the amount of content you need to organize.
- Placeholders: Use boxes and placeholders to represent images, text blocks, or other types of content. At this stage, you’re not worried about visual design — just about where everything will go.
- Annotations: Include notes to explain how certain elements will function, especially if it’s not immediately clear from the wireframe. These notes can be helpful when you move on to creating the mockup and eventually the prototype.
Stage 3: Transforming the wireframe into a mockup
With a clear wireframe in hand, you’re now ready to move into the more detailed phase of the design process: turning that wireframe into a mockup. This is where the website or app begins to take shape visually.
- Choose your design tool: Start by selecting a website mockup tool that best fits your needs. The choice depends on your comfort level with the tool, the complexity of your design, and the features you need.
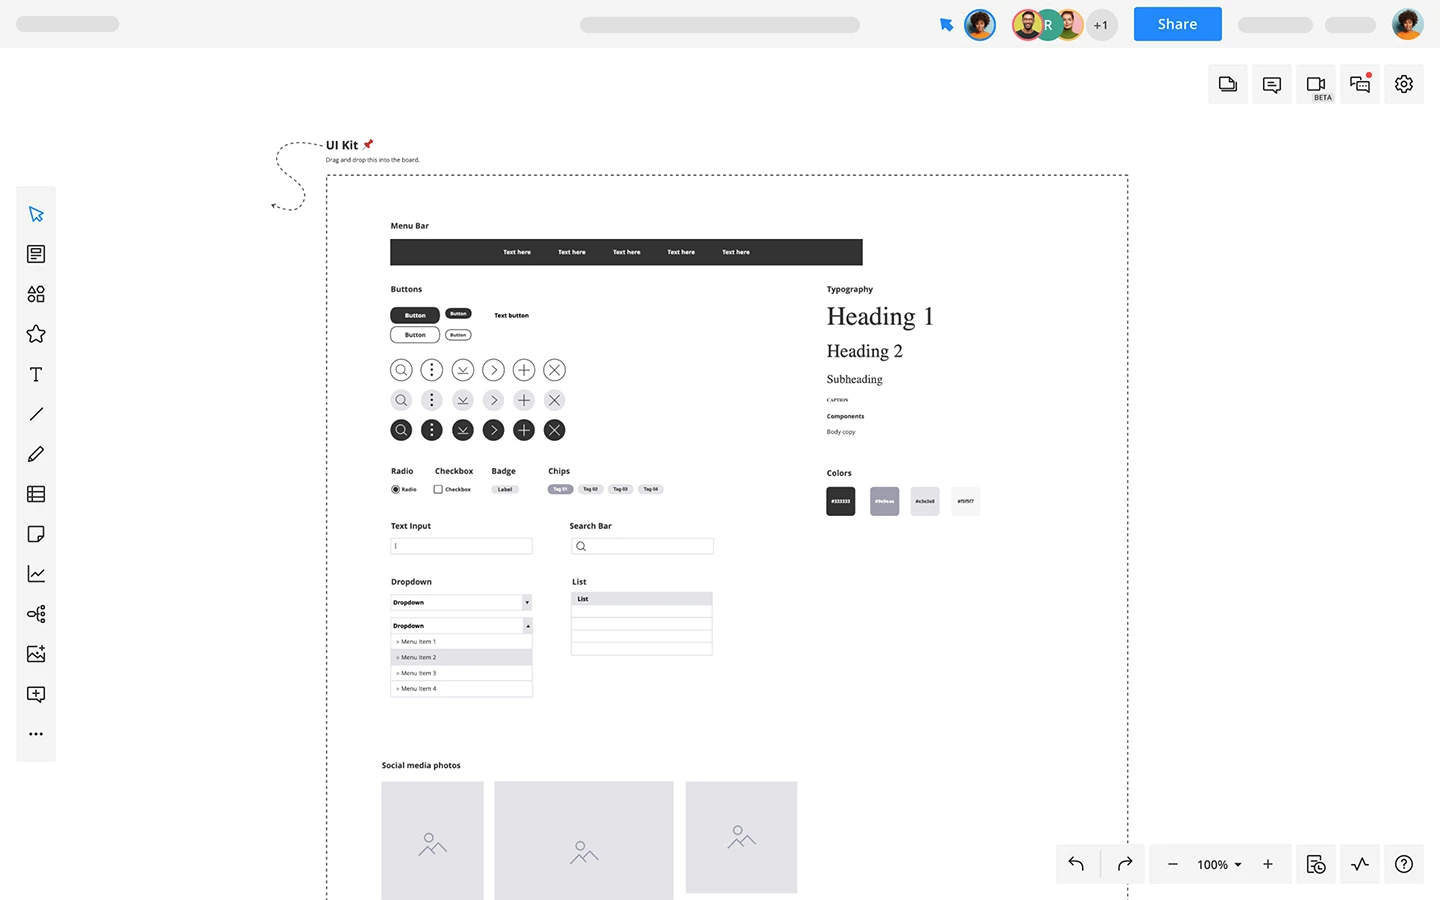
Creating a website mockup in Cacoo
- Layout and grids: Import your wireframe into your design tool if you created it separately, and begin setting up the layout using grids. Grids help you maintain consistency and alignment throughout your design.
- Typography: Select the fonts you’ll be using in your design. Keep in mind legibility, mood, and brand identity. Make sure to consider the hierarchy of your text elements (like headers, subheaders, and body text) when choosing font sizes and weights.
- Color scheme: Decide on the color palette that you’ll use throughout the website or app. This will often be influenced by the brand’s existing color scheme, if applicable. Remember to consider color psychology and accessibility.
- UI elements: Begin replacing your placeholders with detailed UI elements. This includes buttons, form fields, navigation bars, etc. Make sure these elements are consistent in style and align with your chosen typography and color scheme.
- Images and icons: Add any images, illustrations, or icons to your design. Ensure they are high-quality and consistent in style. Icons should be simple and easily recognizable.
- Review and refine: Lastly, review your mockup to ensure everything is consistent and aligned correctly. Check your spacing, font sizes, colors, and image quality. Make any necessary adjustments to improve the overall aesthetics. And that’s it!
Stage 4: Gather and incorporate feedback
Don’t keep your mockup a secret! Once you’ve completed your initial draft, it’s time to gather feedback from stakeholders. This can include clients, team members, or even potential users. Here’s how:
- Present your mockup: Share your mockup with your stakeholders. If possible, present it in person (or via a video call/virtually) so you can walk them through your design decisions. Be prepared to explain why you’ve made certain choices and how they tie back to the project’s scope and goals.
- Gather feedback: Ask your stakeholders for their thoughts. Encourage them to consider both the aesthetics and functionality of the design. Is it visually appealing? Does it align with the brand? Is it user-friendly? Their feedback can give you insights into how well your project meets its objectives.
- Stay open and objective: Receiving feedback can be challenging, especially if it’s critical. But remember that feedback, even if it sounds mean, is meant to improve the final product. The trick is to stay open to suggestions and not to take anything personally. Graciously accepting feedback is a skill worth nurturing.
- Prioritize feedback: You might receive a lot of feedback, and not all of it will be consistent. It’s your job to sift through it and decide which pieces to act on. Prioritize feedback that aligns with the project’s goals and improves user experience, and make sure it’s reasonable. Or in other words, is within your predefined project scope.
- Incorporate changes: Implement the feedback, making necessary adjustments to your design.
- Iterate: The design process is iterative. Chances are, you’ll go through several rounds of revisions before arriving at a final mockup. Don’t be discouraged if your first attempt isn’t perfect; each round brings you closer to a design that gives a great user experience and leaves your users smiling. Remember: feedback is your friend!
Stage 5: Turning your mockup into a prototype
Now, it’s time to transform your static design into an interactive model that behaves like the final product.
- Choose your prototyping tool: Go for a tool that lets you add interactivity to your mockup. Many offer built-in prototyping capabilities to make things simpler.
- Define interactions: Identify the elements of your mockup that users can interact with. These might include buttons, links, form fields, menus, and more. Decide what action will occur when a user interacts with each element.
- Add interactivity: Use your prototyping tool to link different parts of your design together. The goal is to mimic the final product as closely as possible so you and your stakeholders can get a real feel for the finished product (before you’ve taken the leap to make it live).
- Test functionality: Once you’ve added interactions, it’s time to test your prototype. Go through every interaction to make sure it works as expected.
- User testing: Once you’re happy with your prototype, get it in front of users! Do this via various forms of user testing, like usability testing, A/B testing, user interviews, focus groups, surveys, and so on. The more feedback, the better.
- Refine and iterate: Based on your user testing, make any necessary adjustments to improve the user experience. Just like with the mockup, expect to go through several iterations before you arrive at the final design.
Stage 6: Handoff to development
The final stage in the mockup process is often the handoff to development. This is where your design exits the design tool and enters the world of code. Here’s how to ensure a smooth transition:
- Prepare your design files: Begin by organizing your design files. This might include arranging layers in a logical way, naming them properly, and removing any unnecessary elements. This step helps developers understand your design and navigate the files with ease.
- Create a style guide or design system: A UI style guide or design system gives dev teams a reference for colors, typography, spacing, and other style elements. This ensures consistency across different parts of the website or app, and minimizes miscommunication.
- Specify interactions: Make sure all interactions, animations, and transitions are clearly specified. Give as much detail as possible about how they should work and what they should look like. You might need to collaborate closely with developers to ensure feasibility.
- Communication is key: Be prepared to have ongoing conversations with your developers, from handoff and beyond. They may have questions or encounter issues during the development process, so be as communicative as possible to keep the project on track.
- Review and test: Once the developers have built a version of the design, review it and compare it to your original mockup. Carry out functionality and usability testing to ensure everything works as intended.
8 tips and tricks for creating stellar mockups
To wrap up this guide, here are some tips elevate your mockup game:
1. Know your audience
Always design with the end-user in mind. Understand their needs, behaviors, hopes and dreams. The more you empathize with your users, the better you can create a design that is not just visually pleasing, but also intuitive, functional, and fun to use. (This is where having a good customer discovery process steps in.)
2. Embrace simplicity
One of the most effective design philosophies is ‘less is more.’ Avoid cluttering your design with unnecessary elements. Every component should serve a purpose. A clean, simple design improves usability and leaves a lasting impression.
3. Consistency is key
Consistency in your design, from typography and colors to UI elements and spacing, enhances the overall user experience. It makes your design look professional and helps users navigate the website or app more easily.
4. Use grids
Grids are an indispensable tool for creating balanced, well-organized designs. They guarantee alignment, saving you time and effort.
5. Iterate, iterate, iterate
Don’t expect your first mockup to be perfect. It’s a process of continuous refinement, with lots of feedback (some of it touch) along the way. Don’t fear the feedback, and don’t be afraid to experiment, make mistakes, and learn from them.
6. incorporate feedback
Always be open to feedback, whether it comes from your clients, teammates, or users. It’s one of the most valuable resources you have to improve your design.
7. Stay updated
The design industry is always evolving. Stay on top of the latest design trends, tools, and best practices. This keeps your designs fresh and relevant.
8. Leverage diagramming tools
Diagramming tools are the gold standard for creating user wireframes and sitemaps in the early stages of the design process. They help you visualize the overall structure and navigation of your site or app, and many, like Cacoo, offer real-time collaborative sharing capabilities — so you can design, gather feedback, and iterate, all from one place. Give it a try for free today!
About Author

Georgina Guthrie
Guest authorGeorgina is a displaced Brit currently working in France as a freelance copywriter. Before moving to sunnier climates, she worked as a B2B agency writer in Bristol, England, which is also where she was born. In her spare time, she enjoys old films and cooking (badly).


