A successful project is far more than just completing tasks. It’s about managing the big picture and presenting work in a way that’s organized and transparent.
Whether you’re overseeing a website redesign or getting started on a software rollout, Backlog helps you keep everything client-ready from day one.
In this guide, we’ll walk through how to set up and manage a client project using Backlog’s advanced features — from milestones and Gantt charts to automation, integrations, and beyond — so you can deliver professional results every time.
1. Kick off your project space
Every great client project starts with a dedicated workspace. In Backlog, your project serves as the command center, where all milestones, tasks, files, and communication reside.
To get started:
- Create a new project from your Backlog dashboard.
- Give it a clear, recognizable name (for example, “Website Revamp Q4”).
- Add a short description that outlines the project scope or deliverables.
- Invite internal team members — you’ll add your client later once the setup is polished.
Pro tip: If you frequently manage similar client work, clone a past project or start from a sample template to save setup time and maintain consistency.
2. Define your structure and workflow
Before assigning tasks, map out how work will flow. A strong project structure helps your team stay organized and gives clients visibility into every phase.
In Project Settings, create:
- Milestones for key delivery stages such as “Design Approval,” “Beta Review,” or “Launch.”
- Categories to group work by function (Design, QA, Feedback).
- Custom statuses that reflect your actual workflow, like “Waiting for Client Review” or “Approved for Handoff.”
- Custom fields
A clear structure shows clients at a glance where things stand and what’s coming next.
Pro tip: Sketch out your workflow on paper or in Cacoo before building it in Backlog. This ensures your categories and statuses match the real approval path your team follows.
3. Build out tasks and deliverables
Now it’s time to turn your structure into action items. Each client deliverable — from copy decks to design assets — should have its own issue in Backlog. You can create issues and search for issues from Backlog’s global navigation, or from the project page itself.
When creating issues:
- Write short, descriptive titles that clients can recognize easily.
- Fill in key details like assignee, due date, and milestone.
- Use Custom Fields for client-specific data such as content version, asset ID, or approval number.
For complex work, break large deliverables into subtasks and connect dependencies with linked issues. This makes progress easier to track and communicates how each piece fits into the bigger picture.
Pro tip: Use consistent naming conventions like “Design: Homepage Wireframe” or “Content: Landing Page Copy” — it helps clients immediately understand what each issue represents.
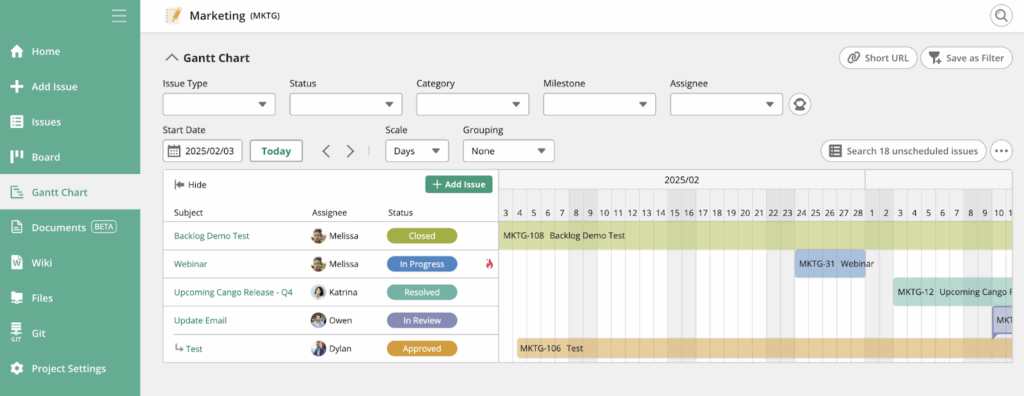
4. Visualize timelines and dependencies
Once your tasks are in place, visualize how everything connects. Backlog’s built-in charts make it easy to see timelines, dependencies, and overall progress — no extra spreadsheet required.
- Use Gantt charts to map milestones and ensure every deliverable aligns with deadlines.
- Create and monitor burndown charts to see how your team’s actual progress compares to the plan.
- Adjust task durations or assignments directly in the chart view when priorities shift.
Pro tip: During client check-ins, share your Gantt chart instead of long progress reports. It instantly communicates what’s completed, in progress, or waiting on review.
5. Create a feedback loop that works
Feedback is the heartbeat of client projects — but it can easily get messy. Keep everything organized and transparent by using Backlog’s collaboration tools.
Here’s how to keep feedback flowing smoothly:
- Invite clients as guest users with view/comment access.
- Use comment threads and @mentions to direct updates and feedback to the right person — no need for long email chains.
- Keep conversations within issues so decisions and file versions stay together.
- Attach relevant assets directly to issues. To keep everything in one place, use file attachments to upload documents, screenshots, images, or client deliverables directly to each issue.
- Embed Cacoo diagrams to show live updates to wireframes, process maps, or architecture charts.
Pro tip: When requesting feedback, tag the client in the issue comment (e.g., “@Client Please review the attached wireframe”). This creates a clear handoff moment and avoids communication mix-ups.
6. Automate updates and connect your tools
Manual updates can eat into your day. Automating key actions helps keep everyone — especially clients — informed without extra admin work.
To streamline your workflow:
- Use Webhooks to trigger notifications when issues move between statuses (for example, from “In Progress” to “Ready for Review”).
- Connect Git or Bitbucket repositories if you’re managing development work. This automatically links commits and pull requests to the right issues.
- Non-technical teams can connect Cacoo or file storage integrations to keep diagrams and documents synced.
Pro tip: Set up automations during project onboarding, not mid-project. Early configuration means smoother reporting and fewer surprises later on.
7. Review your setup before client access
Before sharing the project with your client, do a final walkthrough. Check that milestones are in place, tasks are organized, and visual tools display correctly. Make sure notifications, permissions, and files are functioning as expected.
Then, use the checklist below to confirm everything looks polished before your client logs in!
Client-ready setup checklist
Before inviting your client into the project, run through this checklist to make sure everything is organized, visible, and easy to navigate.
- Define your structure
Create milestones, categories, and custom statuses that match the client’s workflow and delivery stages. Double-check that every task sits within a clear phase or milestone.
- Map your task hierarchy
Break large deliverables into subtasks and link related issues so dependencies are easy to follow. Test your issue filters to ensure progress can be viewed by milestone or category.
- Activate your key features
Enable custom fields for client-specific data, set up Gantt and burndown charts, and confirm that timelines display accurately across all milestones.
- Test your communication flow
Post a sample comment, mention a teammate, and verify that notifications reach the right people. This helps avoid confusion once clients start providing feedback.
- Centralize deliverables
Attach the latest files, reports, and visuals to their relevant issues. Embed or link Cacoo diagrams so clients can see live updates without leaving Backlog.
- Connect your integrations
Link repositories, diagrams, or automation rules early. Run a quick test to make sure commits, diagram updates, and automated notifications appear where expected.
- Set up notifications
You can set up notifications and email alerts to automatically inform clients when tasks are created, completed, or reassigned.
- Review client permissions
Check that clients can view and comment on issues, but can’t edit internal tasks. Adjust access levels if necessary before inviting them in.
- Clean up and label clearly
Use consistent naming conventions across everything — projects, files, tasks, and so on. Archive outdated test data or placeholder content so the project looks polished on first view.
Best practices for managing client projects in Backlog
To keep your project running smoothly long after setup, follow these ongoing best practices:
- Communicate visually
Use diagrams, Gantt charts, and screenshots to show progress — visuals are faster to interpret than long messages. - Document decisions
When a client approves or changes direction, record it in an issue comment. This creates a paper trail that protects your team later. - Keep workflows lean
Don’t overcomplicate statuses or categories. A few clear stages (e.g., To Do → In Progress → Client Review → Done) are easier for clients to understand. - Regularly archive old issues
Use filters to close or archive completed items at each milestone. This keeps the workspace clean and focused. - Review performance
After each project, review Backlog analytics to see how long issues took to resolve and how often milestones slipped. These insights help refine your process.
Final thoughts
Managing client projects doesn’t have to be complicated. With Backlog’s advanced features, you can:
- Set up a structured workspace with milestones and clear workflows
- Track every deliverable through linked issues and automated updates
- Keep files, diagrams, and feedback together for full visibility
- Share progress and reports seamlessly — all from one platform.
Follow these steps and best practices to create client projects that stay organized, transparent, and easy to deliver from start to finish.
About Author

Georgina Guthrie
Guest authorGeorgina is a displaced Brit currently working in France as a freelance copywriter. Before moving to sunnier climates, she worked as a B2B agency writer in Bristol, England, which is also where she was born. In her spare time, she enjoys old films and cooking (badly).


