
If you work in a process-driven field, whether that’s software development or design, you’ll be familiar with a Kanban board. Kanban boards are a project management tool that helps teams visualize work, prioritize important tasks, and collaborate more effectively on complex projects.
Toyota first developed Kanban boards in the 1940s, and they have since become prevalent project management frameworks across many industries. They’re perhaps most widely used by software development teams.
Adopting Kanban boards addresses many challenges development teams face in managing projects, including unclear requirements, scope creep, bottlenecks, and communication challenges. Kanban boards serve as a centralized hub for teams to track upcoming, active, and completed tasks in a simple visual format.
Using Kanban boards to keep your team running like a well-oiled machine demands that you adopt the right tools for the job. An online Kanban board tool is a vital asset for every team looking to adopt the agile project management framework that Kanban boards are a key part of. We will walk you through using Backlog, a leading online Kanban board tool.
Meet Backlog: a leading online kanban board software
Backlog is a cloud-based project management tool that enables teams to spend less time planning projects and more time accomplishing them. The platform’s powerful online Kanban board tools provide a complete solution to help technical teams manage their projects more effectively.
The pre-built kanban board tools in Backlog offer users a wide range of features, including:
- Project planning: Tasks and subtasks can be created, modified, and assigned without leaving your project’s kanban board.
- Optimized workflows: Backlog’s intuitive drag-and-drop interface makes it easy for teams to organize workflows and streamline task completion.
- Real-time task updates: Team members can share comments and updates in real-time, tagging teammates for review and uploading additional resources to tasks.
- Accelerated task completion: Team leads can assess individual workloads, reassign tasks, and identify bottlenecks requiring additional support.
- Endless customization possibilities: Add custom statuses, progress indicators, categories, and more to make your Kanban board fit the needs of your team.
- Powerful filtering tools: With the ability to filter boards by issue types, categories, milestones, or assignees, Backlog empowers leaders to drill down into the details that matter.
Together, these features add up to an intuitive yet powerful online kanban board experience that helps teams unlock greater levels of productivity.
We will explore how you can use Backlog’s Kanban board tools to build greater clarity among your team. We’ll walk you through setting up a Kanban board in Backlog and share some insider tips and tricks to help you optimize your workflows and get the most out of the platform.
How to set up a kanban board in Backlog
It’s easy to start setting up your first Kanban board in Backlog. First, you’ll need to create a Backlog account. You can get started with our free account, or if you’re interested in more advanced features, browse our paid plans to find the best fit for your team.
Once you’ve set up your account, you’re ready to start your first project. Start a new project by clicking the + icon in the menu bar, then select Add Project. Give your project a name and a project key. Click to confirm that you’d like to enable all attributes and functionality, including subtasks.
From here, you’ll create the different statuses that tasks could be in. The statuses form each column of your kanban board. As tasks progress, they’ll be moved from column to column as their status changes.
If you’re a development team, you might find the following status types a helpful place to start:
- Unassigned
- Pending
- Design
- Development
- Testing
- Done
Alternatively, you can create your own statuses using Backlog’s custom status feature. Statuses aren’t set in stone at the project planning phase: In Backlog, you can update your status types or columns anytime, customizing their order, name, color coding, and more.
Adding tasks to your Kanban board
Your next step is adding your team’s tasks to your new Kanban board. If you haven’t already mapped these out, take the time to do so. Focus on identifying your team’s workflows: What discrete steps does each task go through before it is considered complete? What types of tasks fit into this workflow, and which are better suited to a different workflow? How are new tasks added?
Many complex projects have multiple tasks occurring simultaneously. In these instances, listing these offline in an Excel spreadsheet might be helpful, which you can import directly into Backlog to populate your Kanban board.
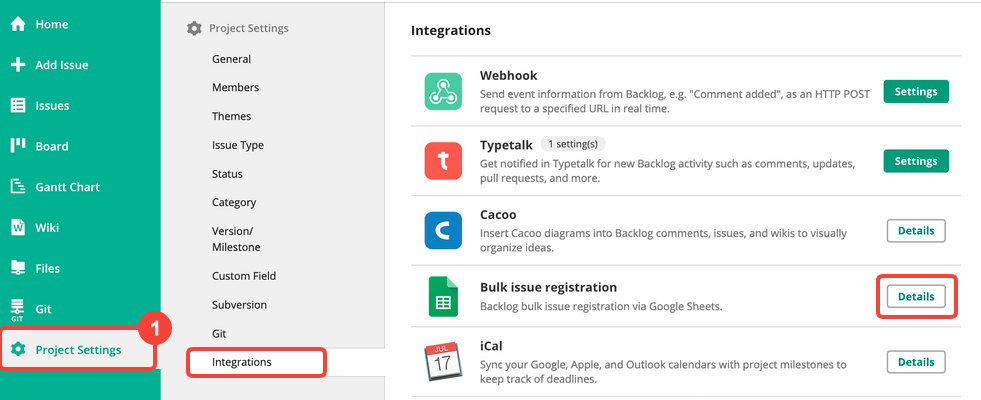
To import a spreadsheet, use Backlog’s bulk issue registration tool. To access this tool, navigate to Project Settings, select Integrations, then click Bulk issue registration. Follow the process outlined in this handy guide to complete your import: Bulk issue registration via Google Sheets.
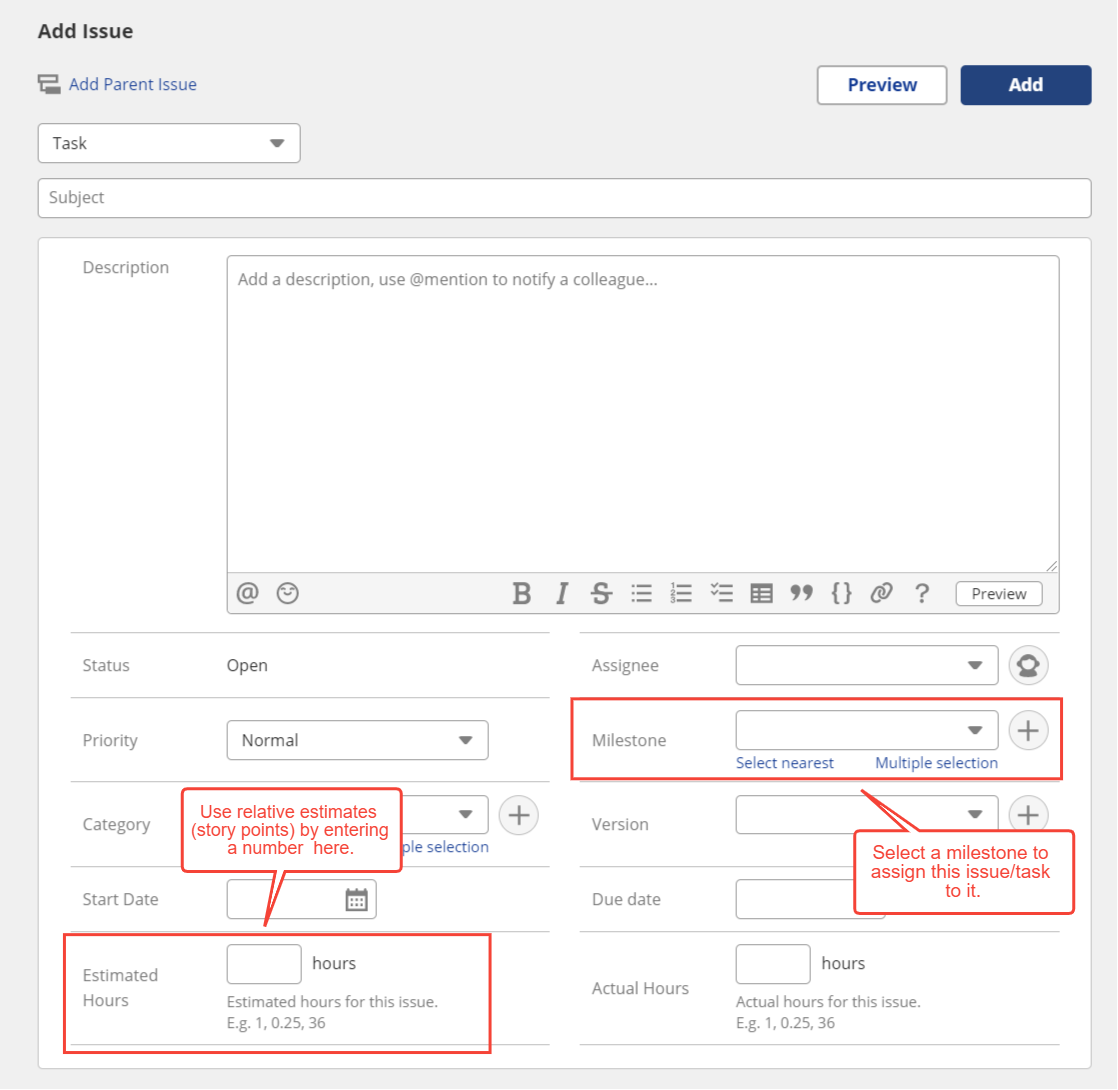
Alternatively, you can create tasks from scratch. In Backlog, a task is called an issue. To add an issue, click the + icon on the project sidebar and select Add Issue. Enter all the details your team needs to successfully complete the task you’re assigning, including a task description, priority, assignee, due date, and more. You can also upload any attachments or resources your team might need to complete the job.

Whether you import your team’s existing tasks or create new ones from scratch, you’ll likely need to edit tasks as the demands of your project evolve. To edit tasks, all you have to do is click on the card for that task and then update whatever you need to: assignees, due dates, directions, and more. Provided your permissions are configured correctly, any team member can update a task and tag their colleagues in a comment, making it easy for teams to collaborate on their work.
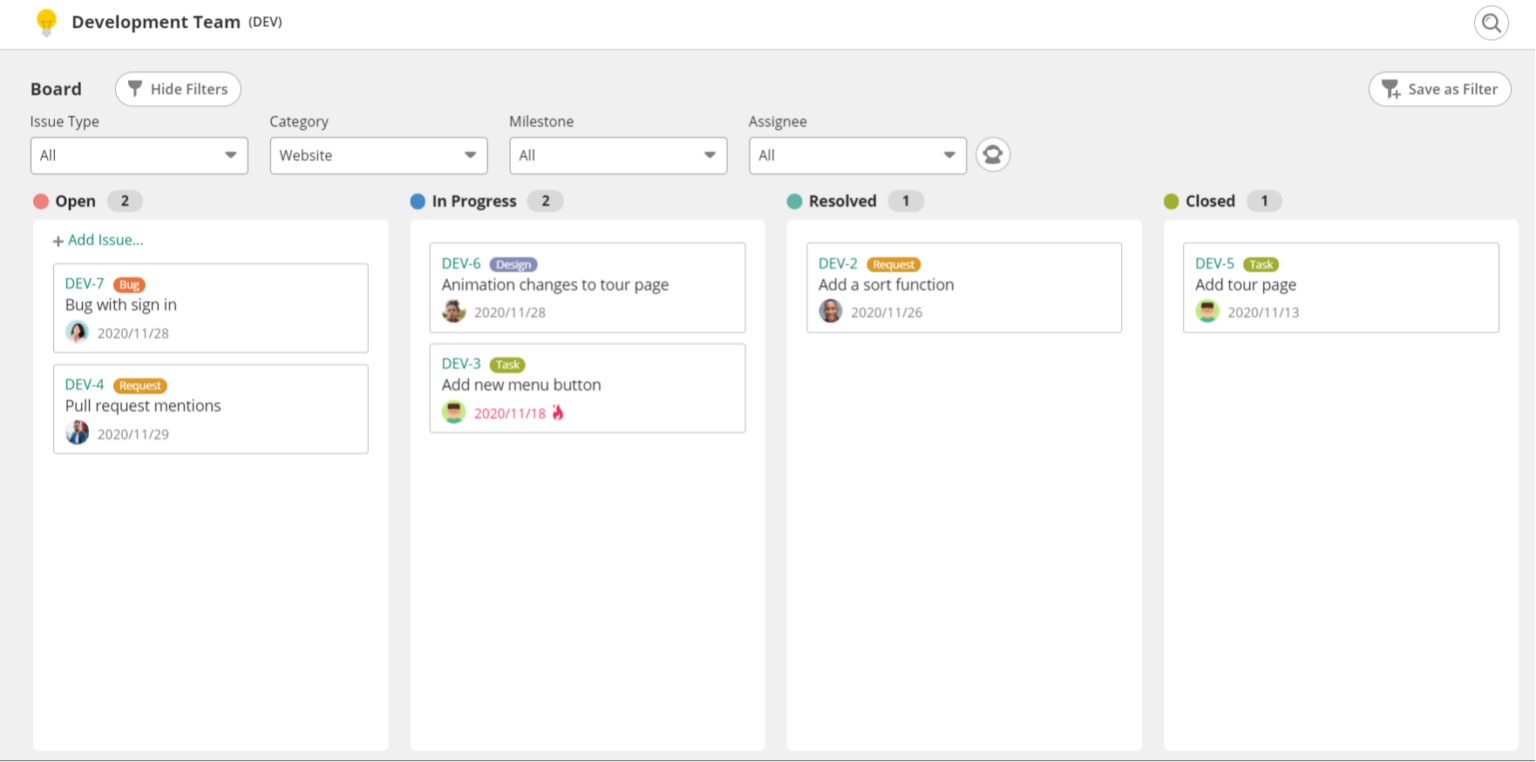
As your team’s work progresses, it’s necessary to move task cards between the different status levels, or columns, on your kanban board. For example, once a developer has finished the coding element of a task, they might move it to the ‘Testing’ column, where another team member will perform quality assurance checks on their work.
Backlog makes it easy to move tasks between different columns. Simply drag and drop the task card you want to move into the relevant column. The status of that task will automatically update.
How to use a kanban board in Backlog
Kanban boards are relatively simple to use, but as with all project management frameworks, there is a learning curve for teams new to the platform. Fortunately, Backlog provides an intuitive, easy-to-use solution that ensures your team’s kanban boards remain organized and straightforward to navigate.
Below, we cover some key activities your team will want to master to get the most out of the platform.
Creating subtasks in Backlog
The tasks that your team works on will often have multiple stages. Take the example of producing a wireframe for a new feature in a software platform your team is responsible for. This task, which is just one component of the broader project of shipping this new feature, has several stages, each involving different stakeholders.
Instead of lumping together the design work, the review process, copywriting, and more into one task, consider splitting complex tasks like these into more manageable subtasks. Breaking large tasks into smaller chunks helps teams better understand the progress of these tasks and makes the workflow easier to manage.
There are two ways to create subtasks in Backlog:
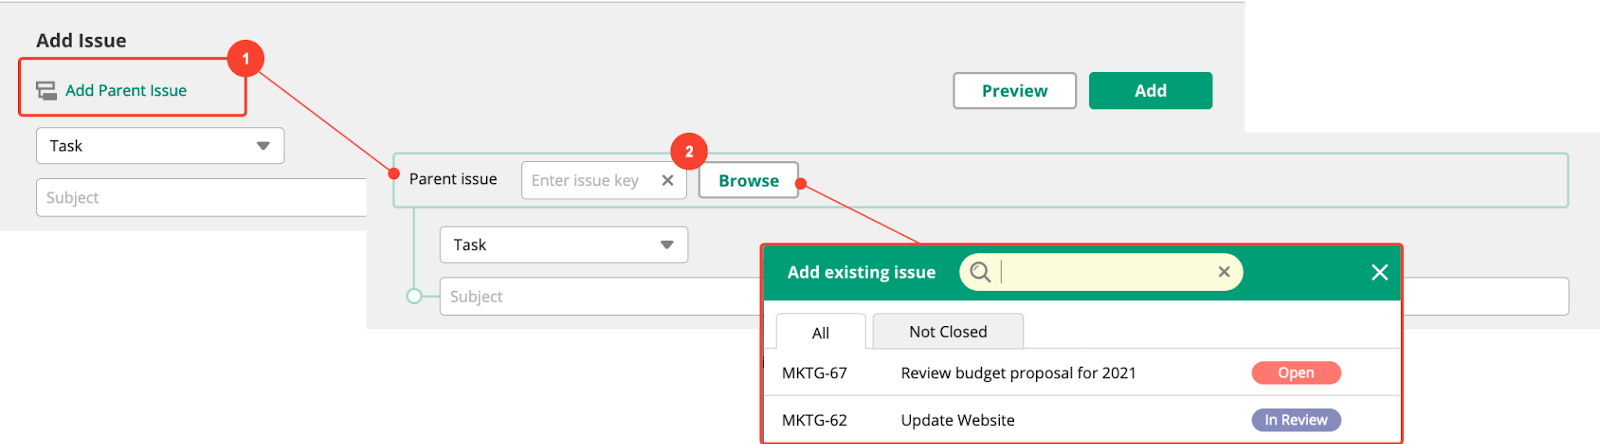
- On the issue registration page, navigate to the Add Issue page, then select Add Parent Issue. A parent issue is the main task under which subtasks will live. Select the parent issue for which you’d like to create sub-tasks, and then click Add to create subtasks.
- Alternatively, click on the issue you’d like to add subtasks to from your Kanban board. Click the + icon, then select Add new child issue to create a subtask. You can also select Add existing issue to link an existing issue from your Kanban board to this parent issue.

Filtering tasks in Backlog
It’s often the case that complicated projects might include dozens of standalone tasks that have to be completed. For project managers, this can make it challenging to locate individual tasks, never mind understanding their progress at a glance.
Users can create custom filters by specifying the criteria they’d like to filter using the dropdown menus at the top of their Kanban board. Filtering options include:
- Issue type
- Category
- Milestone
- Assignee
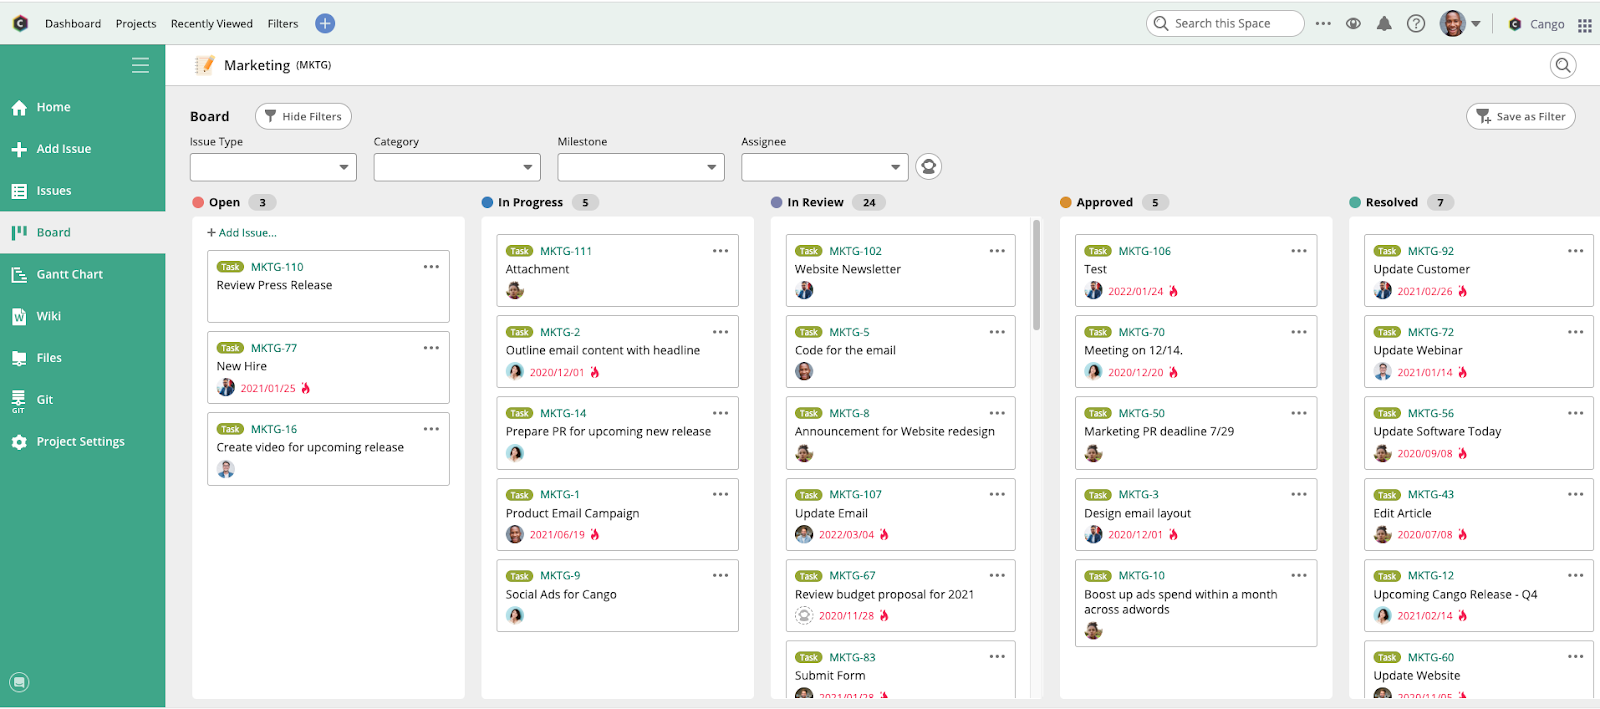
Once users have configured their filters, they have the option to save these filters. This works well for managers to see how many tasks are assigned to each team member or for team leaders looking to understand the progress of various tasks toward a project milestone. Saved filter views can be accessed by clicking the Filters button in the menu bar.
Using progress indicators in Backlog
Big projects have a lot of moving parts. For project managers, keeping on top of these isn’t just important – it’s your entire job. Establishing a quick, easy way to understand the progress of different tasks and the project as a whole is vital in ensuring your team has the support and resources they need to succeed.
Backlog offers various ways to track your projects’ progress, from burndown charts to Gantt charts. If a quick look is preferable, you’ll see the number of tasks under each status type at the top of each column of your Kanban board.
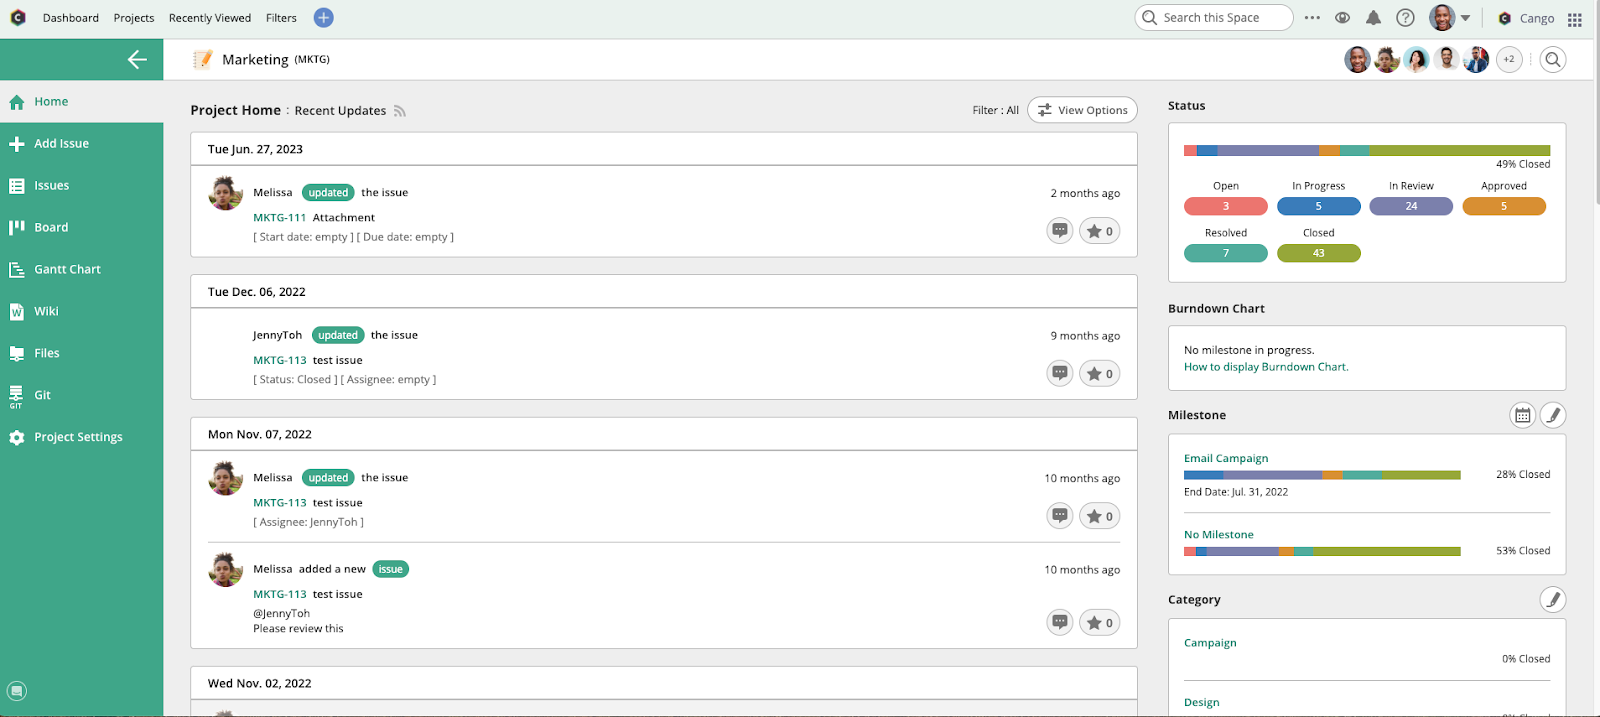
Alternatively, progress can be viewed more visually from the homepage of each Backlog project. To access this view, click the Home icon from the toolbar on the left of your screen. The home screen summarizes the project and includes several modules that indicate the project’s progress, including the number of tasks in each status level and the progress toward project milestones. If you’ve configured burndown charts for your project, you’ll also see these here.
Setting up notifications in Backlog
Project workflows tend to involve multiple people at once, and it can be hard to keep track of the work that your team is doing. One way to simplify this process and ensure you stay up-to-date is to set up email notifications whenever a project is updated.
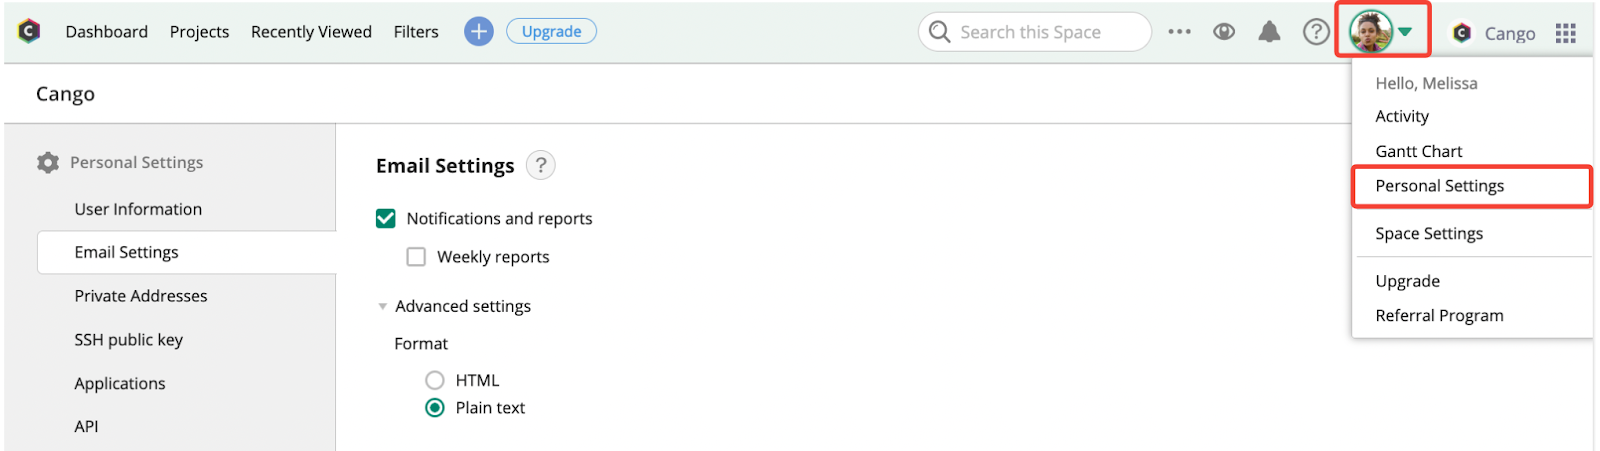
Users can specify the types of activity they would like to receive email notifications for. To update these settings, click on your avatar in the top right corner of the screen, then select Personal Settings, then Email Settings.
Browse through the options, choosing which types of activities you’d like to get email notifications for for each of your projects. You can opt only to receive notifications when someone tags you directly in a comment or when issues are assigned to you or completed.
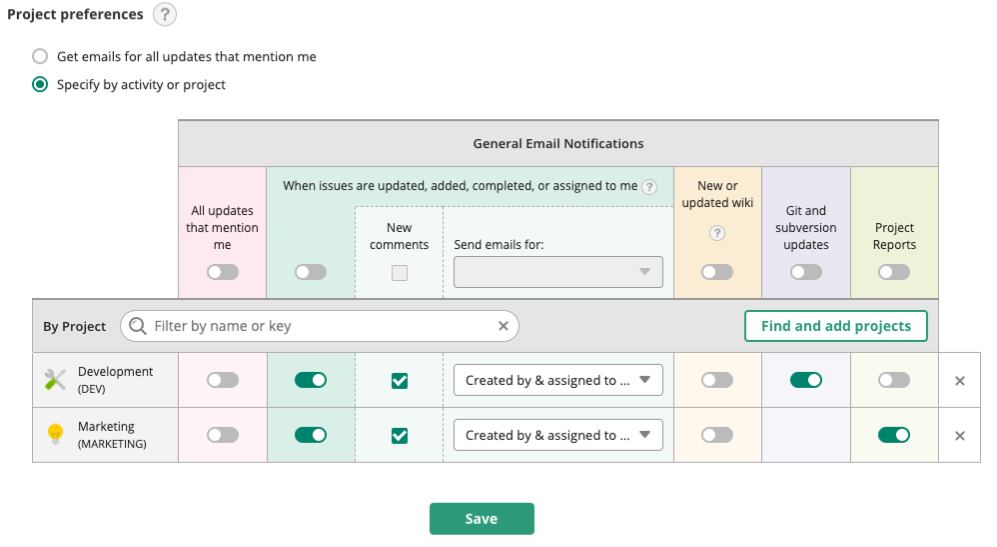
Users can also subscribe to receive weekly email reports on the status of their projects. These settings can be managed under your Personal Settings. Weekly email reports include updates on your tasks, upcoming milestones, and completed tasks.
Optimizing Kanban boards in Backlog
Project managers are responsible for ensuring their teams have the resources they need to be successful. An online Kanban board platform like Backlog empowers project managers to meet those goals, providing a range of tools that leaders can use to understand the resources their team needs better.
Backlog comes with various analytics and reporting tools that help project managers take a data-driven approach to improving efficiency. Read on as we explore two key features team leaders can use to optimize the management of their Kanban boards in Backlog.
Burndown charts
Burndown charts are helpful visual displays of how a project is progressing in comparison to the plan laid out at the beginning of the project.
In the example below, the gray line represents the ideal linear progression of the project, mapping the number of hours logged by a team and the progress toward completing a milestone. The orange line represents the forecasted plan at the beginning of the project, whereas the green line represents the actual progress a team has made.
In this example, it appears that the team had faced a roadblock and fallen behind schedule but was able to get back on track once this barrier had been eliminated. In Backlog, burndown charts update in real-time. By assessing them, it’s easy for project managers to understand how their team is progressing toward the project goals.

To set up a burndown chart for your project, team leaders must establish clear project milestones and assign a bucket of estimated hours to each task. These can be specified in each issue. Once you’ve specified milestones and entered a time estimation for each issue, Backlog will automatically generate and maintain a live burndown chart displaying your team’s progress.
Learn more about using burndown charts in Backlog here: Get started using a burndown chart to track your project.
Gantt charts
A Gantt chart is another visual way to represent your team’s progress, helping to visualize the various elements of a project that your team will be working on in the coming days, weeks, and months.
Like burndown charts, Gantt charts are also automatically generated in Backlog. They’re particularly helpful for understanding dependencies within a project, as well as the chronological order in which tasks will be completed.
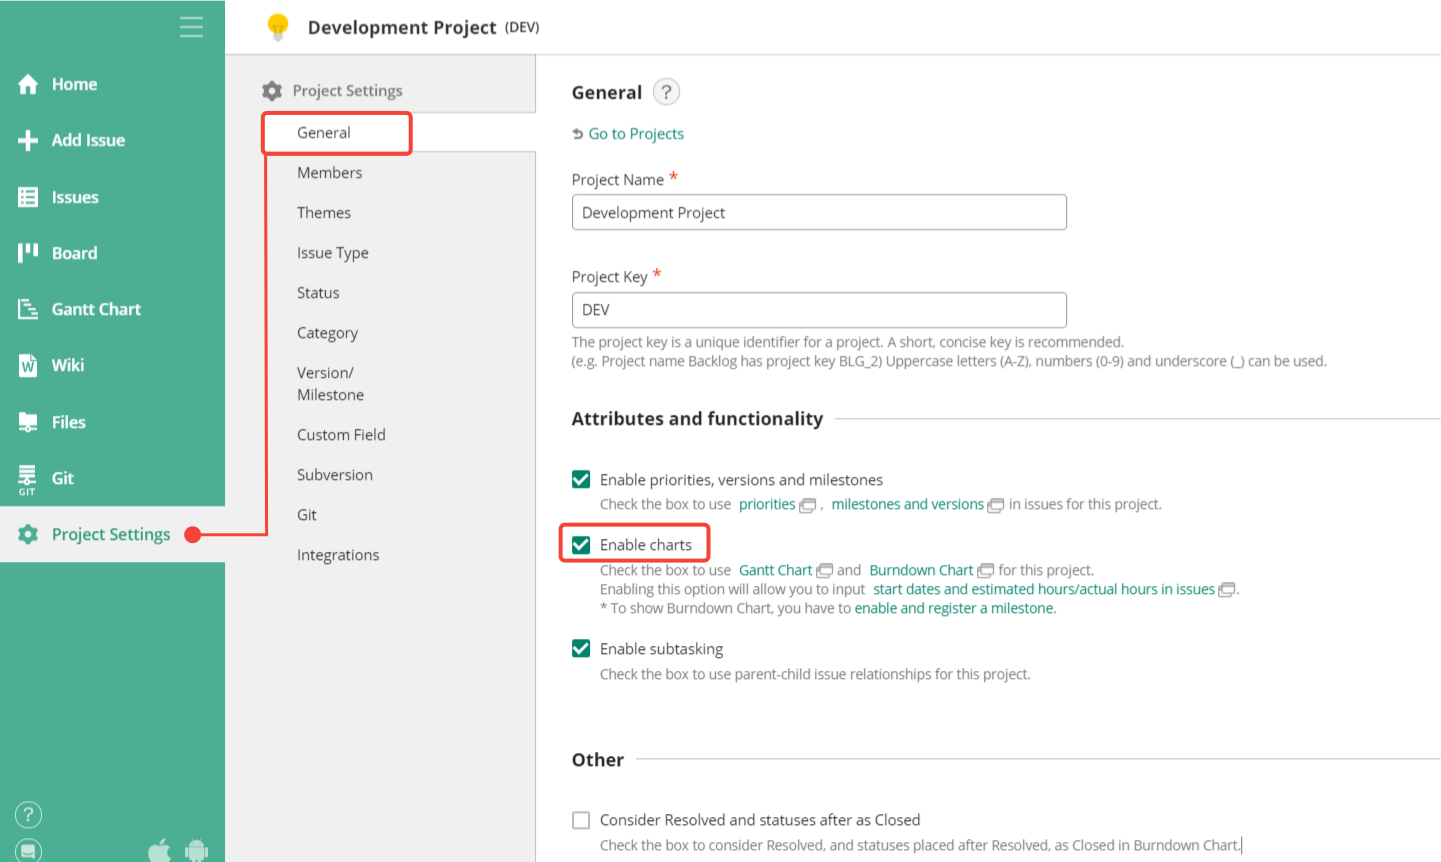
To enable Gantt charts for your project, navigate to Project Settings, select General, and then check the Enable charts box. Every task must have a clear start and end date for the Gantt chart to populate.
Users can create Gantt charts by filtering the wider project chart. For example, a team member might only want to see tasks assigned to them so that they can plan their workload. Users can also customize the time span of the Gantt chart, specify how issues are grouped, and filter by the status of the task.
To learn more about using Gantt charts in Backlog, check out this guide: Simplifying project planning with Gantt chart software.
Get started with Backlog’s online kanban boards today
Kanban boards are invaluable for high-performance teams, ensuring alignment on crucial tasks and enabling seamless collaboration between project collaborators. To truly optimize your team’s workflows, it’s important not only to find the right software tool but also to use it effectively.
Ensure that your team has clear goals and expectations, regularly reviews and updates the Kanban board, and avoids taking on too much work at any time. Following these best practices, paired with adopting a tool like Backlog, offers a tried-and-tested way for teams to manage their workload better – just ask the tens of thousands of businesses that use Backlog every day.
Ready to experience Backlog’s online kanban boards for yourself? Try Backlog for free and start creating your own Kanban boards right now!
About Author

Backlog Staff
Guest authorBacklog is the all-in-one project management software by Nulab. Combining task management, version control, and bug tracking, Backlog delivers the features teams need to create great projects in one simple tool.


