
Just like complicated journeys benefit from a map, complex projects are easier to understand with a timeline.
Let’s say you’re designing an app. It’s a job with lots of moving parts, not to mention people. How long will it take? What are the stages? How do the tasks link up? A project timeline tells you all of this and more, helping the team stay organized and work towards a specific deadline with a predefined set of resources. This clarity drastically lowers your chances of project failure via two common culprits: scope creep and time overruns. Let’s take a closer look at how to master the project timeline for success every time.
What is a project timeline?
A project timeline is a visual representation of a project’s schedule. It’s essentially a chart that shows all your deliverables, deadlines, and milestones in chronological order. But this being more than a simple to-do list, it also maps out the sequence of tasks and their dependencies.
This visual format helps everyone follow the project’s progress at a glance, as well as spot and mitigate any looming bottlenecks.
What’s the difference between a project schedule and a project timeline?
A project schedule is a detailed document that breaks down the project into smaller, bite-sized steps, complete with timings, sequences, and responsibilities.
A project timeline, on the other hand, is a zoomed-out version, showing milestones and deadlines plotted on a chart.
Essentially, it’s a less detailed version of the schedule showing flow and key moments over the granular details. It’s ideal for stakeholders and top level execs who only want an overview.
| Project schedule | Project timeline | |
| Detail | Detailed, includes all tasks and subtasks | High-level, focuses on key milestones and deadlines |
| Format | Text-based, often in a list or table format | Visual, often in the form of charts or graphs |
| Purpose | Detailed planning and tracking of every task | Overview of the project’s major phases and milestones |
| Focus | Specifics of who does what and when | General flow and sequence of the project |
| Usage | Used by project managers and team members for day-to-day management | Used by stakeholders and team members to understand overall progress |
| Example tools | Microsoft Project, Excel | Gantt charts, timeline software |
Why are project timelines important?
Project timelines keep everyone on track while giving stakeholders a high-level view of the project.
- Shows the path forward: A project timeline shows your team exactly what needs to happen and when. It’s especially handy for complex projects.
- Helps you spot bottlenecks: Because you can see all those tasks and dependencies at a glance, you can also see where they’re bunching up or liable to clash. The timeline helps you spot these issues early on before they cause problems.
- Keeps the big picture in view: It’s so easy to get bogged down in the details. A project timeline keeps things simple, showing the entire project from start to finish.
- Keeps the team on track: When everyone knows the key milestones and deadlines, it’s easier to work together toward that bright, shiny endpoint.
- Boosts communication: Having a visual timeline makes it easier to share updates and progress with your team and stakeholders. The more you can see, the more transparent work becomes.
- Helps managers track progress: See at a glance what’s been done and what’s yet to be completed. This helps project managers monitor progress.
- Helps incorporate change: A project timeline makes it easier to adjust tasks and deadlines without throwing the entire project haywire. This helps you stay flexible.
The different types of project timelines (and how to choose)
You’ve got several options, each suited to different jobs and project management styles. Here are the most common options.
Gantt chart
This gives a detailed, graphical representation of the project schedule, showing task start and end dates, dependencies, and key milestones.
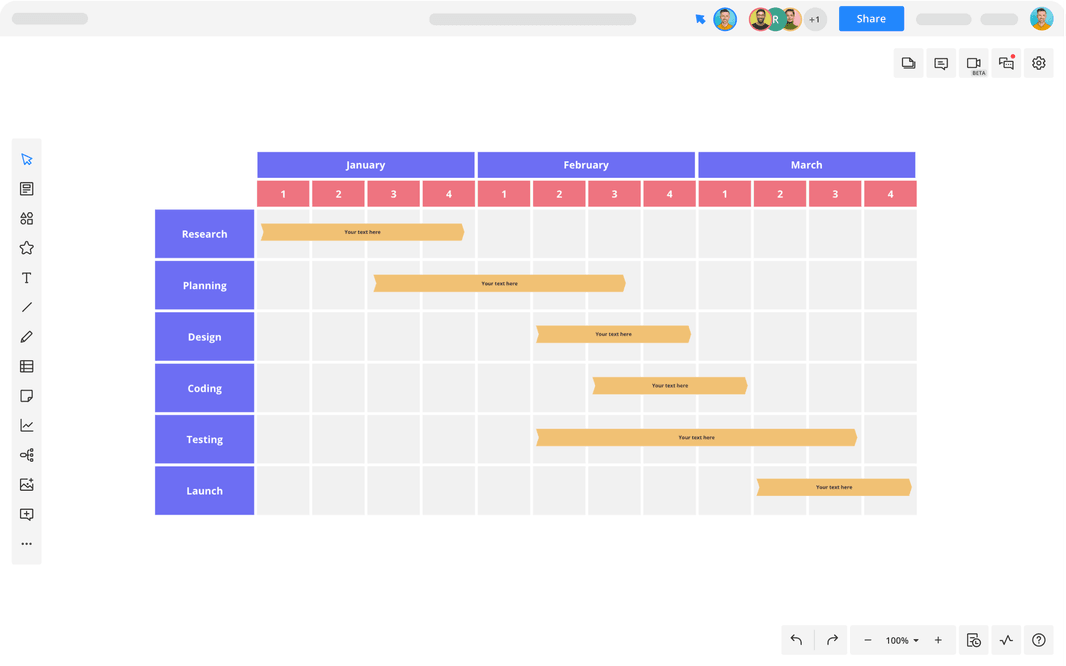
A Gantt chart timeline, created with Cacoo
Best for: Complex projects where detailed task tracking is crucial.
Kanban
Combines the visual elements of Kanban boards with a timeline format, ideal for daily task management and a broader view of project progress
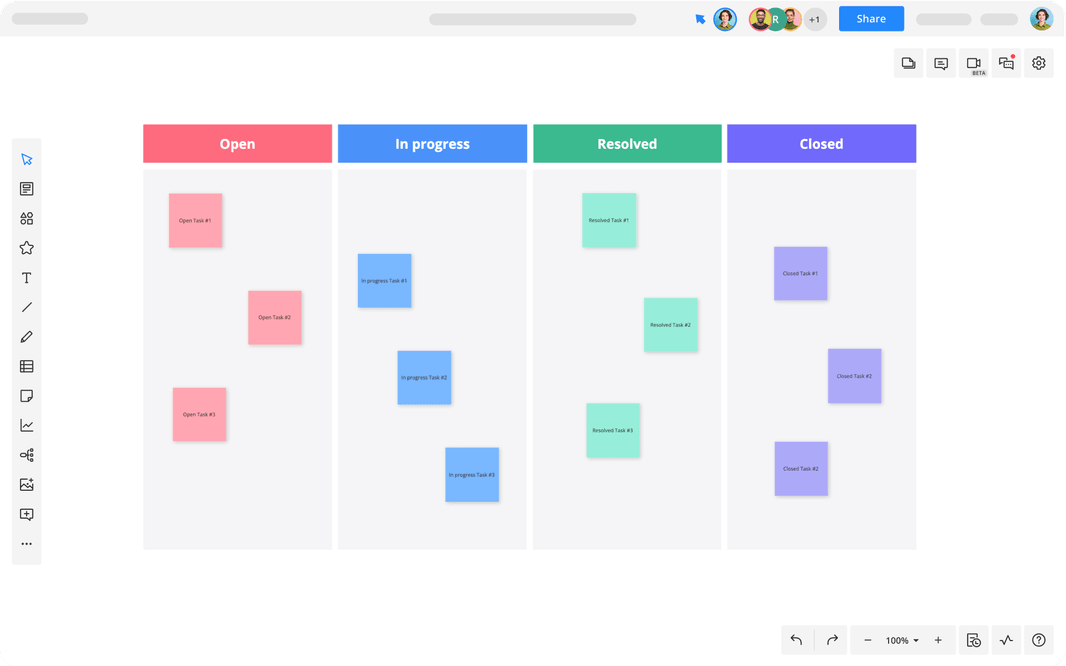
A kanban board created in Cacoo
Best for: Agile teams or projects that benefit from a flexible, visual workflow.
Historical timeline
Lists tasks in chronological order, similar to a historical event timeline. It’s straightforward and easy to understand.
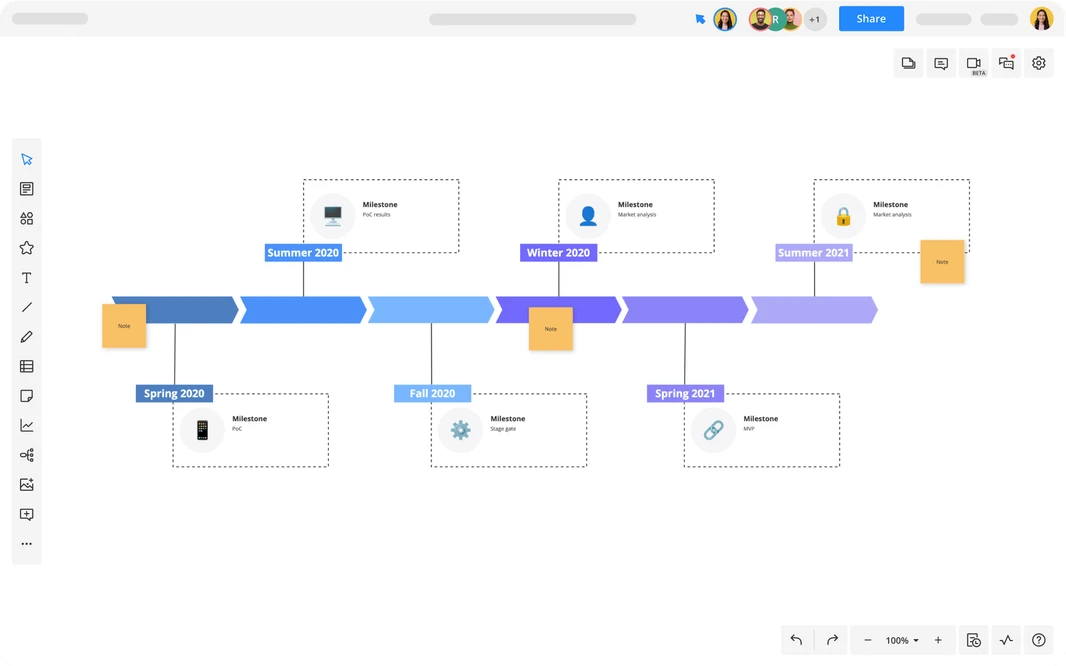
A historical timeline created in Cacoo
Best for: Simpler projects needing a clear, linear view of events and milestones.
Vertical chart
Useful for projects involving data tracking, like finance or marketing, showing progress over time in a vertical format.
Best for: Data-heavy projects where visualizing progress over time is key.
How to create a project timeline (with examples)
It doesn’t matter whether you’re going for a Gantt chart or a vertical chart, just follow these steps to create a timeline from start to finish.
1. Define the scope
Your project scope sets out everything you’re going to do, and crucally, what the project doesn’t include. Parameters are important, so put some time into this initial step.
- Define the goals: What do you want to achieve?
- Set OKRs/KPIs: Objectives and Key Results (OKRs) or Key Performance Indicators (KPIs) are measurable outcomes. Tracking these helps you monitor progress over time.
- Identify deliverables: What are the tangible outputs of the project?
- List tasks and activities: Break down the deliverables into specific tasks.
- Determine constraints: Identify any limitations that might affect the project, such as budget constraints, resource availability, and deadlines. Be realistic.
- Note exclusions: Clearly state what is out of scope to dodge any misunderstandings later on. And get this in writing so there are no quibbles.
Example: Defining the scope for a website redesign project
- Goals: Improve user experience, update the visual design, and enhance mobile responsiveness.
- OKRs/KPIs:
- Increase user engagement by 20%
- Reduce page load time by 50%
- Deliverables:
- New homepage design
- Mobile-responsive layout
- Updated site content
- Tasks and activities:
- Run user research
- Create wireframes
- Design the visual layout
- Develop the homepage
- Test the homepage
- Implement feedback and finalize the design
- Constraints:
- Budget: $20,000
- Resources: 3 designers, 2 developers, 1 project manager
- Deadline: Launch in 3 months
- Exclusions:
- No backend development
- No changes to existing user accounts
2. Add your tasks
Now you’ve got your scope, it’s time to break the project down into bitesized chunks. This process, known as creating a Work Breakdown Structure (WBS), helps you see all the components that feed the big picture. It also helps you avoid overlooking important tasks.
Start by identifying all the deliverables outlined in your project scope. For each deliverable, list the individual tasks that go into achieving it.
- Define tasks: What specific actions do you need to take? Describe what each task involves. For example, ‘Sketch initial wireframe concepts: Draw preliminary wireframe ideas based on user personas and research findings.’
- Assign responsibilities and resources: Who do you need? What are they responsible for? What tools and equipment do you need?
- Estimate timeframes: How long will each task take to complete?
- Sequence tasks: In what order should you complete said tasks?
- Set dependencies: Which tasks depend on the completion of others? Top tip: use a project management tool to find your dependencies automatically.
Example: Defining the scope for a website redesign project (deliverable 1)
Deliverable 1: New homepage design
- Conduct user research
- Identify target audience and user needs.
- Gather data through surveys, interviews, and usability studies.
- Create user personas
- Develop profiles representing different segments of the audience.
- Sketch initial wireframe concepts
- Outline the basic structure and layout of the homepage.
- Review and revise wireframes with the team
- Collaborate with the team to gather feedback and make improvements.
- Finalize wireframes based on feedback
- Incorporate all feedback and finalize the wireframe designs.
- Design the visual layout
- Develop the overall look and feel of the homepage, including color schemes, typography, and images.
- Develop initial design mockups
- Create detailed visual representations of the design.
- Review mockups with stakeholders
- Present the design mockups to stakeholders for feedback.
- Revise and finalize design based on feedback
- Make adjustments to the design according to feedback and finalize.
3. Create time estimates for each task, and split them into milestones
Next stop: time estimates and milestones. This helps you create a realistic timeline that keeps your project running smoothly.
- Estimate task durations: Work out how much time you’ll need to complete each task. Involve your team in this process, since they’ll have valuable insights and experiences. Consider task complexity, the skill mix, and potential obstacles.
- Break tasks into smaller parts if needed: Sometimes, a task might seem too big or complex to estimate accurately. When this happens, break it down into smaller parts and rebuild it.
- Create milestones: Milestones are checkpoints in your project journey. They’re like the conductor’s beat, telling you how far you’ve come, when you need to celebrate wins, and offer convenient places to pause and check in with everyone. Example: in a website redesign project, milestones could include completing user research, delivering wireframes, and launching a new homepage.
Here’s how to organize your tasks into milestones:
- Find logical groupings: Look for natural breakpoints in your task list where a set of tasks completes a specific phase of the project. These groupings will form your milestones.
- Add deadlines to milestones: Based on your task durations and dependencies, set deadlines for each milestone. Be realistic, and mindful of potential delays.
4. Assign tasks to team members
Proper task assignment means everyone knows what they’re doing, and work is shared evenly across the team.
- Evaluate team skills and availability: Start by working out who’s suited to what. Match tasks based on individual expertise and availability.
- Assign responsibilities: Make sure each team member knows exactly what they need to do, the deadline for their tasks, and any dependencies. For example, if a designer needs to create wireframes before a developer can start coding, both parties need to be aware of this dependency.
- Document assignments: Use your project management tool to document tasks. This gives a clear record of who is responsible for what and helps keep everyone accountable.
- Set expectations for collaboration: Encourage team members to communicate and collaborate as needed. Regular check-ins and team meetings keep everyone aligned.
- Give support and resources: Make sure everyone has what they need, whether tools and training to more hands on deck.
Example: Assigning tasks during a redesign project
- User research
- Assigned to: Research Analyst Simba
- Tasks: Conduct user surveys, analyze data, create user personas
- Deadline: [Specific Date]
- Wireframe creation
- Assigned to: UX Designer Steve
- Tasks: Sketch initial concepts, create detailed wireframes, review and revise wireframes
- Deadline: [Specific Date]
- Visual design
- Assigned to: Graphic Designer Sabrina
- Tasks: Design visual elements, review designs with stakeholders, make revisions
- Deadline: [Specific Date]
5. List deadlines
Deadlines mean momentum and accountability.
- Be realistic: Make sure they’re achievable and not overly ambitious, which can lead to stress and burnout.
- Prioritize tasks and dependencies: Work out which tasks need to be done first, considering those dependencies. For example, in a website redesign, the wireframe must be approved before the visual design begins.
- Include buffer time: Incorporate some buffer time into your deadlines to account for unexpected delays or issues.
- Communicate deadlines clearly: Make sure all team members are aware of their deadlines and understand their importance. Give everyone access to the timeline.
- Monitor and adjust: Regularly check progress. If a task is taking longer than expected, communicate this with stakeholders.
Top tips for creating the best project management timeline
The secret to nailing this the first time? Clarity, transparency, and tools that are up to the job.
Have crystal-clear objectives
Define the project’s goals and deliverables in simple, straightforward terms. For example, ‘raise conversion rates by 5% is better than ‘get more customers’.
Regularly update the timeline
A project timeline should be a living document. Schedule regular check-ins to update the doc with any changes. Or better yet, use project management software and enjoy hands-off automatic notifications. Never miss a task change again!
Communicate clearly and often
Transparency is vital. Keep the lines of communication open between all team members. Regularly share updates on progress, upcoming deadlines, and any potential roadblocks, and keep stakeholders informed at every stage (with Backlog, you can give them limited Guest access so they can follow the project themselves. No more email updates 😍)
Factor in hiccups
Identify risks that could derail your project and have a contingency plan ready, just in case. It’s not pessimistic; it’s due diligence. This proactive approach helps you mitigate issues before they escalate.
Review and reflect
Reflect on what worked well and what didn’t. Gather feedback from the team and stakeholders to improve your approach for future projects. This continuous improvement cycle means each project will benefit from all those lessons learned.
Use the right tools
Tools aren’t everything, but they can save a lot of effort. Backlog comes equipped with interactive Gantt charts, Kanban boards, workflows, and more — essentially, everything you need to create and monitor your timeline from project start to finish. Plus, being in one central cloud-based hub, it offers a clear overview for all team members and stakeholders, wherever they are. Ready to give it a try?
About Author

Georgina Guthrie
Guest authorGeorgina is a displaced Brit currently working in France as a freelance copywriter. Before moving to sunnier climates, she worked as a B2B agency writer in Bristol, England, which is also where she was born. In her spare time, she enjoys old films and cooking (badly).


